Homemade cereal bars are a fantastic solution for those seeking a quick, healthy snack or breakfast option. These convenient treats are simple to prepare, offering customizable flavors to suit any palate. Learning to make them ensures you always have a wholesome, energy-boosting bite on hand for busy days.
Key Takeaways
- Homemade cereal bars are simple to make and ideal for busy schedules.
- Basic pantry ingredients are all you need for delicious, customizable recipes.
- Follow easy steps for mixing, baking, and cooling to achieve perfect bars.
- Learn various flavor combinations, from classic oats and honey to creative additions.
- Proper storage keeps your wholesome snacks fresh and ready to enjoy.
Making your own cereal bars is incredibly rewarding. It saves money significantly. You control all ingredients perfectly. Adjust sweetness and add-ins as desired. Enjoy healthier grab-and-go options.
Quick and Easy Cereal Bars
Starting your day with a nutritious boost doesn’t have to be a struggle, especially when you have homemade cereal bars at your fingertips. These delightful treats offer a compelling alternative to store-bought options, which often contain excessive sugars and artificial ingredients. Preparing your own allows for complete control over the quality and type of ingredients, ensuring a wholesome beginning to any day. They are not just for breakfast; these versatile bars make excellent post-workout fuel, afternoon pick-me-ups, or even a light dessert.
Perfect for Busy Mornings
For individuals with hectic schedules, time is a precious commodity. Homemade cereal bars excel in providing a grab-and-go solution that doesn’t compromise on taste or health. Imagine waking up, grabbing a pre-made bar, and heading out the door, knowing you’re fueling your body with something substantial and delicious. They eliminate the need for elaborate breakfast preparations, freeing up valuable minutes during the morning rush. Consider pairing them with a fresh fruit smoothie or a cup of coffee for a complete and satisfying start. These bars are a staple, much like a quick Hawaiian roll french toast, providing energy without the fuss.
A Sweet, Healthy Snack
While often associated with breakfast, these homemade cereal bars are also a fantastic choice for a sweet, healthy snack anytime hunger strikes. They provide a balanced mix of carbohydrates for energy, fiber for satiety, and often protein from additions like nuts or seeds. Unlike many processed snacks, you can adjust the sweetness level to your preference, opting for natural sweeteners like honey or maple syrup. This flexibility ensures that your cereal bars are not only delicious but also align perfectly with your dietary goals, supporting a healthier lifestyle without sacrificing flavor.
Gather Your Cereal Bar Ingredients
Creating delectable homemade cereal bars begins with assembling the right components. The beauty of these recipes lies in their simplicity, often requiring ingredients you likely already have stashed in your kitchen. Opting for high-quality, fresh ingredients will significantly enhance the flavor and nutritional value of your finished bars. Don’t be afraid to customize and experiment with different brands or varieties of grains, sweeteners, and mix-ins to discover your perfect combination. Having everything ready before you start mixing makes the process smooth and enjoyable.
Pantry Staples You Need
The foundation of most cereal bar recipes relies on a few key pantry staples. Rolled oats are almost always the star, providing a hearty texture and a good source of fiber. A binder is crucial to hold everything together; common choices include peanut butter, almond butter, or other nut/seed butters, alongside liquid sweeteners like honey, maple syrup, or agave nectar. These ingredients not only add sweetness but also contribute to the bars’ chewiness and overall structure. Other essentials might include a pinch of salt to balance flavors and a touch of vanilla extract for aromatic depth. Having these basics on hand ensures you’re always ready to whip up a batch.
List of Simple Items
Here’s a general list of simple items you’ll typically need for many homemade cereal bar recipes:
- Rolled Oats: The primary base for texture and nutrition. Quick oats can also be used for a softer bar.
- Nut Butter: Peanut butter, almond butter, or cashew butter. Seed butters like sunflower seed butter are great for nut allergies.
- Sweetener: Honey, maple syrup, or brown rice syrup. These also act as a natural adhesive.
- Optional Mix-ins:
- Dried Fruits: Raisins, cranberries, chopped apricots, dates.
- Nuts/Seeds: Chopped almonds, walnuts, pecans, chia seeds, flax seeds, sunflower seeds, pumpkin seeds.
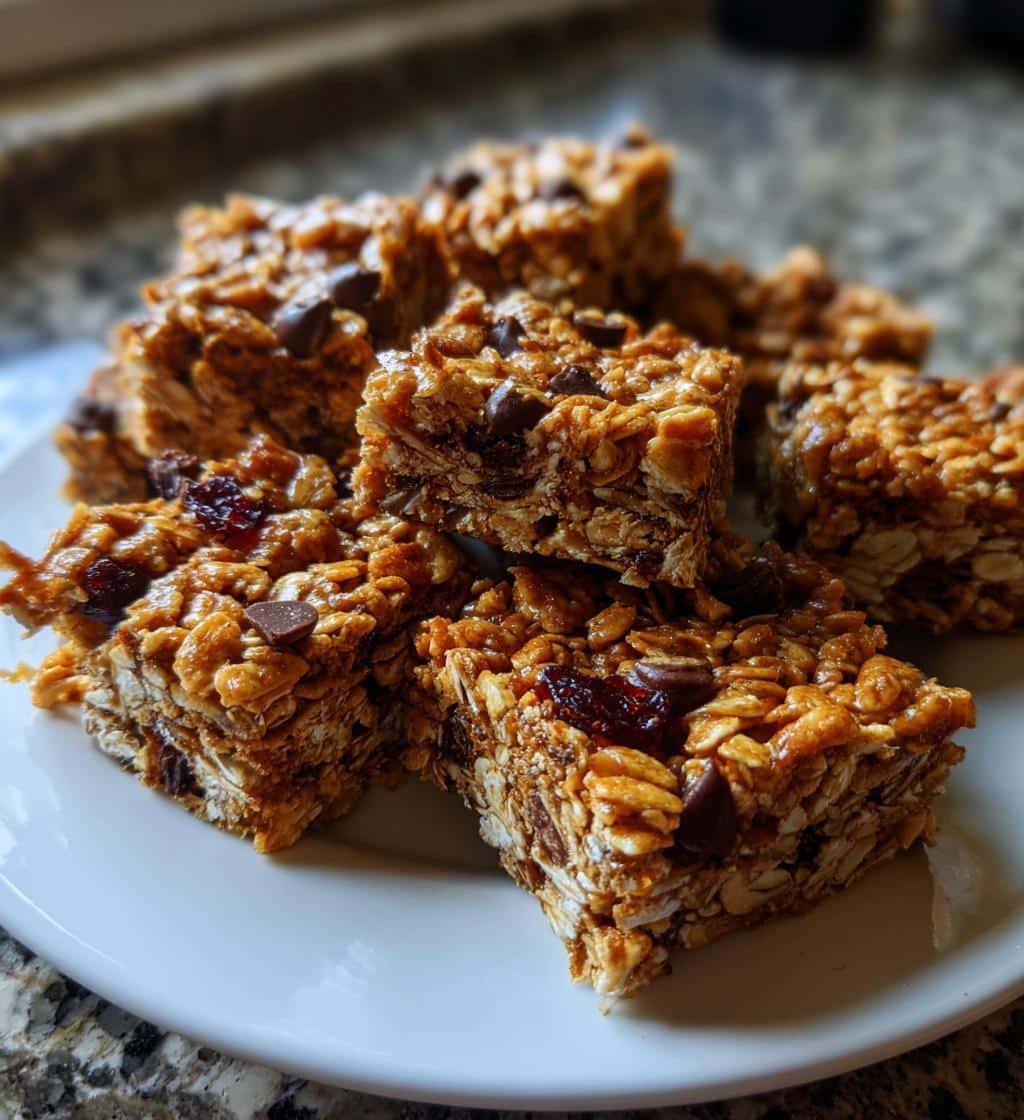
- Chocolate Chips: Dark, semi-sweet, or milk chocolate.
- Spices: Cinnamon, nutmeg, or a pinch of ginger for added warmth.
- Vanilla Extract: Enhances overall flavor.
- Salt: A small amount helps to bring out the sweetness and other flavors.
Before you begin, ensure all ingredients are measured out and ready. This mise en place approach will make the subsequent steps of mixing and baking much more efficient and enjoyable.
Step-by-Step Cereal Bar Instructions
Making your own cereal bars might seem daunting at first, but it’s a remarkably straightforward process that even novice bakers can master. The key is to follow each step carefully, ensuring all components are properly combined and prepared for baking. This methodical approach guarantees a consistent texture and delicious outcome every time. Preparing your baking pan and gathering your utensils beforehand will also streamline the entire process, allowing you to focus on the fun part: creating your personalized snack.
Mixing All Components
The first critical step involves combining your dry ingredients with your wet binder. In a large mixing bowl, start by combining your rolled oats with any dry mix-ins like dried fruits, nuts, seeds, or spices. Give these a good stir to ensure they are evenly distributed. In a separate, microwave-safe bowl or small saucepan, gently warm your nut butter and liquid sweetener until they are fluid and easily stirrable. Adding vanilla extract and a pinch of salt to this wet mixture at this stage helps to disperse the flavors uniformly. Once warmed, pour the wet ingredients over the dry mixture. Use a sturdy spatula or a wooden spoon to thoroughly combine everything. It’s crucial that every oat and every mix-in is coated with the sticky binder, creating a cohesive mixture that will hold together when pressed.
Pressing into the Pan
Once your mixture is thoroughly combined and sticky, it’s time to transfer it to your prepared baking pan. Line an 8×8 or 9×13 inch baking pan with parchment paper, leaving an overhang on the sides. This overhang will act as handles, making it much easier to lift the finished bars out of the pan. Evenly spread the cereal bar mixture into the prepared pan. Now comes the important part: pressing the mixture down firmly and evenly. Use the back of your spatula, a flat-bottomed glass, or even your hands (lightly dampened to prevent sticking) to compact the mixture. The harder and more evenly you press, the less likely your bars will crumble after baking. Pay special attention to the corners and edges to ensure uniform thickness. A well-pressed mixture is the secret to perfectly structured, non-crumbly homemade cereal bars.
Bake and Cool Your Cereal Bars
The baking and cooling phases are just as crucial as the mixing process for achieving perfectly structured and delicious cereal bars. Proper attention to oven temperature and cooling time ensures that your bars set firmly, develop a pleasant texture, and are easy to cut without falling apart. Rushing either of these steps can lead to crumbly or overly soft bars, so patience is key. Think of it as the final, delicate stage in bringing your homemade snack vision to life, much like how precision is needed in crafting snickerdoodle cobbler.
Oven Temperature and Time
Preheating your oven to the correct temperature is the first step. Generally, most cereal bar recipes call for an oven temperature between 300°F and 350°F (150°C to 175°C). The lower temperature helps to gently toast the oats and bind the ingredients without over-baking, which can result in dry or hard bars. Baking time typically ranges from 20 to 30 minutes, depending on your oven and the thickness of your bars. You’ll know your bars are ready when the edges are lightly golden brown and the center appears set. While the bars may still feel soft to the touch when hot, they will firm up considerably as they cool. Avoid over-baking, as this can make your bars tough or brittle, detracting from their delightful chewiness.
Letting Bars Set Firmly
Once your cereal bars are out of the oven, resisting the urge to cut into them immediately is perhaps the hardest part! However, letting them cool completely and set firmly is paramount for their structural integrity. Allow the pan to cool on a wire rack at room temperature for at least an hour, or until it’s no longer warm to the touch. For an even firmer set, especially in warmer climates or if your recipe is particularly moist, refrigerate the bars for an additional 1-2 hours after they’ve cooled to room temperature. This cooling period allows the binders to solidify and the flavors to meld. Once fully cooled and firm, use the parchment paper overhang to lift the entire slab of bars out of the pan. Place it on a cutting board and use a sharp knife to cut them into your desired sizes. This patient approach guarantees clean, sturdy bars that won’t crumble in your hands or lunchbox.
Cereal Bar Nutrition Information
Understanding the nutritional profile of your homemade cereal bars is a significant advantage over store-bought versions. When you make them yourself, you have complete transparency about what goes into each bite, allowing you to tailor the ingredients to fit your specific dietary needs and preferences. This section will help you consider the typical nutritional breakdown and how you can influence it. For a general understanding of these popular snacks, you can learn more about cereal bars on Wikipedia.
Per Serving Details
The nutritional value per serving of your cereal bars will vary widely based on the ingredients you choose and the size you cut them into. A typical homemade bar (around 1.5-2 ounces) often contains a good balance of macronutrients. For example, a bar made with oats, peanut butter, and honey might provide a decent amount of complex carbohydrates for sustained energy, healthy fats from the nuts, and some dietary fiber. Adding ingredients like chia seeds or flax seeds can significantly boost fiber and omega-3 fatty acid content, while a scoop of protein powder can increase the protein per serving, making them ideal for post-workout recovery or a more satiating snack. Always consider your ingredient choices when estimating per-serving details.
Calories, Fat, and Sugar
When customizing your cereal bars, pay attention to the caloric density, fat content, and sugar levels. Oats themselves are relatively low in calories but nutrient-dense. The primary contributors to calories and fat are usually nut butters and added oils (if any). While nuts and seeds provide healthy fats, they are calorie-dense, so portion control is helpful if you’re watching caloric intake. Sugar content mainly comes from sweeteners like honey, maple syrup, or dried fruits. If you’re aiming for lower sugar, reduce the amount of liquid sweetener or choose unsweetened dried fruits. For those monitoring fat, opt for lower-fat nut butters or reduce the quantity. Conversely, if you need more energy for active days, you can be more generous with calorie-dense additions. The beauty of homemade is that you control these variables to align with your health goals, allowing for truly personalized and healthy snacking.
Storing Your Delicious Cereal Bars
Proper storage is essential to maintain the freshness, texture, and flavor of your homemade cereal bars. After all the effort you put into making these delightful treats, you want them to last as long as possible. Incorrect storage can lead to stale, dry, or even moldy bars, which defeats the purpose of having a convenient, healthy snack on hand. Following a few simple guidelines will ensure your bars remain enjoyable for days, or even weeks.
Keep Them Fresh Longer
To maximize the shelf life of your cereal bars, ensure they are completely cool before storing. Any residual warmth can create condensation inside the container, leading to sogginess or promoting bacterial growth. Once cool, it’s best to store them in a cool, dry place away from direct sunlight. A pantry or cupboard is usually ideal. If your bars contain ingredients that are prone to spoiling quickly, like fresh fruit or a yogurt drizzle, refrigeration is recommended. However, most standard oat-and-nut-butter bars do well at room temperature for several days. For longer storage, you can freeze individual bars, which makes them perfect for meal prepping and ensures you always have a quick option available.
Airtight Container Tips
An airtight container is your best friend when it comes to storing cereal bars. This prevents air exposure, which can cause the bars to dry out and become stale. Here are some tips for using airtight containers effectively:
- Layer with Parchment Paper: If you’re stacking multiple bars, place a small square of parchment paper between each bar. This prevents them from sticking together, especially if they are slightly softer or have sticky toppings.
- Choose the Right Size: Select a container that fits your bars snugly without too much empty space. Less air inside the container means less chance for staleness.
- Material Matters: Glass containers offer an excellent airtight seal and don’t absorb odors, making them a great choice. High-quality plastic containers with tight-fitting lids also work well.
- Refrigeration: If refrigerating, the airtight container still applies. The cold temperature will help prevent spoilage for bars with more perishable ingredients.
- Freezing: For freezing, wrap individual bars tightly in plastic wrap or foil before placing them in an airtight freezer-safe container or freezer bag. This double layer of protection prevents freezer burn and allows you to grab just one bar at a time. Frozen bars can last for up to 3 months and can be thawed at room temperature or quickly microwaved for a soft, warm treat.
First Irresistible Cereal Bar Recipe
When venturing into the world of homemade cereal bars, starting with a classic recipe is always a good idea. It builds confidence and provides a solid foundation for future culinary experiments. This first recipe focuses on comforting, familiar flavors that are universally loved, making it an excellent go-to for both beginners and seasoned snack makers alike. The combination of wholesome oats and the richness of nut butter creates a satisfying and energy-boosting treat.
Oats and Honey Classic
The “Oats and Honey Classic” cereal bar is a timeless favorite for good reason. It’s incredibly simple, yet profoundly satisfying. This recipe typically combines rolled oats with a warm mixture of honey (or maple syrup) and a touch of butter or coconut oil. The honey provides natural sweetness and acts as a binder, while the oats give it that wholesome, chewy texture. A pinch of cinnamon often complements these flavors beautifully, adding a warm, inviting aroma. You can also add a handful of raisins or chopped dried cranberries for a touch of fruity sweetness and extra chewiness. This basic recipe is the perfect canvas for learning the fundamental techniques of cereal bar making before you branch out into more complex variations.
Peanut Butter Goodness
Elevating the classic a step further, the “Peanut Butter Goodness” variation introduces the beloved flavor and creamy texture of peanut butter. This version typically uses peanut butter as the primary binder, often warmed with honey or maple syrup to create a sticky, cohesive mixture that coats the oats perfectly. The rich, nutty flavor of peanut butter pairs wonderfully with the subtle sweetness of the oats and honey. For an extra layer of deliciousness, consider stirring in some mini chocolate chips or chopped peanuts into the mixture before pressing it into the pan. If you’re a fan of peanut butter, you might also enjoy the rich flavors of peanut butter brownie swirl cookies. This variation is a hearty and flavorful choice, packed with protein and healthy fats, making it an excellent option for sustained energy throughout your day.
Second Cereal Bar Recipe Idea
Once you’ve mastered the foundational recipes, it’s time to get creative and personalize your cereal bars. The beauty of homemade snacks is the endless opportunity for customization, allowing you to tailor flavors, textures, and nutritional profiles to your exact liking. This section explores two popular ways to diversify your cereal bar repertoire, introducing new tastes and making each batch unique and exciting for your palate. Experimentation is highly encouraged!
Add Different Dried Fruits
Dried fruits are a fantastic way to introduce natural sweetness, chewiness, and a burst of flavor to your cereal bars. Beyond the common raisins and cranberries, there’s a whole world of options to explore. Consider chopping up dried apricots for a tangy, sweet bite, or adding diced dates for a rich, caramel-like sweetness and a soft texture. Dried cherries can provide a delightful tartness, while dried blueberries offer a subtle fruitiness. For an exotic twist, try finely chopped dried mango or pineapple. When incorporating dried fruits, make sure they are soft and pliable; if they are too dry, you might want to soak them in a little warm water for a few minutes before adding to the mixture. This ensures they blend seamlessly and contribute to the bar’s overall moistness. The type of dried fruit you choose can dramatically change the flavor profile of your finished bar.
Swap Chocolate for Nuts
For those who love a bit of decadence, chocolate chips are a popular mix-in. However, if you’re looking for a different kind of crunch, or aiming for a less sweet profile, swapping chocolate for a variety of nuts can be a game-changer. Chopped almonds, walnuts, pecans, or cashews each bring their unique flavor and texture to the bars. Walnuts offer an earthy, slightly bitter note, while pecans are buttery and sweet. Almonds provide a satisfying crunch and mild flavor. Beyond tree nuts, consider seeds like sunflower seeds or pumpkin seeds for a great source of healthy fats and minerals, especially if you have nut allergies. Toasting your nuts lightly before adding them to the mixture can further enhance their flavor and crunch. This swap allows for greater control over the sweetness level and provides a heartier, more savory dimension to your homemade treats, making your cereal bars a versatile snack that truly caters to all tastes.
Third Simple Cereal Bar Recipe
Expanding your cereal bar repertoire often involves simple yet impactful substitutions. By changing just one or two core ingredients, you can drastically alter the flavor profile and nutritional content of your bars. This section focuses on two easy swaps that offer new dimensions to your homemade creations, proving that versatility is key when crafting the perfect snack for any occasion. These variations are quick to implement and deliver delicious results without much extra effort.
Nut Butter Substitutions
While peanut butter is a popular choice for cereal bars due to its strong flavor and excellent binding properties, exploring other nut and seed butters can open up a world of new tastes and cater to various dietary needs. Almond butter offers a milder, slightly sweeter flavor and a smooth texture, perfect for a more subtle bar. Cashew butter is incredibly creamy and sweet, adding a luxurious feel. For those with nut allergies, sunflower seed butter (SunButter) is an outstanding alternative, providing a rich, nutty taste without the allergens. Tahini (sesame paste) can also be used for a distinct, slightly bitter and savory note, often paired well with dates or a hint of citrus. When making substitutions, be mindful of the consistency of the new butter; some might be thicker or thinner than peanut butter, which could slightly affect the final texture of your bars. Adjust liquid sweeteners or a touch of milk accordingly to achieve the right stickiness. These simple changes can make your bars excitingly different each time you bake.
Maple Syrup for Honey
Swapping out honey for maple syrup is another straightforward way to change the flavor of your cereal bars while maintaining their structure. Maple syrup provides a distinct, rich, and earthy sweetness that differs from the floral notes of honey. This substitution is not only great for flavor variation but also caters to those who prefer a vegan option if paired with a plant-based nut butter. Pure maple syrup is also generally considered a less processed natural sweetener. The consistency of maple syrup is quite similar to honey, so a direct 1:1 substitution usually works perfectly without requiring other adjustments to the recipe. This simple swap can transform a classic oats and honey bar into a delightful maple-pecan or maple-walnut creation, offering a taste reminiscent of autumn. For another delicious treat that incorporates delightful sweetness, consider trying a recipe like snickerdoodle cobbler, where sweet notes truly shine.
Fourth Creative Cereal Bar Option
Beyond basic ingredient swaps, you can infuse your homemade cereal bars with additional layers of flavor and nutritional benefits through creative additions. This section delves into two methods for making your bars even more unique and healthful, transforming them from a simple snack into a truly gourmet treat. These options are perfect for those who enjoy experimenting and want to maximize both taste and wellness in their creations.
Add Warm Spices
Spices are a powerful tool to elevate the flavor profile of your cereal bars, adding warmth, depth, and complexity. Cinnamon is perhaps the most obvious choice, pairing beautifully with oats, nuts, and most sweeteners. A teaspoon of ground cinnamon can transform a basic bar into a comforting, autumnal delight. But don’t stop there! Consider adding a pinch of nutmeg, ground ginger, or even a touch of allspice for a richer, more nuanced flavor. For a more adventurous twist, a hint of cardamom can introduce an exotic, aromatic note that is both surprising and delicious. Pumpkin pie spice or apple pie spice blends are also excellent shortcuts to infuse a variety of warm, inviting flavors. Remember that a little goes a long way with strong spices, so start with small amounts and adjust to your preference. These aromatic additions not only taste wonderful but also bring a sense of cozy indulgence to your otherwise simple snack.
Include Chia or Flax
For an extra boost of nutrition without significantly altering the taste or texture, incorporating superfoods like chia seeds or flax seeds is an excellent strategy. These tiny powerhouses are packed with omega-3 fatty acids, fiber, and protein, making your cereal bars even healthier. Chia seeds, known for their ability to absorb liquid and form a gel, can also act as an additional binder, helping to hold your bars together. They add a very subtle crunch. Flax seeds, especially when ground, are another fantastic source of omega-3s and fiber. Ground flax seeds integrate seamlessly into the mixture, providing nutritional benefits without being overtly noticeable in texture. You can add 1-2 tablespoons of either chia seeds, ground flax seeds, or a combination of both to your dry ingredients. They blend in beautifully with the oats and other components, turning your delicious snack into a nutritional powerhouse. This simple addition is a fantastic way to boost your daily intake of essential nutrients and make your homemade bars a truly wholesome choice for any healthy snacks collection.
Fifth Flavorful Cereal Bar Recipe
Taking your homemade cereal bars to the next level of flavor and presentation often involves adding a special finishing touch. These final flourishes can transform a simple snack into an elegant treat, perfect for impressing guests or simply indulging yourself. This section explores two delightful ways to add a gourmet touch to your already delicious creations, proving that a little extra effort can yield truly remarkable results.
Try a Yogurt Drizzle
For a lighter, tangy, and visually appealing finish, a yogurt drizzle is an excellent option. This works especially well with bars that contain dried fruits or have a slightly sweeter base. To create the drizzle, combine plain Greek yogurt (for its thickness) with a touch of honey or maple syrup and a splash of vanilla extract. You can also add a tiny bit of lemon zest for an extra pop of freshness. Whisk until smooth and slightly runny. Once your cereal bars are completely cooled and firm, use a spoon or a piping bag with a very small snip in the corner to zig-zag the yogurt mixture over the tops of the bars. Allow the drizzle to set in the refrigerator for about 15-20 minutes. This not only adds a beautiful aesthetic but also introduces a creamy texture and a delightful tang that cuts through the sweetness of the bar. Remember that bars with yogurt drizzle will need to be stored in the refrigerator.
Dipping in Dark Chocolate
For those who love a touch of indulgence, dipping the bottoms or drizzling the tops of your cereal bars with dark chocolate is an irresistible choice. Dark chocolate not only provides a rich, decadent flavor but also offers antioxidants. To do this, melt your favorite dark chocolate chips or a chopped dark chocolate bar using a double boiler method or carefully in the microwave. Once smooth and glossy, dip one side of each cooled cereal bar into the melted chocolate, or use a spoon to drizzle it artfully over the tops. Place the chocolate-coated bars on a parchment-lined tray and refrigerate them until the chocolate is completely set and firm. The contrast between the chewy cereal bar and the crisp, slightly bitter dark chocolate is absolutely divine. This option makes your homemade cereal bars feel incredibly luxurious and satisfying, perfect for a special treat or a sophisticated snack. For more recipe ideas and inspiration, visit CarinaRecipes on Pinterest.
Enjoy Your Homemade Cereal Bars
Congratulations! You’ve successfully crafted a batch of delicious and wholesome homemade cereal bars. The journey from gathering simple ingredients to seeing your perfectly baked and cooled bars is incredibly rewarding. Now comes the best part: savoring the fruits of your labor. These versatile treats are designed to fit seamlessly into various aspects of your daily life, offering convenience, nutrition, and delightful flavor whenever you need it most. They are a testament to the fact that healthy eating can also be incredibly enjoyable and straightforward.
Perfect Anytime Snack
Your homemade cereal bars are truly the perfect anytime snack. Whether you need a quick energy boost before a workout, a fulfilling bite during a busy workday, or a wholesome treat to curb afternoon cravings, these bars deliver. Their portability makes them ideal for packing into lunchboxes, backpacks, or gym bags, ensuring you always have a healthy option at hand. Unlike many store-bought alternatives, you know exactly what’s in them, giving you peace of mind with every bite. Keep a stash readily available for those moments when hunger strikes unexpectedly, and avoid reaching for less nutritious processed options. They are a smart choice for anyone looking to maintain a balanced diet with ease.
Share with Family
One of the greatest joys of cooking and baking is the opportunity to share your creations with loved ones. Your homemade cereal bars are no exception. They make wonderful additions to family breakfasts, school lunches, or even as thoughtful homemade gifts for friends and neighbors. Involving children in the making process can also be a fun and educational activity, teaching them about healthy ingredients and basic cooking skills. Customizing batches to suit different family preferences – some with nuts, others with extra chocolate chips – ensures there’s something for everyone. Sharing these wholesome, flavorful bars is not just about the food; it’s about sharing love, care, and the satisfaction of a job well done. For more delicious family-friendly recipes and culinary inspiration, be sure to follow CarinaRecipes on Instagram, where we share a variety of meal ideas and helpful tips.