Oreo Brownie Cookies combine two beloved desserts into one irresistible treat. This baking recipe brings together the chewy richness of brownies and the classic crunch of Oreo cookies, making for perfect sweet squares. Ideal for any gathering or a cozy night in, they are truly a crowd pleaser with simple preparation.
Key Takeaways
- Effortlessly create delicious Oreo brownie cookies by merging two popular desserts.
- Follow a straightforward process from ingredient gathering to final baking and cooling.
- Learn practical tips for achieving the best texture and perfect distribution of Oreo chunks.
- Discover versatile serving suggestions and effective storage methods for lasting enjoyment.
These cookies offer pure joy. They are a chocolate lover’s dream. Simple ingredients make them accessible. Baking them is so rewarding. Share these sweet treats often.
Oreo Brownie Cookies: A Perfect Treat
Why Everyone Loves This Combo
There’s something universally appealing about the combination of rich, fudgy brownies and crisp, creamy Oreo cookies. This innovative baking recipe for Oreo brownie cookies brings together the best of both worlds, creating a harmonious symphony of textures and flavors. People gravitate towards this delightful dessert because it offers a familiar comfort with an exciting twist. The chewiness of a classic brownie base perfectly complements the satisfying crunch of chopped Oreo pieces, making each bite an adventure. It’s a nostalgic treat that appeals to both children and adults, serving as a powerful crowd pleaser at any event. The joy of these sweet squares lies in their ability to deliver a double dose of dessert happiness, making them an instant favorite for anyone who tries them. Whether you’re a chocolate aficionado or a cookie lover, this combination offers a truly satisfying and unforgettable experience that sets it apart from traditional desserts. They are more than just a sweet snack; they’re a celebration of two iconic treats merging into one perfect indulgence.
Quick and Easy to Make
Despite their impressive appearance and incredible flavor, Oreo brownie cookies are surprisingly quick and easy to make, even for novice bakers. The simple preparation steps ensure that you can whip up a batch of these homemade treats without feeling overwhelmed. Most of the ingredients are pantry staples, and the process doesn’t require any complex techniques. From mixing the batter to folding in the chopped Oreo cookies, each step is designed for efficiency and ease. This accessibility makes it a fantastic recipe for last-minute gatherings, a casual weeknight dessert, or a fun baking project with the family. The straightforward nature of this recipe means you spend less time in the kitchen and more time enjoying the delicious results. It truly is a simple recipe that yields spectacular chocolate delight, proving that you don’t need to be a gourmet chef to create something truly special. For more delicious dessert ideas, check out our extensive collection.
Gathering Your Baking Essentials
All Ingredients You Need
To create these delightful Oreo brownie cookies, you’ll need a selection of fresh, high-quality ingredients. Start with unsalted butter, granulated sugar, and light brown sugar for that perfect balance of sweetness and moisture. Large eggs and pure vanilla extract are crucial for flavor and binding. For the distinctive brownie base, you’ll need all-purpose flour and unsweetened cocoa powder; dutch-processed cocoa often yields a darker, richer brownie. A pinch of salt enhances all the flavors, while baking powder helps with a slight lift. And, of course, the star of the show: a package of original Oreo cookies, which will be chopped into delectable chunks. Make sure your butter is at room temperature for smoother mixing, and your eggs are also not straight from the fridge to ensure better emulsification with the other ingredients. Using fresh ingredients will significantly impact the final taste and texture of your homemade treats, ensuring a truly special chocolate delight. For another delightful cookie recipe, consider trying our Peanut Butter Brownie Swirl Cookies.
Essential Kitchen Tools
Having the right tools on hand will make the baking process a breeze. You’ll need a large mixing bowl, preferably a sturdy one that can withstand vigorous mixing. An electric mixer, either hand-held or stand mixer, is highly recommended for creaming the butter and sugars, ensuring a light and airy base. Measuring cups and spoons are indispensable for accurate ingredient portions. A rubber spatula will be useful for scraping down the sides of the bowl and folding in the dry ingredients and Oreo chunks. You’ll also need a sharp knife and a cutting board for chopping the Oreo cookies. A 9×13-inch baking pan is ideal for this recipe, ensuring even baking and allowing you to slice perfect servings. Parchment paper is a fantastic aid for easy removal of the baked cookies from the pan, and a wire rack is necessary for proper cooling. Lastly, having a timer will help you keep track of baking times, preventing over-baking and guaranteeing a perfectly fudgy result. Understanding the basics of baking and having these tools ready makes any recipe, especially this brownie cookie recipe, much more enjoyable and successful.
Prepping for Delicious Brownie Cookies
Preheat Oven to 350°F
The first crucial step in preparing your delicious brownie cookies is to properly preheat your oven. Always set your oven to 350°F (175°C) at least 15-20 minutes before you plan to put your batter in. This seemingly small step is vital for consistent baking. When your oven is fully preheated, it ensures that the internal temperature is stable, creating the ideal environment for your cookies to rise and set correctly from the moment they enter the heat. If you place your batter into a cold or still-heating oven, the cookies will not bake evenly, potentially leading to a dense or undercooked center and overcooked edges. A preheated oven allows the baking powder to activate effectively, resulting in the desired chewy yet fudgy texture that defines a perfect Oreo brownie cookie. Don’t rush this stage; patience here pays off in the quality of your homemade treats.
Grease Your Baking Pan
Once your oven is preheating, turn your attention to preparing your baking pan. For these Oreo brownie cookies, a 9×13-inch baking pan is recommended. To prevent sticking and ensure easy removal of your sweet squares, you’ll need to grease it thoroughly. You can use cooking spray, butter, or shortening to coat the bottom and sides of the pan. For an even easier removal and cleaner slices, lining the pan with parchment paper is highly advised. Cut a piece of parchment paper to fit the bottom of the pan, leaving an overhang on two opposite sides. This “sling” will allow you to lift the entire baked slab of cookies out of the pan with ease once it’s cooled. After placing the parchment paper, give it a light spray or grease to ensure nothing sticks. This simple preparation step is essential for achieving those clean, perfect servings and makes the cutting process much less messy, preserving the integrity of your chocolate delight.
Crafting the Cookie Batter Base
Melt Butter with Sugar
The foundation of these rich Oreo brownie cookies begins with carefully melting butter and combining it with sugars. In a large mixing bowl, combine your softened unsalted butter with both granulated sugar and light brown sugar. Using a stand mixer fitted with a paddle attachment, or a hand-held electric mixer, beat these ingredients together on medium speed until the mixture becomes light, fluffy, and pale in color. This creaming process typically takes about 2-3 minutes. The aeration created during this step is crucial as it incorporates air into the batter, which contributes to the cookies’ final texture—a perfect balance of chewy and tender. The sugars will dissolve slightly into the butter, creating a smooth and luscious base for your chocolate delight. This initial step is fundamental to ensuring your brownie cookie recipe achieves its signature fudgy consistency and rich flavor profile, setting the stage for truly amazing homemade treats.
Add Eggs and Vanilla
Once your butter and sugars are perfectly creamed, it’s time to incorporate the wet ingredients that add richness and depth of flavor. Crack in your large eggs, one at a time, mixing well after each addition until just combined. Be careful not to overmix at this stage; you want to maintain the air incorporated earlier. The eggs serve as a primary binding agent, contributing to the structure and moistness of the cookies. Following the eggs, stir in a generous amount of pure vanilla extract. Vanilla is a magical ingredient in baking; it doesn’t just add its own flavor, but it also enhances and complements the rich cocoa and sweet notes present in the batter. Mix until the vanilla is fully distributed. This careful addition ensures a smooth, homogeneous batter, ready for the dry ingredients, and ultimately contributes to the incredible taste of your future sweet squares. Proper blending here leads to a uniform texture, which is key for a truly delicious brownie cookie recipe.
Mixing Dry Ingredients Smoothly
Cocoa Powder and Flour
After your wet ingredients are perfectly combined, it’s time to introduce the dry components that will give your Oreo brownie cookies their structure and deep chocolate flavor. In a separate medium bowl, whisk together the all-purpose flour and unsweetened cocoa powder. The cocoa powder is what provides that intense chocolate delight, so choose a good quality one. Dutch-processed cocoa typically offers a darker color and milder flavor, while natural cocoa is fruitier and lighter. Whisking them together before adding them to the wet ingredients ensures that they are evenly distributed, preventing pockets of unmixed flour or cocoa in your final batter. This step is critical for a smooth and consistent cookie bar. Gradually add this dry mixture to your wet ingredients, mixing on low speed until just combined. Overmixing at this stage can develop too much gluten in the flour, leading to tough cookies rather than the desired fudgy texture. Gentle folding is key to maintaining a light and tender crumb for your homemade treats.
Salt and Baking Powder
Alongside the flour and cocoa powder, two other dry ingredients play vital roles in the success of your brownie cookie recipe: salt and baking powder. Salt is more than just a seasoning; it balances the sweetness of the sugars and deepens the chocolate flavor, making the cookies taste richer and more complex. Don’t skip it! Baking powder, on the other hand, acts as a leavening agent. While these aren’t traditional cake-like brownies that rise significantly, a small amount of baking powder helps to create a slightly lighter texture and contributes to that characteristic chewiness without making them overly dense. Ensure both are fresh for optimal effectiveness. Add them to the flour and cocoa mixture and whisk thoroughly before incorporating into the wet ingredients. This uniform distribution prevents any bitter spots from concentrated baking powder and ensures the salt evenly enhances the overall flavor profile. These small additions are critical for achieving the perfect balance of taste and texture in your delicious snacks, making every bite truly satisfying.
Adding Those Signature Oreo Chunks
Fold in Chopped Cookies
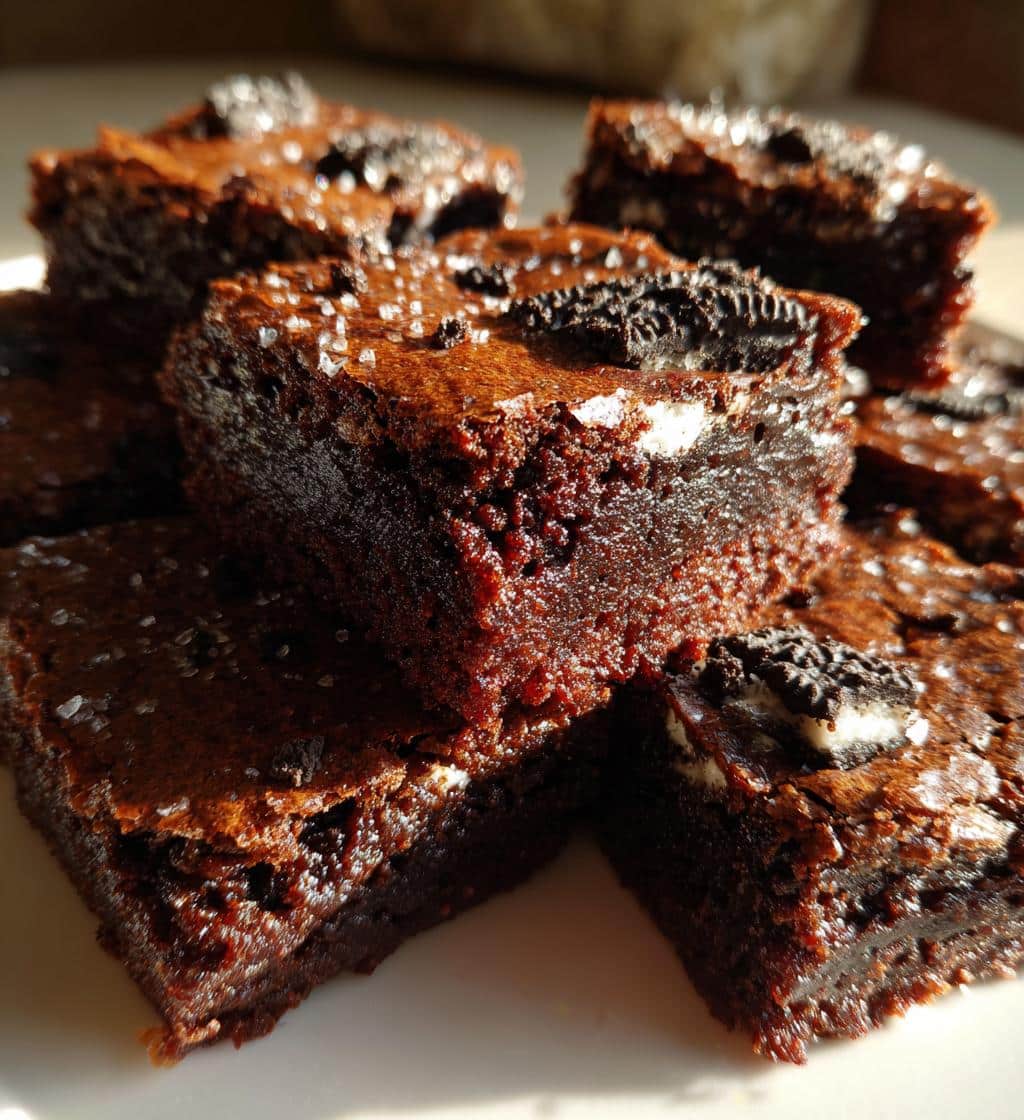
The moment has arrived to add the star attraction to your delicious brownie cookie recipe: the signature Oreo chunks. Begin by taking your package of Oreo cookies and roughly chop them into pieces. A mix of smaller crumbs and larger chunks works best, as the crumbs will meld into the batter while the larger pieces provide distinct bursts of crunch and flavor. Gently fold these chopped cookies into your prepared brownie batter using a rubber spatula. The key here is to fold, not stir vigorously. Folding helps to evenly distribute the pieces without crushing them too much or overworking the batter, which can lead to a tough texture. This step transforms a simple chocolate delight into an Oreo brownie cookie, offering an irresistible combination that is a true crowd pleaser. Take your time to ensure the chunks are well integrated throughout the batter, promising an Oreo surprise in every single bite of your sweet squares.
Evenly Distribute Pieces
Achieving an even distribution of the Oreo pieces is crucial for maximum enjoyment. You want every serving of your Oreo brownie cookies to have a generous amount of that classic cookie crunch. As you fold, ensure you scrape down the sides and bottom of the bowl to catch any hidden batter or cookie pieces. If you notice a concentration of Oreos in one area, gently spread them out with your spatula. This meticulous step guarantees that each bite will deliver that wonderful contrast between the fudgy brownie and the crisp cookie. It’s the small details like even distribution that elevate homemade treats from good to truly amazing. Don’t be afraid to take a moment to eyeball the batter and adjust as needed. Once the Oreo chunks are uniformly incorporated, your batter is ready for the pan, poised to become delectable cookie bars that everyone will love. For more baking inspiration, be sure to visit our Pinterest page where we share many fantastic dessert ideas.
Baking Your Oreo Brownie Cookies
Pour Batter into Pan
With your oven preheated and your baking pan greased and lined, it’s time to transfer your rich, Oreo-studded batter. Carefully pour the thick, luscious brownie cookie batter into the prepared 9×13-inch baking pan. Use your rubber spatula to spread the batter evenly across the bottom of the pan, making sure it reaches all corners. Gently tap the pan on your counter a few times to help settle the batter and release any large air bubbles. This creates a uniform layer, which is essential for even baking and for achieving those perfect servings later. A smooth top also ensures that your chocolate delight bakes with a beautiful, crinkly top crust, a hallmark of a well-made brownie. This step is straightforward, but taking a moment to ensure evenness will make a big difference in the final presentation and consistency of your delicious snacks. Remember, the goal is uniform cookie bars, making every piece equally delightful.
Bake for 25-30 Minutes
Once the batter is evenly spread, place your baking pan into the preheated 350°F (175°C) oven. Bake for approximately 25-30 minutes. Baking time can vary slightly depending on your oven’s calibration and the exact thickness of your batter, so keep a close eye on them. You’ll know your Oreo brownie cookies are done when the edges appear set and a toothpick inserted into the center comes out with moist crumbs, not wet batter. A completely clean toothpick means they might be overbaked, resulting in a drier cookie. We’re aiming for that signature fudgy texture, so a few moist crumbs are ideal. The top should have a slightly crinkled, shiny appearance. Around the 25-minute mark, start checking periodically. Over-baking can quickly turn fudgy sweet squares into dry cookie bars, so careful monitoring is key to preserving their decadent chewiness. This bake time is critical for producing those perfect homemade treats that will be a memorable crowd pleaser.
Cooling and Cutting Your Squares
Let Cookies Cool Down
Patience is a virtue, especially when it comes to freshly baked Oreo brownie cookies. Once removed from the oven, it’s absolutely crucial to let your cookie bars cool down completely in the pan on a wire rack. Resist the urge to cut into them immediately, no matter how tempting the aroma of chocolate delight is. Warm brownies are notoriously difficult to cut cleanly, and they can easily fall apart, ruining those perfect servings you’re aiming for. Cooling allows the cookies to fully set and firm up, making them much easier to handle and slice. This process typically takes at least 1-2 hours, or even longer if your kitchen is warm. If you used parchment paper with an overhang, you can gently lift the entire slab out of the pan and transfer it to the wire rack to cool more quickly, but still allow ample time for it to reach room temperature. Proper cooling ensures the fudgy texture remains intact and prevents crumbling, delivering satisfying sweet squares every time.
Slice into Perfect Servings
After your Oreo brownie cookies have completely cooled, it’s time for the gratifying task of slicing them into perfect servings. If you used the parchment paper sling, gently lift the entire baked rectangle out of the pan and place it on a clean cutting board. This method makes cutting significantly easier and helps maintain the integrity of your cookie bars. Use a large, sharp knife, cleaning the blade with a warm, damp cloth between each cut to ensure clean edges and prevent sticking, especially from the gooey chocolate delight. You can cut them into traditional squares, about 2×2 inches, or into smaller bite-sized pieces for a party, making them an ideal crowd pleaser. For a visually appealing presentation, trim off the edges first if you desire perfectly uniform squares. The goal is consistent, attractive pieces that show off the beautiful contrast of the dark brownie and the white Oreo cream. This attention to detail transforms simple homemade treats into a truly professional-looking dessert. You can share your creations and find more delicious recipe ideas on our Instagram page.
Storing Your Fresh Brownie Cookies
Keep in Airtight Container
To maintain the irresistible freshness and fudgy texture of your Oreo brownie cookies, proper storage is key. Once completely cooled and sliced, transfer your sweet squares to an airtight container. A plastic container with a tight-fitting lid or a glass container with a silicone seal works perfectly. Ensure that the container is clean and dry before placing the cookie bars inside. If you’re stacking multiple layers, you can place a piece of parchment paper between each layer to prevent them from sticking together. Storing them in an airtight environment prevents them from drying out, keeps them moist, and protects them from absorbing any unwanted odors from your refrigerator or pantry. This simple step ensures that every time you reach for one of these delicious snacks, it tastes just as good as it did on the day you baked it, extending the life of your homemade treats.
Enjoy Them for Days
When stored correctly in an airtight container at room temperature, your Oreo brownie cookies will remain wonderfully fresh and delicious for 3-4 days. If you prefer them to last even longer, you can store them in the refrigerator for up to a week. For an even extended shelf life, these cookie bars freeze exceptionally well. Wrap individual squares tightly in plastic wrap, then place them in a freezer-safe bag or container. They can be frozen for up to 2-3 months. When you’re ready to enjoy a frozen treat, simply let them thaw at room temperature for an hour or two, or gently warm them in the microwave for a few seconds for that fresh-baked feel. Having a stash of these chocolate delight squares means you’re always ready for an unexpected guest or a sudden craving for a crowd pleaser. They’re perfect for enjoying them for days, making them a convenient and satisfying dessert idea.
Serving Ideas for These Treats
Warm with Vanilla Ice Cream
While these Oreo brownie cookies are utterly delicious on their own, serving them warm with a scoop of vanilla ice cream elevates them to an extraordinary dessert experience. The contrast of the warm, fudgy brownie-cookie hybrid against the cold, creamy ice cream is simply divine. As the ice cream slowly melts, it creates a luscious sauce that perfectly complements the rich chocolate delight and the crunchy Oreo pieces. For an extra touch of indulgence, drizzle a little chocolate syrup or caramel sauce over the top. This presentation transforms simple sweet squares into a restaurant-worthy treat, making it an ideal dessert idea for impressing guests or simply spoiling yourself. Just a quick zap in the microwave for 10-15 seconds will warm up an individual cookie bar perfectly, ready for its icy companion. It’s a classic pairing that never disappoints and truly highlights the versatility of these homemade treats.
Perfect for Any Occasion
One of the many charms of Oreo brownie cookies is their versatility, making them perfect for any occasion. Their irresistible appeal makes them a guaranteed crowd pleaser at birthday parties, potlucks, and holiday gatherings. They are easy to transport, making them an excellent choice for school bake sales or picnics. For a more intimate setting, these delicious snacks are wonderful for a cozy movie night at home or as a comforting after-dinner treat with a cup of coffee. You can dress them up with a sprinkle of powdered sugar or colorful sprinkles for festive events, or keep them rustic for a casual get-together. Whether you’re celebrating a special milestone or simply looking for a simple recipe to brighten an ordinary day, these cookie bars fit the bill perfectly. They’re a stress-free dessert option that consistently delivers on flavor and satisfaction, ensuring everyone leaves with a smile. Consider making them for your next gathering, or perhaps try our Snickerdoodle Cobbler for another fantastic dessert.
Understanding the Nutrition Details
Calories Per Serving
When indulging in these delightful Oreo brownie cookies, it’s helpful to have a general understanding of their nutritional content. While exact figures can vary based on specific ingredients and portion sizes, these homemade treats are typically calorie-dense, reflecting their rich butter, sugar, and chocolate content. A standard 2×2 inch serving of a brownie cookie can range from approximately 250 to 350 calories. This makes them a satisfying dessert idea to enjoy in moderation. Those looking to manage calorie intake might opt for smaller servings, transforming them into delicious snacks that can still be part of a balanced diet. Factors like the type of chocolate used, the amount of butter, and the number of Oreo chunks will influence the final calorie count. Knowing this can help you plan your treat enjoyment, ensuring you savor every bite of these sweet squares without guilt. For specific dietary needs, online calorie calculators can provide a more precise breakdown.
Sugar and Fat Content
Given the nature of a brownie cookie recipe, these tasty treats are also notably rich in sugar and fat. The primary sources of sugar come from granulated sugar, brown sugar, and the sugar content within the Oreo cookies themselves, contributing to both the flavor and the moist texture. A single serving could contain anywhere from 25 to 40 grams of sugar. Fat content is primarily derived from the butter, eggs, and the fat within the Oreo cream filling. Each serving might have between 15 to 25 grams of fat, including saturated fats. While these figures highlight that Oreo brownie cookies are an indulgence, they are also a source of pure chocolate delight and happiness. Understanding these details allows you to make informed choices about portion sizes and frequency of enjoyment. For healthier options, you might explore other dessert recipes with different nutritional profiles, but for a true crowd pleaser and a decadent treat, these brownie cookies hit the mark perfectly. For more information about the nutritional values of common foods, you can refer to Wikipedia’s nutrition facts label article.
Final Tips for Amazing Oreo Brownie Cookies
Adjust Baking Time as Needed
The journey to amazing Oreo brownie cookies culminates with a few final, crucial tips that will ensure your homemade treats are nothing short of perfect. Firstly, always remember that oven temperatures can vary significantly. Even if your oven is set to 350°F, its actual internal temperature might be slightly off. Therefore, treat the recommended baking time of 25-30 minutes as a guideline rather than a strict rule. Start checking your brownie cookies around the 22-minute mark. Look for edges that are set and a slightly firm top, but remember that the center should still be a bit gooey. A toothpick inserted into the center should come out with moist crumbs, not wet batter. If it comes out completely clean, your cookies might be overbaked and less fudgy. Learning your oven’s quirks and adjusting the baking time by a few minutes shorter or longer can make all the difference between a good brownie cookie and an absolutely incredible chocolate delight. This flexibility is a key aspect of any successful recipe guide.