Maltesers Rocky Road is a delightful no-bake dessert that brings joy with minimal effort. This sweet treat combines crispy Maltesers, crunchy biscuits, and rich chocolate for an irresistible texture and flavor. It’s perfect for a quick indulgence or sharing with friends and family. Enjoy this simple recipe today.
Key Takeaways
- This Maltesers Rocky Road recipe is incredibly easy and requires no baking.
- It offers a perfect blend of sweet chocolate, crunchy biscuits, and airy Maltesers.
- The recipe is highly customizable with various additions like different candies or nuts.
- Proper chilling ensures perfect squares and a firm, delicious texture.
- It’s an ideal quick dessert for parties, family treats, or a simple craving.
Rocky road is a classic confection. It offers delightful texture contrasts. Sweet and crunchy, it pleases all. A truly simple dessert. Everyone loves making it.
Gathering Essential Items
Before you dive into the delicious world of Maltesers Rocky Road, ensuring you have all the necessary kitchen items at hand will make the process smooth and enjoyable. You’ll need a large mixing bowl, sturdy enough to handle all your ingredients, and a heatproof bowl that fits snugly over a saucepan for melting chocolate. A silicone spatula or wooden spoon will be perfect for gentle mixing, ensuring all components are well combined without crushing the delicate Maltesers or biscuits too much. For shaping, a square or rectangular baking tin (approximately 20x20cm or 8×8 inches) lined with baking parchment is crucial. The parchment paper isn’t just for easy removal; it also helps in lifting the set rocky road out of the tin for clean slicing. Having these basic tools ready means less fumbling and more fun, allowing you to focus on the creative joy of making this sweet treat. Think of it as setting the stage for a culinary performance – simple yet effective tools for a delightful outcome.
Choosing Your Chocolate
The type of chocolate you select is pivotal to the flavor profile of your Maltesers Rocky Road. While milk chocolate is a popular choice for its sweetness and creamy texture, a blend of milk and dark chocolate can add a sophisticated depth that balances the overall sweetness. For those who prefer a richer taste, opting for a higher percentage of dark chocolate will introduce a lovely bitterness that complements the other sugary elements. White chocolate can also be used, either as the primary chocolate or as a drizzle for an extra visual and taste dimension, but be aware it melts differently and can be sweeter. When choosing, look for good quality couverture chocolate or baking chocolate chips, as these melt more smoothly and consistently than standard eating bars. Avoid compound chocolate if possible, as it lacks the rich flavor and smooth melt of true chocolate, which can impact the final texture of your rocky road. Experimenting with different chocolate types is part of the fun in customizing your no-bake dessert. For more information on the history and types of this beloved ingredient, you can read about chocolate on Wikipedia.
Ingredients for Your Maltesers Rocky Road
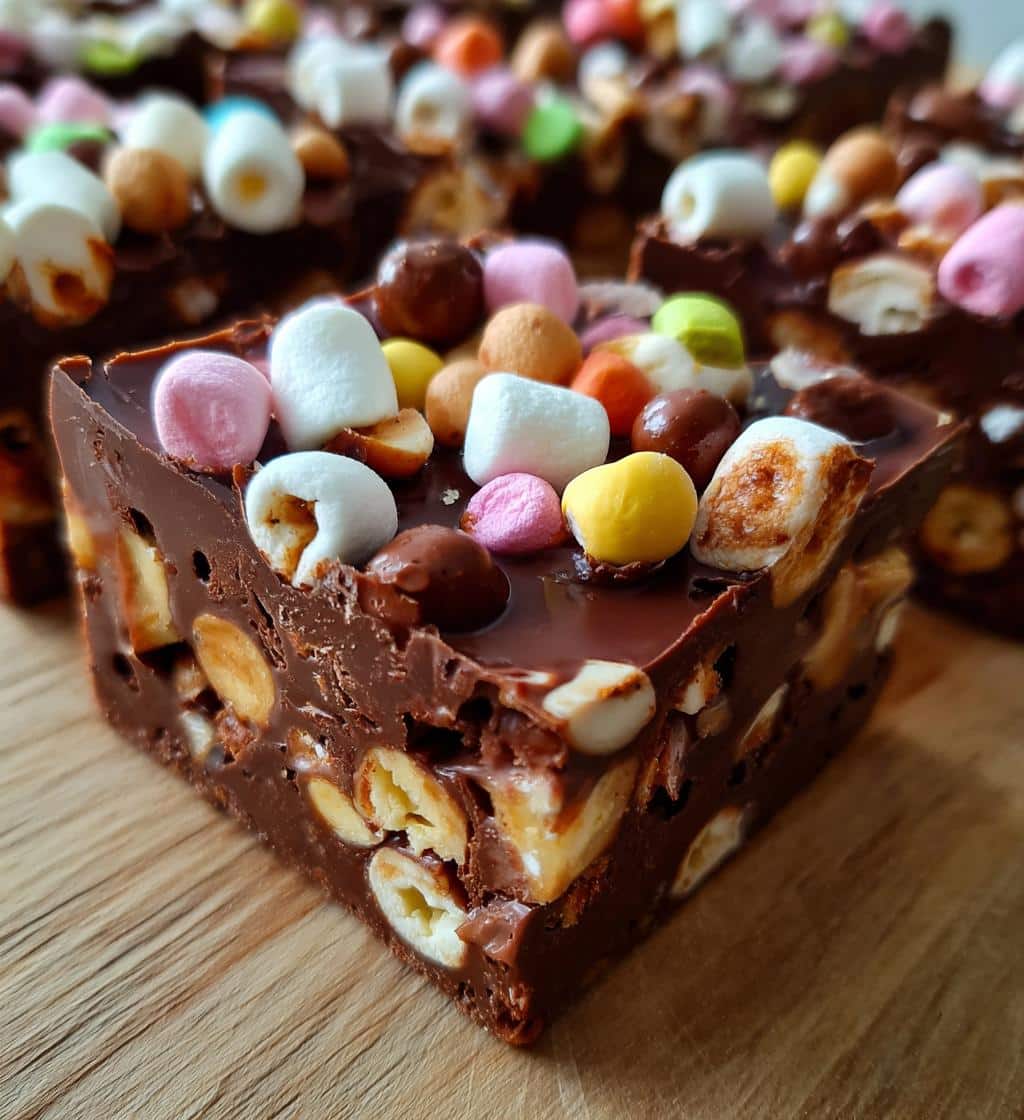
Creating this tempting Maltesers Rocky Road requires a handful of simple ingredients, each playing a crucial role in achieving the perfect balance of flavor and texture. At its heart, you’ll need a generous amount of your chosen chocolate, which forms the luscious binding agent. Digestive biscuits are typically used for their mild flavor and satisfying crunch, providing a wonderful contrast to the smooth chocolate. Of course, Maltesers are the star of the show, offering their unique airy, malty crunch that makes this recipe so distinctive. A touch of butter or coconut oil is essential for melting the chocolate smoothly and adding richness. Marshmallows, often mini ones, contribute a soft chewiness and a pop of color, making each bite an interesting mix of textures. Sometimes, a spoonful of golden syrup or a similar liquid sweetener is added to enhance the melt and give a slight chew, helping to hold everything together even better. Always ensure your ingredients are fresh for the best results, especially the Maltesers, which should be crisp and intact. This simple list of components transforms into a truly decadent treat with minimal effort.
Dark Chocolate and Butter Basics
The foundation of a great rocky road lies in its chocolate base, and the combination of dark chocolate with butter is key to achieving a rich, glossy, and perfectly set mixture. Dark chocolate, with its intense cocoa flavor, provides a wonderful counterpoint to the sweetness of Maltesers and marshmallows, creating a more balanced and less cloying treat. When melting, a good quality unsalted butter is incorporated to lend a smooth, luxurious texture to the chocolate, making it easier to mix with the other ingredients and ensuring a consistent set. The fat from the butter also helps prevent the chocolate from seizing and gives it a beautiful sheen once cooled. It’s important to use a gentle heat when melting this duo, either over a bain-marie (double boiler) or in a microwave on short bursts, stirring frequently to prevent burning. The goal is a uniform, liquid chocolate mixture that is warm enough to coat everything, but not so hot that it melts the marshmallows instantly. This basic blend creates the perfect sticky, sweet canvas for your rocky road masterpiece.
Crushing Biscuits Made Easy
Crushing biscuits for your Maltesers Rocky Road should be an enjoyable, stress-free step that yields the perfect texture. The goal is a mix of fine crumbs and larger, discernible chunks to provide interesting textural variety in every bite. There are a few easy ways to achieve this. The simplest method involves placing your digestive biscuits into a sturdy, sealable plastic bag. Using a rolling pin, gently bash and roll over the bag until the biscuits break down to your desired consistency. Avoid over-crushing to a fine powder; those varying sizes are what give rocky road its charm. Alternatively, if you have a food processor, you can pulse the biscuits a few times. Be careful not to process them too long, as you want texture, not flour. Another old-school technique is to use a pestle and mortar, which gives you precise control over the crumb size, though it’s more labor-intensive for a larger batch. Whatever method you choose, ensure the biscuits are crushed before you start melting your chocolate, so they’re ready to be folded into the mixture without delay. For more on the history of these popular baked goods, check out the Biscuit page on Wikipedia.
Simple Steps to Make Rocky Road
Making Maltesers Rocky Road is a straightforward process that’s perfect for beginner bakers or anyone looking for a quick and satisfying dessert. The simplicity of this no-bake recipe lies in its minimal steps and the joy of combining delicious ingredients. Once your ingredients are prepped, the main work involves melting chocolate, mixing, and chilling. First, prepare your tin by lining it with baking parchment. Then, gather your crushed biscuits, whole Maltesers, and mini marshmallows in a large mixing bowl, ready for the chocolate. The next crucial step is creating the luscious chocolate base, ensuring it’s perfectly melted and smooth. After the chocolate is ready, you’ll gently fold in the dry ingredients, coating them evenly. Finally, transfer the mixture to your prepared tin and allow it to set in the refrigerator until firm. This recipe proves that you don’t need an oven or complex techniques to create an impressive and utterly delightful treat that everyone will love.
Melting Chocolate and Butter
The key to a smooth and glossy Maltesers Rocky Road starts with properly melting your chocolate and butter. This process needs to be done carefully to prevent the chocolate from seizing or burning. The most recommended method is using a double boiler, or bain-marie. Place your heatproof bowl containing the chopped chocolate and butter over a saucepan of simmering water, ensuring the bottom of the bowl does not touch the water. The steam will gently melt the chocolate, allowing it to become a uniform, liquid consistency. Stir occasionally with a spatula until completely smooth. If you’re using a microwave, melt in short bursts (15-30 seconds), stirring well after each interval to prevent overheating. Chocolate retains its shape even when melted, so stirring is crucial to gauge its true consistency. Once melted, remove it from the heat immediately. A perfectly melted chocolate mixture will be shiny and pourable, ready to envelop your crunchy and chewy ingredients, forming the rich foundation of your rocky road.
Mixing Everything Gently
Once your chocolate and butter mixture is perfectly melted and smooth, the next step is to combine it with the dry ingredients – crushed biscuits, Maltesers, and marshmallows. This stage requires a gentle touch to ensure everything is evenly coated without crushing the Maltesers or making the marshmallows disappear. Pour the warm chocolate mixture over the prepared dry ingredients in your large mixing bowl. Using a silicone spatula or a wooden spoon, fold the ingredients together carefully. Start by folding from the bottom up, ensuring the chocolate reaches every piece of biscuit and marshmallow. The goal is to achieve a consistent coating, where no dry patches remain, but the individual textures of each component are still discernible. This gentle mixing technique also helps to maintain the airy crunch of the Maltesers and the soft chew of the marshmallows. Avoid vigorous stirring, which can break down the biscuits too much or deflate the Maltesers. Take your time with this step; it ensures every bite of your Maltesers Rocky Road will be a delightful combination of flavors and textures.
No-Bake Fun with Rocky Road
The beauty of Maltesers Rocky Road lies in its delightful simplicity and the sheer joy of creating a delicious dessert without ever needing to turn on an oven. This “no-bake” characteristic makes it an incredibly appealing option for everyone, from busy parents looking for a quick treat to aspiring young chefs eager to experiment in the kitchen. It’s perfect for warm days when you want to avoid heating up your home, or for those times when you simply don’t have access to baking equipment. The process involves minimal cooking – just melting chocolate – making it virtually foolproof. The fun extends beyond its preparation; the ability to customize with different candies, nuts, or dried fruits offers endless creative possibilities, transforming a simple recipe into a personalized masterpiece. This hands-on, no-fuss approach makes rocky road an ideal activity for kids, allowing them to participate in the mixing and decorating, fostering a love for cooking without the complexities of baking. It’s a truly satisfying and enjoyable culinary experience from start to finish.
Chill Time for Perfect Squares
After all the delightful mixing, the most crucial step for achieving perfectly sliceable Maltesers Rocky Road squares is adequate chill time. This period in the refrigerator allows the chocolate base to firm up completely, binding all the delicious components together into a cohesive block. Without sufficient chilling, your rocky road will be soft, messy, and difficult to cut into neat portions, potentially falling apart as you try to serve it. The minimum recommended chill time is usually 2 to 3 hours, but for best results and a really firm set, leaving it in the refrigerator for at least 4 hours or even overnight is ideal. During this time, the fats in the chocolate and butter solidify, and the flavors also have a chance to meld and deepen, enhancing the overall taste experience. Resist the temptation to rush this step by placing it in the freezer, as extremely rapid chilling can sometimes cause the chocolate to bloom (form white streaks), affecting its appearance. Patience here truly pays off with a superior texture and presentation.
Setting It Just Right
Achieving the perfect set for your Maltesers Rocky Road is essential for both texture and presentation. The goal is a firm yet not rock-hard slab that can be easily sliced into individual pieces. To ensure optimal setting, make sure your chocolate mixture is evenly spread in the prepared tin, gently pressing it down with the back of a spoon or spatula to eliminate any large air pockets and create a compact base. Once in the refrigerator, place it on a flat surface to prevent any uneven settling. The temperature of your fridge plays a role; a consistent cold environment is best. You’ll know it’s set just right when the surface is completely firm to the touch and the block feels solid when you gently try to lift it from the tin using the parchment paper. If you notice any softness, simply return it to the fridge for more time. A perfectly set rocky road will give you clean cuts, revealing a beautiful cross-section of Maltesers, biscuits, and marshmallows, making it as visually appealing as it is delicious.
Serving Your Delicious Maltesers Rocky Road
Once your Maltesers Rocky Road has had its full chill time and is perfectly set, it’s ready to be served and enjoyed! Carefully lift the entire block out of the tin using the baking parchment. Place it on a clean cutting board. For clean, neat squares, use a sharp, warm knife. You can achieve this by dipping the knife in hot water and wiping it dry between each cut. This technique helps prevent the chocolate from cracking and ensures smooth edges. Cut the rocky road into your desired portion sizes – from small bite-sized pieces for a party platter to larger squares for a more indulgent treat. Arrange the pieces artfully on a serving dish, perhaps dusted with a light sprinkle of cocoa powder or icing sugar for an elegant touch. This treat is fantastic on its own, but it also pairs wonderfully with a cup of coffee or as part of a dessert buffet. The delightful combination of textures and flavors makes it a crowd-pleaser for any occasion, from casual gatherings to special celebrations. Share your sweet creations with the world on social media, like our Instagram page!
Why This Treat Will Delight You
Maltesers Rocky Road is more than just a dessert; it’s a delightful experience that promises satisfaction with every bite. The reasons for its widespread appeal are numerous, stemming from its irresistible blend of textures and flavors. Imagine the crisp, malty crunch of Maltesers, the satisfying snap of rich chocolate, the chewy give of marshmallows, and the subtle crunch of biscuits – all harmonizing in one glorious mouthful. This treat offers a perfect balance of sweetness without being overly cloying, making it appealing to a broad range of palates. It’s also incredibly versatile, easily adapted to various dietary preferences or flavor combinations, ensuring there’s a rocky road for everyone. Beyond the taste, the sheer simplicity of its preparation adds to its charm, providing a sense of accomplishment for even the most novice of cooks. It’s a joyful, fuss-free confection that consistently delivers happiness and a moment of pure, sweet indulgence.
Quick Preparation Time
One of the most compelling reasons to fall in love with Maltesers Rocky Road is its remarkably quick preparation time. Unlike traditional baked desserts that often require extensive mixing, proofing, and oven time, this no-bake wonder comes together in a flash. The active preparation, involving melting chocolate and mixing ingredients, typically takes no more than 15-20 minutes. This speed makes it an ideal choice for impromptu gatherings, last-minute cravings, or when you simply don’t have much time but still want to create something special. The majority of the waiting period is hands-off chilling time, allowing you to focus on other tasks or simply relax. This efficiency means you can have a decadent, homemade sweet treat ready to impress in a fraction of the time it would take for many other desserts, making it a truly rewarding and time-saving option for any sweet tooth.
No Oven Needed
The “no oven needed” aspect of Maltesers Rocky Road is a huge draw, contributing significantly to its ease and widespread appeal. This feature eliminates the need for preheating, baking, and the constant vigilance often required for oven-cooked recipes. It’s a fantastic advantage, particularly during hot weather when turning on the oven is the last thing you want to do, or in situations where an oven isn’t readily available, like in dorm rooms or while camping. The simplicity of requiring only a stovetop or microwave for melting the chocolate makes this recipe accessible to a broader audience, including those new to cooking or without extensive kitchen equipment. It transforms dessert making into a relaxed, stress-free activity, focusing on assembly and chilling rather than precise baking temperatures and timings. This freedom from the oven truly underlines the effortless charm and convenience of making a delicious rocky road.
Customize Your Rocky Road Delights
One of the most exciting aspects of Maltesers Rocky Road is its incredible adaptability and the endless possibilities for customization. While the classic combination of Maltesers, biscuits, and marshmallows is superb, don’t hesitate to experiment with different additions to create your unique version. Think beyond the basic ingredients and consider what other textures and flavors you love. You can introduce various nuts for an extra crunch and healthy fats, such as chopped peanuts, almonds, or pistachios. Dried fruits like cranberries, raisins, or chopped apricots can add a lovely chewiness and a touch of tangy sweetness, complementing the rich chocolate beautifully. For an adult twist, a splash of liqueur like Baileys or Kahlúa can be stirred into the melted chocolate for a sophisticated flavor. The beauty of customization is that it allows you to cater to personal preferences or specific occasions, making each batch a distinctive culinary creation. This freedom ensures your rocky road is always fresh and exciting, much like exploring other dessert options such as Peanut Butter Brownie Swirl Cookies.
Adding Different Candies
Beyond traditional additions, incorporating various candies is a fantastic way to elevate your Maltesers Rocky Road and make it truly unique. Consider what complementary flavors and textures would work well with the chocolate and Maltesers. For a playful, colorful touch, mini M&M’s or chopped chocolate bars can be folded in, adding bursts of color and extra chocolatey goodness. If you’re a fan of something chewy, chopped caramels or nougat can provide a delightful, soft counterpoint to the crispy Maltesers and biscuits. For a hint of saltiness to balance the sweetness, pretzels or chopped salted caramel pieces are excellent choices. Peanut butter cups, either mini or chopped, can introduce a rich, nutty flavor that pairs wonderfully with chocolate. The key is to choose candies that won’t melt completely into the warm chocolate but will retain their shape and texture once set. This allows for delightful surprises in every bite, transforming your rocky road into a personalized candy medley that’s sure to impress.
Storing Your Maltesers Rocky Road Fresh
To keep your Maltesers Rocky Road tasting its best, proper storage is essential. Once cut into squares, transfer the pieces to an airtight container. This will protect them from drying out, absorbing odors from other foods in the refrigerator, and maintaining their texture. Store the container in the refrigerator; the cool temperature helps the chocolate stay firm and prevents the rocky road from becoming soft or sticky, especially in warmer climates. When stored correctly, your Maltesers Rocky Road can stay fresh and delicious for up to one week. If you’ve added any ingredients that might spoil faster, like fresh fruit, consume it sooner. Before serving, you can take it out of the fridge a few minutes beforehand to allow it to come slightly closer to room temperature, which can enhance the chocolate’s flavor and make the pieces a little softer to bite into. This careful storage ensures that every piece remains as enjoyable as the first, making it a perfect make-ahead treat for any occasion. For more sweet ideas and inspiration, visit our Pinterest page, where you’ll find plenty of dessert recipes to try.
Keeping It Good Longer
If you’ve made a large batch of Maltesers Rocky Road or simply want to enjoy it over an extended period, freezing is a fantastic option for longer preservation. To freeze, first ensure the rocky road is fully set and cut into individual portions. Wrap each piece tightly in plastic wrap, then place the wrapped pieces in a freezer-safe airtight container or heavy-duty freezer bag. This double layer of protection helps prevent freezer burn and maintains the quality of the rocky road. When properly frozen, it can last for up to 2-3 months without a significant loss in flavor or texture. To enjoy, simply remove the desired number of pieces from the freezer and let them thaw in the refrigerator overnight, or at room temperature for about an hour. Thawing gradually helps maintain the texture and prevents any condensation from forming too quickly. This method is ideal for meal prepping desserts or ensuring you always have a delicious sweet treat on hand whenever a craving strikes.
Quick Recipe Notes and Tips
For an even smoother and more enjoyable Maltesers Rocky Road experience, here are a few quick tips to keep in mind. Always use good quality ingredients; better chocolate makes a noticeable difference. When melting chocolate, patience is key – gentle heat prevents burning and seizing. If your mixture feels too thick, a tiny bit of neutral oil (like vegetable or coconut oil) can help thin it slightly, but use sparingly. For an extra indulgent touch, you can drizzle melted white chocolate over the top once the rocky road has slightly set in the tin, creating an attractive swirl effect. To intensify the flavor, a pinch of sea salt can be added to the melted chocolate, which helps to cut through the sweetness and highlight the cocoa notes. Don’t be afraid to experiment with different biscuit types or even a mix of biscuits for varying textures. These small adjustments can elevate your rocky road from good to truly exceptional, making it a memorable dessert.
Gluten-Free Options
Making your Maltesers Rocky Road suitable for gluten-free diets is incredibly simple, ensuring everyone can enjoy this delightful treat. The main ingredient that typically contains gluten is the biscuit. Fortunately, there are many excellent gluten-free digestive biscuits available in most supermarkets. Simply swap out the regular digestives for a gluten-free alternative, and you’re good to go. Most other ingredients like chocolate, Maltesers (check label for certification, though many are naturally gluten-free), marshmallows, and butter are usually gluten-free, but it’s always wise to double-check the labels for hidden gluten or cross-contamination warnings, especially for the Maltesers. By making this simple substitution, you can create a safe and equally delicious rocky road that caters to dietary needs without compromising on flavor or texture. It’s a small change that makes a big difference, allowing more people to partake in the joy of this easy, no-bake dessert.
Clean Cutting Secrets
Achieving perfectly clean and neat squares of Maltesers Rocky Road can sometimes be a challenge, but with a few secrets, you can make every slice picture-perfect. Firstly, ensure your rocky road is thoroughly chilled and completely firm before attempting to cut it. A semi-set slab will lead to messy, crumbly edges. The most effective trick is to use a very sharp, long knife. For truly pristine cuts, heat your knife under hot running water for a few seconds, then wipe it completely dry. The warm blade will glide through the chocolate smoothly, creating a clean edge. Repeat this heating and drying process for each cut. Cutting in one decisive motion, rather than sawing back and forth, also helps. If the rocky road is sticking to the knife, clean it off periodically. For extra precision, you can score the top first to mark your lines before making the full cuts. These simple yet effective techniques will ensure your rocky road squares are beautifully presented, ready to impress.
Nutrition Facts for Rocky Road
While Maltesers Rocky Road is undoubtedly a delicious treat, it’s also important to have a general understanding of its nutritional aspects, especially when considering portion sizes. As a dessert rich in chocolate, biscuits, and marshmallows, it is naturally calorie-dense and contains a significant amount of sugar and fat. The exact nutritional values will vary widely depending on the type of chocolate used (milk vs. dark), the specific biscuits, and any additional ingredients like nuts or other candies. For instance, using higher cocoa content dark chocolate might slightly reduce sugar while increasing antioxidant content, whereas adding more marshmallows or extra toppings will increase sugar and calorie counts. It’s best to enjoy rocky road in moderation as part of a balanced diet. Homemade versions allow for some control over ingredients, potentially opting for lower-sugar marshmallows or whole-grain biscuits if desired. For context on how this indulgent treat fits into a broader culinary landscape, consider other sweet options like a Quick Italian Cream Cake, which offers a different nutritional profile.
Understanding Each Serving
Understanding each serving of your Maltesers Rocky Road helps in mindful indulgence. Given its richness, a standard serving size is typically a small square, roughly 1-2 inches (2.5-5 cm) per side. This portion control allows you to savor the deliciousness without overdoing it. Each serving will contribute to your daily intake of carbohydrates, fats, and sugars. The specific calorie count can range from 150-300 calories per square, depending on its size and the ingredient ratio. While rocky road provides a quick energy boost, it is primarily a treat and not a significant source of essential vitamins or minerals, apart from potentially some iron from dark chocolate. If you’re managing dietary restrictions or health goals, being aware of these general nutritional figures can help you enjoy your rocky road responsibly. Remember, homemade treats offer the flexibility to adjust ingredient quantities to better suit your preferences or dietary needs, making your sweet indulgence a more informed one.
Frequently Asked Rocky Road Questions
As a popular and versatile dessert, Maltesers Rocky Road often sparks a few common questions. Understanding these can help you troubleshoot issues, explore variations, and generally get the most out of your rocky road making and eating experience. People often wonder about ingredient substitutions, storage longevity, or how to achieve a perfect texture every time. For instance, concerns about chocolate seizing during melting, or how to prevent marshmallows from melting too much, are frequent queries. Another common question revolves around customization – what other ingredients can be safely added? Addressing these questions provides clarity and confidence, empowering you to become a rocky road master. Whether you’re a first-timer or a seasoned dessert maker, these insights ensure your journey into creating this delightful sweet treat is smooth and successful, much like trying out another enjoyable dessert such as Funnel Cake Bites.
Can I Freeze It?
Yes, absolutely! Freezing Maltesers Rocky Road is an excellent way to extend its shelf life and ensure you always have a sweet treat ready for any occasion. As detailed in the “Keeping It Good Longer” section, the process involves wrapping individual, thoroughly chilled pieces tightly in plastic wrap and then storing them in an airtight freezer-safe container or bag. This method helps prevent freezer burn and maintains the rocky road’s texture and flavor for up to 2-3 months. When you’re ready to enjoy, simply transfer the desired number of pieces from the freezer to the refrigerator to thaw overnight, or let them sit at room temperature for about an hour. Freezing is particularly useful if you’ve made a large batch for a party or if you want to prepare gifts in advance. It’s a convenient and effective storage solution that allows you to savor your delicious rocky road whenever a craving strikes.