The Volcano Roll is a popular sushi creation, known for its vibrant flavors and satisfying texture. Making this spicy tuna sushi at home can be a rewarding experience, allowing you to control ingredients and customize taste. This recipe guides you through each stage, from preparing sushi rice to assembling your beautiful rolls.
Key Takeaways
- Learn to prepare perfect sushi rice and assemble your Volcano Roll.
- Understand the essential ingredients and tools required for homemade sushi.
- Discover tips for rolling sushi tightly and slicing it beautifully.
- Gain insights into customizing spice levels and serving suggestions.
Homemade sushi offers fresh flavors. It’s a fun culinary adventure. You control the quality. Create delicious rolls easily. Enjoy a restaurant favorite at home.
Master the Volcano Roll at Home
Crafting a Volcano Roll in your own kitchen is a fantastic way to impress guests or simply enjoy a fresh, customized meal. This guide will take you through every crucial step, ensuring your sushi-making journey is both successful and enjoyable. From the very first grain of rice to the final drizzle of sauce, you’ll gain the confidence to create delicious sushi that rivals your favorite restaurant.
Why Make Sushi Yourself?
Making sushi at home offers numerous benefits beyond just saving money. You gain complete control over the quality and freshness of your ingredients, which is paramount for raw fish dishes. It’s also a deeply satisfying culinary art form that allows for endless creativity in fillings and flavors. Plus, the process itself can be a mindful and enjoyable activity, turning meal preparation into a delightful experience. Knowing exactly what goes into your food is incredibly reassuring, especially when aiming for healthy and fresh dining options. You might even find yourself inspired to try other main course recipes once you’ve mastered sushi!
Your 7 Steps to Success
To ensure a smooth sushi-making process, we’ve broken it down into seven manageable steps. Following these stages diligently will help you achieve a perfectly constructed and flavorful Volcano Roll:
- Prepare and season the sushi rice.
- Gather and prepare all your fresh ingredients.
- Set up your rolling station with a bamboo mat and nori.
- Layer the rice and fillings on the nori sheet.
- Carefully roll the sushi tightly using the bamboo mat.
- Slice the rolled sushi into individual pieces.
- Garnish with sauces and serve immediately for the best taste.
Each step is designed to build on the last, ensuring a cohesive and delicious outcome. Pay close attention to the details, especially when handling the rice and raw fish, to ensure both safety and optimal flavor.
Gather Ingredients for Your Sushi
The success of any sushi recipe, especially the Volcano Roll, hinges on the quality and freshness of its ingredients. Investing in good quality components will significantly elevate the taste and texture of your homemade sushi. This section details everything you’ll need, from the foundational rice to the flavorful sauces and fillings, ensuring you’re well-prepared before you even begin the rolling process.
Rice and Vinegar Mix
The foundation of any great sushi roll is the rice. You’ll need high-quality short-grain sushi rice, which is sticky enough to hold its shape. Along with the rice, a traditional sushi vinegar mix is crucial. This typically consists of rice vinegar, sugar, and salt, creating the distinct sweet and tangy flavor profile of sushi rice. For approximately two cups of uncooked rice, you’ll generally need about 1/4 cup of sushi vinegar mix. This mixture not only flavors the rice but also helps preserve it and gives it that characteristic sheen. Proper seasoning of the rice is non-negotiable for authentic tasting sushi.
Tuna and Avocado Fillings
For the Volcano Roll, the primary filling components are fresh tuna and creamy avocado. For the tuna, choose sushi-grade tuna, such as Ahi or Yellowfin, ensuring it is incredibly fresh and suitable for raw consumption. Dice the tuna into small, uniform pieces. The “spicy” element often comes from mixing the tuna with a touch of mayonnaise and a generous amount of sriracha or other chili sauce. Aim for a consistency that is easy to spread but still retains some texture. Avocado should be ripe but firm, sliced into thin, even strips. You might also consider adding cucumber strips for a refreshing crunch.
Essential Sauces and Nori
Beyond the core fillings, several other ingredients are vital. Nori, the dried seaweed wrappers, is indispensable. Opt for high-quality, fresh nori sheets that are crisp and dark green. For serving, eel sauce (unagi sauce) is often drizzled over Volcano Rolls, offering a sweet and savory glaze. Additionally, spicy mayo, made by combining mayonnaise and sriracha, is frequently used as a topping or for mixing with the tuna. Don’t forget soy sauce for dipping and pickled ginger and wasabi for serving alongside your sushi. For another delightful recipe that uses rice, consider making easy street corn chicken rice bowls.
Essential Tools for Making Sushi
While the art of sushi making can seem complex, having the right tools makes the process significantly easier and more enjoyable. You don’t need a professional kitchen setup, but a few key items will ensure your rolls are perfectly formed and your experience is smooth. These tools are often affordable and can be reused for countless sushi-making sessions, making them a worthwhile investment for any aspiring sushi chef at home. Think of them as extensions of your hands, helping you achieve precision and consistency with every roll.
Don’t Forget the Mat
The most crucial tool for rolling sushi is undoubtedly the bamboo sushi mat, also known as a makisu. This flexible mat allows you to apply even pressure across the entire roll, helping you create a tight, uniform cylinder. Without it, achieving a neatly rolled sushi is nearly impossible. To prevent rice from sticking to the bamboo, it’s highly recommended to cover your mat with plastic wrap. This also makes cleanup a breeze. In addition to the mat, you’ll want a very sharp knife for slicing the rolls – a dull knife can smash your sushi rather than cut it cleanly. A bowl of water mixed with a little rice vinegar (tezu) is also essential for dampening your hands, preventing the sticky rice from clinging to them. Lastly, a rice paddle or spoon is helpful for scooping and spreading the rice evenly. These simple tools, when used correctly, will significantly enhance your sushi-making prowess. For more culinary adventures, you can always visit Carina Recipes on Pinterest.
Perfecting Sushi Rice for Rolls
The quality of your sushi hinges largely on the perfection of its rice. Properly prepared sushi rice is plump, slightly sticky, and perfectly seasoned, providing the ideal foundation for your Volcano Roll. This isn’t just about cooking; it’s about a precise process that transforms ordinary rice into a sushi-ready staple. Mastering these steps will elevate your homemade sushi from good to truly exceptional, ensuring every bite has the right texture and flavor balance.
Rinsing Rice Properly
The first and often overlooked step is rinsing the rice. This is crucial for removing excess starch, which can make the rice overly sticky and gummy. Place your sushi rice in a large bowl and cover it with cold water. Swirl the rice with your hand, gently rubbing the grains. You’ll notice the water becoming cloudy. Drain the cloudy water and repeat the process several times until the water runs mostly clear. This usually takes 5-7 rinses. This step ensures that each grain of rice cooks separately and maintains its desired texture, creating a delightful mouthfeel in your finished roll.
Cooking Rice to Tenderness
After rinsing, drain the rice thoroughly and transfer it to a heavy-bottomed pot with a tight-fitting lid or a rice cooker. For every cup of rice, add 1.25 cups of cold water. Bring the water to a boil, then immediately reduce the heat to the lowest setting, cover, and simmer for about 15-20 minutes, or until all the water has been absorbed. Do not lift the lid during cooking! Once cooked, remove the pot from the heat and let it steam, still covered, for another 10-15 minutes. This steaming period allows the rice to fully cook through and become tender without drying out. You’ll have fluffy, perfectly cooked rice ready for seasoning.
Seasoning Rice for Flavor
Once the rice has steamed, gently transfer it to a large, non-metallic bowl or a wooden hangiri (sushi rice tub). The key now is to season it while it’s still warm. Slowly pour your sushi vinegar mix (rice vinegar, sugar, salt) over the rice. Using a rice paddle or a wooden spoon, gently fold and cut through the rice with a slicing motion, avoiding mashing. This helps distribute the seasoning evenly and cools the rice simultaneously. Continue this process for several minutes, fanning the rice as you mix (a small fan or even a piece of cardboard works). The fanning helps cool the rice quickly, giving it a glossy appearance and preventing it from becoming too sticky. Once cooled to room temperature, your perfectly seasoned sushi rice is ready for building your rolls. For those who enjoy combining savory flavors, consider trying southern-style collard green and potato stew.
Building Your Volcano Roll Layers
With your perfect sushi rice ready and all your fresh ingredients prepped, it’s time for the exciting part: assembling your Volcano Roll. This stage requires a gentle touch and an understanding of how to layer the components effectively to create a balanced and aesthetically pleasing roll. Precision here ensures that each slice of your finished sushi roll will hold together beautifully and offer a harmonious blend of flavors and textures.
Nori on Bamboo Mat
Begin by placing your bamboo sushi mat on a clean, dry surface. If you haven’t already, cover the mat with plastic wrap to prevent the rice from sticking and simplify cleanup. Lay one sheet of nori, shiny side down, on the plastic-covered bamboo mat. Position it closer to the edge nearest to you, leaving about an inch of the mat exposed at the top. This positioning provides enough leverage for rolling later. Ensure the nori lies flat and smooth, ready to receive its layers of rice and fillings.
Spreading Thin Rice Layer
Dampen your hands lightly with the tezu (vinegared water) to prevent the rice from sticking. Take a handful of prepared sushi rice – about 3/4 to 1 cup – and gently spread it evenly over the nori sheet. Start from the bottom edge and extend it almost to the top, leaving a 1/2-inch strip of bare nori at the far end. This bare strip will act as a seal for your roll. The key is to spread the rice in a thin, even layer, applying light pressure so as not to smash the grains. Avoid making the rice layer too thick, as this can make the roll difficult to close and overwhelm the other ingredients. A thin, consistent layer is crucial for a well-balanced sushi roll.
Adding Fillings to Center
Once your rice layer is spread, it’s time to add the delicious fillings. Arrange your spicy tuna mix in a neat line horizontally across the center of the rice, about 1-2 inches from the bottom edge of the nori. On top of or alongside the tuna, add your thinly sliced avocado strips. You can also include other ingredients like cucumber or tempura flakes at this stage if you desire. Don’t overfill the roll, as this will make it challenging to close tightly. A modest, balanced amount of fillings will ensure the roll maintains its structure and offers a satisfying bite without bursting open. This careful arrangement sets the stage for a perfect roll. For more recipe inspirations, explore our page on Instagram.
How to Roll Sushi Tightly
The rolling technique is arguably the most intimidating yet critical step in sushi making. A well-rolled sushi holds its shape, doesn’t fall apart when cut, and provides a delightful eating experience. It requires a bit of practice, but with patience and the right technique, you’ll be rolling like a pro in no time. The goal is to create a compact cylinder without squeezing the ingredients too much, maintaining a good balance of firmness and texture.
Using the Bamboo Mat
Once your rice and fillings are layered on the nori, grasp the edge of the bamboo mat closest to you, along with the nori and rice. Carefully lift and fold the mat over the fillings, bringing the bottom edge of the nori to meet the rice just beyond the fillings. Apply gentle but firm pressure to start forming the roll. As you roll forward, gently pull the mat back towards you a little to compress the roll, then continue rolling, lifting the mat as you go. This technique ensures that the roll remains tight and even throughout. Think of it as guiding the roll into shape, rather than just pushing it. A helpful resource for understanding sushi history and preparation can be found on Wikipedia.
Making a Firm Roll
After the initial fold, continue rolling the mat forward, using your fingers to keep the fillings tucked in tightly. Each time you roll forward, gently pull the mat away from the roll and adjust it if needed, then roll again. The bare strip of nori you left at the top should eventually meet the rolled portion, sealing the sushi. You can apply a tiny bit of water to this strip to help it adhere. Once fully rolled, give the mat a final squeeze around the entire roll to ensure it’s uniformly firm. This final compression helps solidify the shape and prevents the roll from disintegrating when sliced. A firm, cylindrical shape is the hallmark of a well-executed sushi roll, ready for slicing and enjoying.
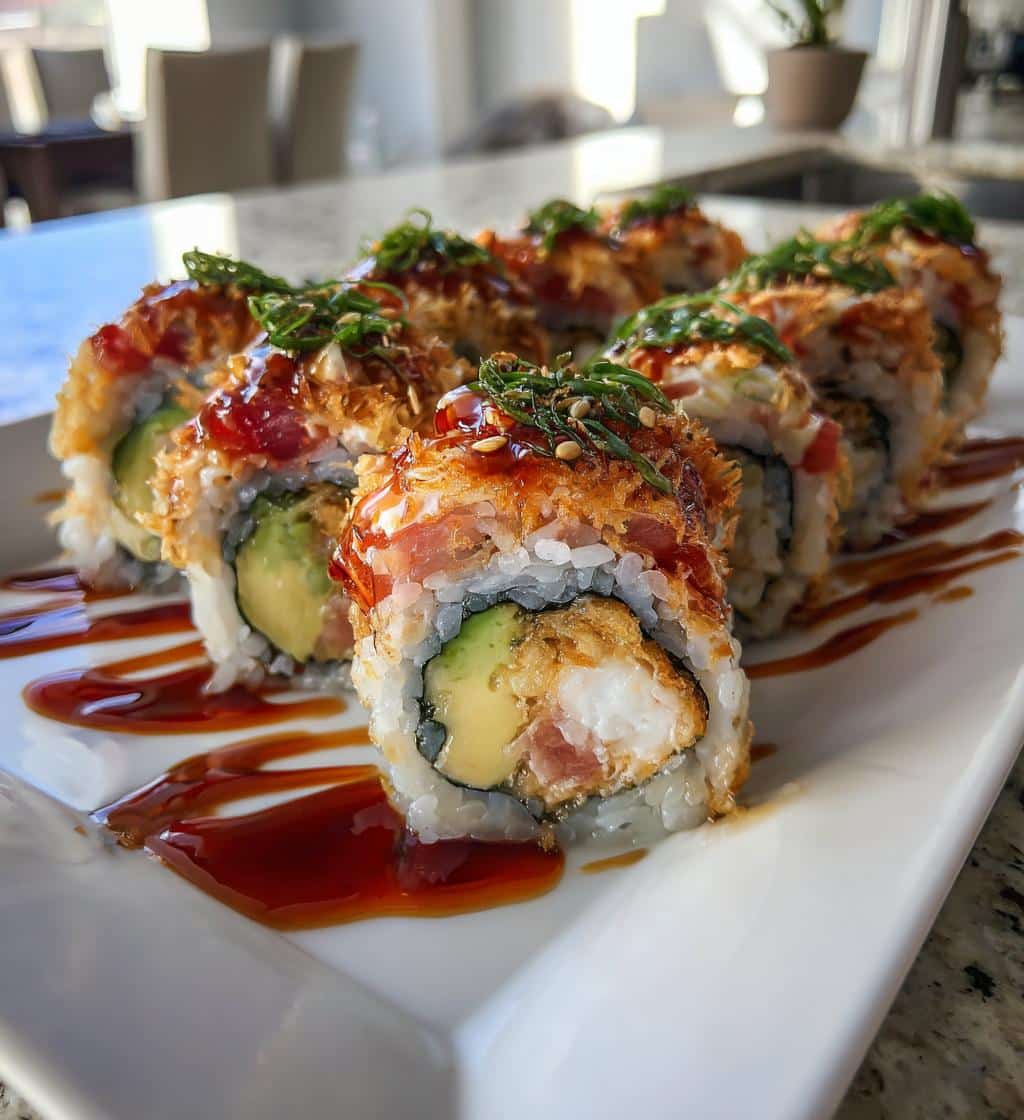
Slice and Serve Your Volcano Roll
After all your careful preparation and expert rolling, the final steps of slicing and serving are where your Volcano Roll truly comes to life. Presentation is key in sushi, and clean cuts along with a beautiful drizzle of sauce will make your homemade creation look as professional as it tastes. This stage transforms your long cylinder into individual, bite-sized pieces ready to be savored.
Cutting Roll into Pieces
For clean cuts, you’ll need a very sharp, damp knife. Dampen the blade with a little water or tezu before each cut to prevent the rice from sticking. Place the roll on a clean cutting board. Start by cutting the roll in half, then line up the two halves and cut them in half again, resulting in four roughly equal pieces. Finally, cut each of these four pieces in half to yield eight individual sushi pieces. This method helps maintain uniform size. Wipe your knife clean and re-dampen it between cuts if necessary. Precision here ensures that each piece is a perfect mouthful, showing off all the colorful layers within.
Drizzling with Eel Sauce
Arrange the cut sushi pieces artfully on a serving platter. The classic Volcano Roll is often finished with a generous drizzle of eel sauce (unagi sauce), which provides a sweet and savory counterpoint to the spicy tuna. You can also add a zigzag of spicy mayonnaise for extra flavor and visual appeal. This final flourish adds an extra layer of taste and makes the presentation truly stand out. Serve immediately to enjoy the freshest flavors and textures of your homemade sushi. This presentation makes the dish feel special, much like a carefully plated salmon spinach pasta dish.
Quick Times for Volcano Roll
Understanding the time commitment for any recipe helps you plan your cooking schedule effectively. While sushi might seem daunting, the actual hands-on time for a Volcano Roll is quite manageable, especially once you get the hang of it. These time estimates provide a general framework, allowing you to budget your kitchen efforts efficiently for a delicious outcome. Remember that practice can often reduce these times, making sushi a quicker weeknight option.
Prep Time: 30 Minutes
The 30-minute prep time covers all the pre-cooking activities. This includes rinsing and soaking the rice, dicing your sushi-grade tuna, slicing the avocado and any other vegetables, and preparing your sushi vinegar mix. Having all your ingredients prepped and ready (mise en place) before you start cooking the rice or rolling is key to a smooth and efficient sushi-making process. This time also accounts for covering your bamboo mat and setting up your workspace, ensuring everything is within easy reach when you begin assembling.
Cooking Time: 20 Minutes
The cooking time primarily refers to the actual rice cooking process. This involves bringing the rice and water to a boil, simmering, and then allowing it to steam off the heat. This 20-minute window focuses solely on the rice’s transformation into its tender, fluffy state. Once cooked, the rice will need additional time to cool and be seasoned, which is typically considered part of the rolling and assembly phase, not the active cooking time. For additional cooking insights, consider visiting the cooking page on Wikipedia.
Servings: Four People
This Volcano Roll recipe, using about two cups of uncooked sushi rice and proportionate fillings, typically yields enough for four people. This translates to roughly two to three full rolls, which when sliced, produce 16-24 pieces of sushi, depending on how thickly you cut them. This quantity makes it ideal for a family dinner, a small gathering with friends, or even for meal prepping if you enjoy sushi multiple times a week. Adjust ingredients accordingly if you wish to serve more or fewer people.
Volcano Roll: Nutrition Information
Understanding the nutritional profile of your homemade Volcano Roll can be beneficial, especially if you’re tracking your intake. While specific values can vary based on ingredient quantities and brands, we can outline general nutritional aspects. Sushi is often perceived as healthy, and while it offers many benefits, being mindful of certain components is always a good practice. This overview provides a typical approximation based on common ingredient ratios.
Calories and Macronutrients
A typical serving of Volcano Roll (around 6-8 pieces) might contain approximately 350-500 calories. This can vary significantly based on the amount of rice, the fattiness of the tuna, and the quantity of mayonnaise and sauces used. In terms of macronutrients, you can expect around 15-25g of protein, primarily from the tuna. Carbohydrates will be the most abundant macronutrient, ranging from 40-60g, mostly from the sushi rice. Fat content can be anywhere from 15-30g, contributed by avocado, tuna’s natural oils, and especially the mayonnaise-based spicy tuna mix and drizzles. These values highlight its role as a balanced meal, offering energy, protein, and healthy fats from the avocado.
Sodium and Cholesterol Details
Sodium content in a Volcano Roll can be a point of consideration due to ingredients like seasoned rice vinegar, soy sauce (if used for dipping), and sometimes additives in processed sauces. A serving might contain 400-800mg of sodium, so being mindful of additional soy sauce use is wise. Cholesterol levels are generally moderate, mainly coming from the tuna. A serving might contain around 30-50mg of cholesterol. For those concerned about these values, choosing low-sodium soy sauce, reducing the amount of mayonnaise in the tuna mix, and limiting extra drizzles can help manage the intake. Homemade versions allow you to control these elements far more easily than restaurant options.
Achieve Sushi Perfection at Home
Achieving sushi perfection isn’t just about following steps; it’s also about embracing certain principles that elevate your culinary results. By focusing on fundamental aspects like ingredient quality and personalizing the flavors, you can consistently produce Volcano Rolls that are both delicious and tailored to your preferences. These tips are designed to guide you beyond the basic recipe, helping you refine your technique and enhance your appreciation for sushi making.
Use Fresh Ingredients Always
The golden rule for sushi, especially when dealing with raw fish, is to always use the freshest ingredients possible. This applies not only to the sushi-grade tuna but also to the avocado, nori, and even the rice. Fresh tuna will have a vibrant color, a firm texture, and a clean ocean scent. Avocado should be perfectly ripe, offering a creamy texture without being mushy. High-quality nori will be crisp and have a deep green hue. Fresh ingredients not only taste better but are also safer, ensuring a pleasant and worry-free dining experience. This commitment to freshness will significantly impact the overall quality and flavor of your Volcano Roll.
Adjust Spice as You Wish
One of the great advantages of making sushi at home is the ability to customize the spice level to your liking. The “volcano” in Volcano Roll often refers to its spicy kick, typically from the tuna mix. You can easily adjust the amount of sriracha or other chili paste mixed with the tuna and mayonnaise. For a milder roll, use less; for a fiery experience, be more generous. You can also experiment with different types of hot sauces or add a pinch of cayenne pepper. Don’t be afraid to taste and adjust the tuna mixture before rolling to find your perfect balance of heat. Personalizing the spice ensures every bite is exactly how you love it.
Serving Suggestions for Your Roll
While the Volcano Roll is a standalone masterpiece, enhancing its enjoyment with complementary accompaniments can elevate the entire dining experience. Traditional sushi pairings not only add layers of flavor but also cleanse the palate between bites, allowing you to fully appreciate the intricate tastes of your homemade creation. These suggestions are simple yet effective ways to complete your sushi meal.
Pairing with Soy Sauce
Soy sauce is the quintessential condiment for sushi. While the Volcano Roll has its own rich flavors, a light dip in soy sauce can add an extra layer of umami and saltiness. Pour a small amount into a shallow dish, and gently dip only the fish side of your sushi piece. Avoid drenching the rice, as it can absorb too much soy sauce and become overly salty or cause the roll to fall apart. For those mindful of sodium, opt for low-sodium soy sauce. Some people also enjoy mixing a tiny bit of wasabi directly into their soy sauce for an extra kick. This classic pairing enhances, rather than overwhelms, the roll’s inherent taste.
Adding Pickled Ginger
Pickled ginger, or gari, is another traditional accompaniment that serves a vital role. Its slightly sweet, tangy, and pungent flavor acts as a palate cleanser between different types of sushi pieces or between bites of the same roll. It refreshes your taste buds, preparing them for the next delicious mouthful. Place a small piece of pickled ginger on your plate and eat it between your sushi pieces. Its crisp texture and zesty flavor provide a wonderful contrast to the creamy and spicy elements of the Volcano Roll. Don’t mix it with your soy sauce; enjoy it separately to maximize its cleansing effect.
Customizing Your Volcano Roll Spice
The “volcano” in this roll’s name points directly to its signature heat, but personalizing that spice level is entirely within your control. This allows you to tailor the experience to your own palate or to the preferences of your guests. Experimenting with different chili components can transform the roll, making it a truly bespoke culinary creation that offers a unique kick with every bite.
Varying Tuna Mix Heat
The primary way to customize the spice in your Volcano Roll is by adjusting the heat level of the spicy tuna mix. The standard typically involves sriracha, but you can experiment with other chili sauces like gochujang for a deeper, fermented heat, or even a dash of ghost pepper hot sauce for extreme spice. Start with a small amount, mix, and taste, adding more gradually until you reach your desired intensity. You can also incorporate finely minced fresh chili peppers, such as serrano or jalapeño, into the tuna mix for a brighter, more immediate heat and a textural crunch. For a nuanced spice, a touch of Togarashi (Japanese seven-spice blend) can also be sprinkled into the mix. This careful customization ensures your Volcano Roll is perfectly hot for you.