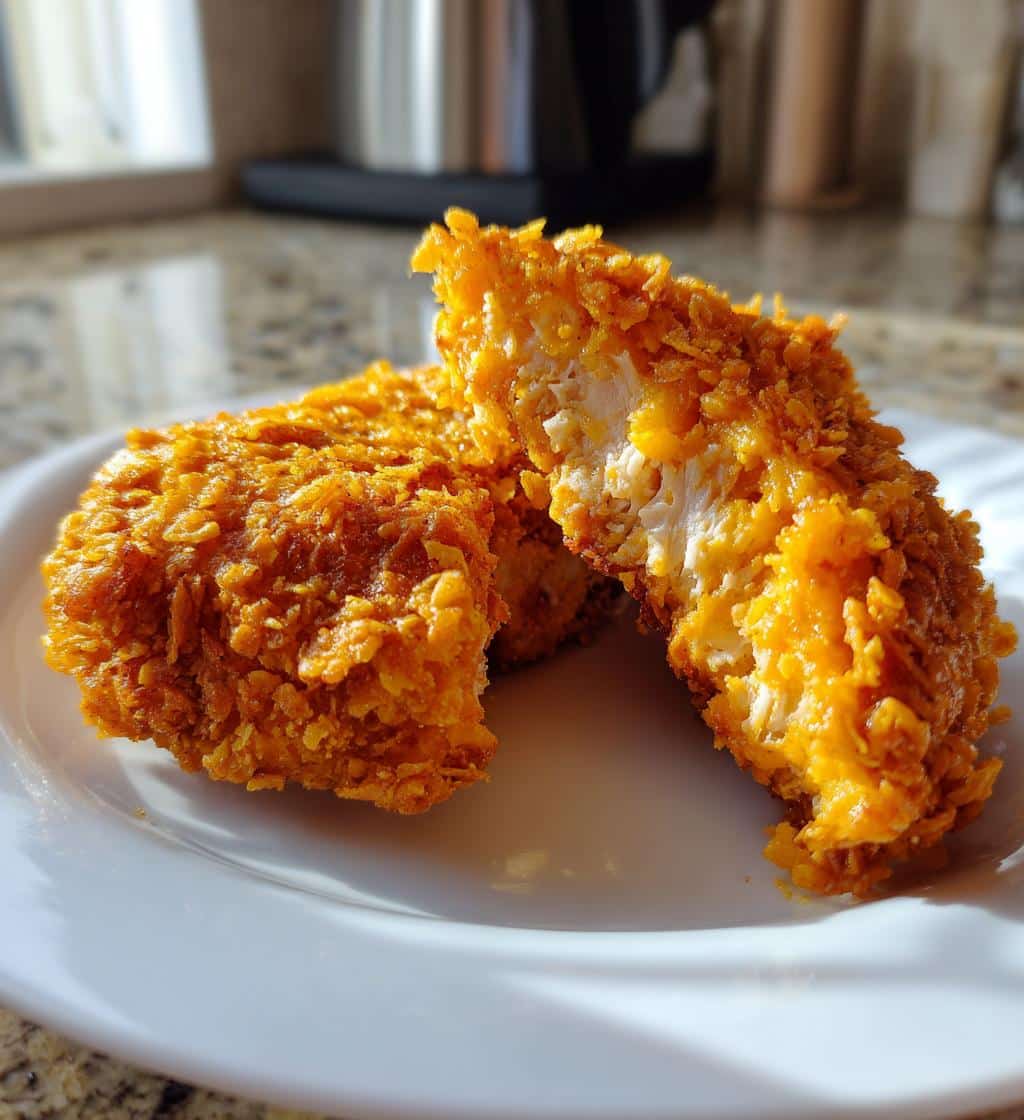
Crispy Cheddar Chicken offers a delightful take on a family favorite. This simple recipe provides tender chicken with a perfectly golden, cheesy crust. It’s an easy baked chicken solution for any delicious weeknight meal, bringing flavor and texture to your dinner table in just a few steps.
Key Takeaways
- Achieve maximum crispiness with specific breading and baking techniques.
- Customize your chicken with simple ingredient swaps for different flavors.
- Learn optimal storage and reheating methods to keep leftovers delicious.
- Understand the nutritional profile of this satisfying dish.
- Prepare components in advance for quick and convenient cooking.
This easy baked chicken is truly delightful. It offers crispy texture and cheesy flavor. A quick meal solution for busy nights. Prep is straightforward, cooking simple. Enjoy this delicious, satisfying dish.
Getting Started with Crispy Cheddar Chicken
Embarking on the journey to create chicken perfection doesn’t have to be complicated. Crispy Cheddar Chicken is a fantastic dish that combines tender, juicy chicken with a crunchy, flavorful, and cheesy exterior. This recipe is designed to be accessible for home cooks of all skill levels, delivering restaurant-quality taste right from your kitchen oven. It’s a wonderful alternative to fried chicken, offering a healthier spin without sacrificing any of the satisfying crispness you crave. Whether you’re planning a family dinner or looking for an impressive dish for guests, this recipe will quickly become a favorite.
Prep Time and Cooking Details
One of the many benefits of this crispy cheddar chicken recipe is its manageable time commitment. You’ll typically spend about 15-20 minutes on preparation, which includes gathering your ingredients and setting up your breading station. The cooking time in the oven is around 25-30 minutes, depending on the thickness of your chicken pieces and your oven’s calibration. This makes it an ideal option for a weeknight meal when you want something homemade and delicious but are short on time. Totaling less than an hour from start to finish, it’s efficient without compromising on flavor or quality. For another quick and satisfying dinner, consider our Easy Honey Garlic Chicken.
What You Need to Know First
Before you begin, ensure your chicken breasts are pounded to an even thickness (about 1/2 to 3/4 inch). This guarantees uniform cooking and prevents some parts from drying out while others are still undercooked. Having all your ingredients prepped and laid out will make the breading process much smoother and less messy. Also, preheat your oven adequately; a properly preheated oven is crucial for achieving that desired golden-brown crust and even cooking. A little foresight in these preliminary steps goes a long way in ensuring your crispy cheddar chicken turns out perfectly every time. Remember to read through the entire recipe once before you start cooking to familiarize yourself with all the steps.
Gather Your Crispy Cheddar Chicken Ingredients
Having all your ingredients ready before you start cooking is a cornerstone of efficient kitchen practice, especially for a multi-step recipe like Crispy Cheddar Chicken. This organized approach, often called “mise en place,” not only saves time but also reduces stress and the likelihood of missing a crucial component. This recipe utilizes common kitchen staples and a few star ingredients that come together to create a symphony of flavor and texture, resulting in a truly delicious weeknight meal.
Main Chicken Items You’ll Need
The star of our dish is, of course, the chicken. You’ll need boneless, skinless chicken breasts. As mentioned, pounding them to an even thickness is key for consistent cooking. You could also use chicken tenderloins for a quicker cooking time, or even boneless, skinless chicken thighs for a richer flavor, though cooking times might vary slightly. Freshness is paramount here, so choose good quality chicken from a reputable source. For a comforting meal, you might also enjoy our Cheesy Chicken and Rice Casserole.
Breading and Seasoning Spices
The magic of crispy cheddar chicken largely lies in its breading. For this, you’ll require all-purpose flour, eggs (whisked), and a breadcrumb mixture. The breadcrumbs can be panko for extra crunch or regular breadcrumbs for a classic texture. The seasoning is where you can truly make this dish your own. Essential spices typically include garlic powder, onion powder, paprika, salt, and black pepper. A touch of dried Italian herbs can also add a wonderful aromatic note. And, of course, finely shredded cheddar cheese is folded into the breading mix, ensuring that delightful cheesy flavor permeates every bite.
Simple Kitchen Staples to Use
Beyond the primary ingredients, a few simple kitchen staples will round out your preparation. You’ll need cooking oil or non-stick cooking spray for your baking sheet to prevent sticking and aid in browning. A little milk or water can be added to the eggs to create a smoother wash for coating. Basic kitchen tools like shallow bowls for your breading station, tongs for handling the chicken, and a baking sheet lined with parchment paper or a wire rack will be invaluable. These simple items ensure a smooth process from start to finish.
Easy Steps to Bake Crispy Cheddar Chicken
Baking is a fantastic method for achieving crispy cheddar chicken without the mess and added fat of deep frying. The key to successful baking lies in a few specific techniques that promote maximum crispiness and even cooking. By following these straightforward steps, you’ll be able to create a healthy chicken dish that boasts a golden-brown, crunchy exterior and wonderfully moist interior, perfect for any occasion. This method is not only easier but also produces a consistently delicious result every time.
Step-by-Step Cooking Process
- Preheat Oven and Prep Pan: Preheat your oven to 400°F (200°C). Line a baking sheet with parchment paper or spray it with non-stick cooking spray. For extra crispiness, place a wire rack on the baking sheet and spray the rack.
- Prepare Chicken: Pat chicken breasts dry with paper towels. Season both sides with salt and pepper. Pound them to an even 1/2 to 3/4-inch thickness if not already done.
- Set Up Breading Station: Create three shallow bowls. In the first, place all-purpose flour. In the second, whisk eggs with a tablespoon of water or milk. In the third, combine panko breadcrumbs, shredded cheddar cheese, garlic powder, onion powder, paprika, and a pinch more salt and pepper.
- Coat the Chicken: Dredge each chicken piece first in flour, shaking off excess. Then dip into the egg mixture, allowing excess to drip off. Finally, press firmly into the breadcrumb-cheddar mixture, ensuring it’s completely coated on all sides.
- Bake: Place the coated chicken on the prepared baking sheet or wire rack. Bake for 25-30 minutes, flipping halfway through, or until the chicken is golden brown, crispy, and cooked through (internal temperature reaches 165°F / 74°C).
- Rest and Serve: Let the chicken rest for a few minutes before serving. This allows the juices to redistribute, keeping the chicken moist.
Following these steps will ensure a perfectly baked and crispy result. This process is similar to how we achieve perfection in our Crispy Parmesan Chicken with a Rich Garlic Sauce, highlighting the effectiveness of proper breading and baking techniques.
Set Up Your Breading Station Easily
A well-organized breading station is the secret to a smooth and efficient cooking process when making crispy cheddar chicken. It minimizes mess, ensures even coating, and makes the whole experience much more enjoyable. Think of it as an assembly line, where each component plays a specific role in creating that desirable golden, crunchy crust. Taking a moment to set this up properly will save you time and frustration during the actual breading of the chicken pieces, making the make ahead chicken prep even simpler.
Bowls for Flour and Eggs
You’ll need three shallow bowls, trays, or plates for your breading station. The first bowl should contain your all-purpose flour. Season this flour lightly with salt and pepper; this adds an initial layer of flavor directly to the chicken. The second bowl will hold your whisked eggs. For a smoother consistency that adheres better to the chicken, you can add a tablespoon or two of milk or water to the eggs before whisking them thoroughly. These two layers are fundamental, providing a moist surface for the final crumb mixture to cling to effectively.
Creating the Flavorful Crumb Mix
The third and final bowl is where the magic truly happens: the flavorful crumb mix. Here, combine your breadcrumbs (panko breadcrumbs are highly recommended for superior crispiness), finely shredded cheddar cheese, garlic powder, onion powder, paprika, and any other desired seasonings like dried herbs. Ensure the cheddar cheese is finely shredded so it melts and integrates seamlessly into the crust without clumping. Mix these ingredients thoroughly so that every scoop of the mixture contains an even distribution of flavor and cheese. This meticulous attention to detail in your chicken coating tips will guarantee a delicious and evenly seasoned crust on your crispy cheddar chicken.
Coating Chicken for Best Crispiness
Achieving that signature crispiness in your Crispy Cheddar Chicken is all about the coating process. It’s a precise technique that ensures each piece of chicken is enveloped in layers of flavor and texture, culminating in a perfectly crunchy crust after baking. Skipping steps or doing them improperly can result in a soggy or unevenly coated chicken, so paying close attention here is crucial for a truly delicious weeknight meal. This is where those chicken coating tips truly shine.
Flour, Egg, and Crumb Layers
The “dredge, dip, and press” method is tried and true for achieving maximum adherence and crispiness. First, take a seasoned chicken breast and dredge it thoroughly in the seasoned flour. Shake off any excess flour; you want a thin, even coat. This flour layer helps to absorb surface moisture from the chicken and provides a dry surface for the egg to cling to. Next, transfer the floured chicken to the whisked egg mixture, ensuring it’s completely coated. Allow any excess egg to drip off—too much egg can make the breading heavy and less crispy. Finally, move the egg-coated chicken to the breadcrumb-cheddar mixture.
Pressing Crumb Mix Firmly
This last step is perhaps the most critical for achieving ultimate crispiness. Once the chicken is in the breadcrumb mixture, press the crumbs firmly onto all sides of the chicken. Don’t be shy; use your hands to really pack that cheesy breading onto every inch. This firm pressing ensures that a thick, even layer of crumbs adheres to the chicken, which will create a substantial and incredibly crispy crust when baked. The cheddar cheese in the mixture will melt and bind the crumbs together, further enhancing the texture. Make sure to turn and press multiple times until no bare spots remain. This meticulous coating is what gives the crispy cheddar chicken its irresistible crunch.
Baking Your Crispy Chicken Just Right
The oven is your ally in transforming coated chicken into golden, crispy perfection without the need for deep frying. Proper baking is crucial for crispy cheddar chicken, ensuring it cooks through evenly while developing that coveted crunchy exterior. This section provides the essential chicken coating tips and guidance to achieve optimal results, resulting in a healthy chicken dish that’s both flavorful and satisfying. Understanding these baking nuances will elevate your cooking skills and guarantee a delicious outcome.
Oven Temperature and Time
For crispy cheddar chicken, a hot oven is key. Preheat your oven to 400°F (200°C). This high temperature helps the breading crisp up quickly and prevents the chicken from drying out. The baking time will typically range from 25 to 30 minutes for average-sized boneless, skinless chicken breasts that have been pounded to an even thickness. If using smaller tenderloins, reduce the time slightly, perhaps to 20-25 minutes. Larger or thicker pieces might need an extra 5-10 minutes. Flipping the chicken halfway through the baking process is also highly recommended. This ensures both sides get direct heat, promoting uniform browning and crispness all around.
Checking for Doneness
The most reliable way to confirm your crispy cheddar chicken is cooked through and safe to eat is by checking its internal temperature. Insert a meat thermometer into the thickest part of the chicken breast, avoiding any bones (if applicable). The chicken is fully cooked when it reaches an internal temperature of 165°F (74°C). Visually, the crust should be golden brown and firm to the touch, and the juices should run clear. Never rely solely on visual cues, as chicken can look cooked on the outside while still being undercooked internally. For a similar delicious main course, check out our main course category for more ideas.
How to Serve Your Delicious Chicken
Once your Crispy Cheddar Chicken emerges from the oven, golden brown and perfectly crunchy, the next exciting step is deciding how to serve it. This versatile and delicious weeknight meal pairs wonderfully with a variety of sides and sauces, allowing you to tailor the dining experience to your preferences or the occasion. Whether you’re aiming for a casual family dinner or a more elaborate spread, this crispy chicken dish provides a fantastic foundation for a memorable meal.
Dipping Sauce Pairings
The tender, cheesy chicken, with its satisfying crunch, is just begging for a complementary dipping sauce. Classic choices like honey mustard or ranch dressing are always popular and add a creamy, tangy contrast. For those who enjoy a little heat, a sriracha mayonnaise or a sweet chili sauce can provide a delightful kick. A simple marinara sauce offers an Italian-inspired twist, especially if you’ve added Italian herbs to your breading mix. You could even get creative with a homemade garlic aioli or a fresh herb pesto. Offer a few options to let everyone customize their crispy cheddar chicken experience.
Complete Meal Side Dishes
To create a truly complete and balanced meal, pair your crispy cheddar chicken with some complementary side dishes. A fresh green salad with a light vinaigrette offers a refreshing counterpoint to the richness of the chicken. Steamed or roasted vegetables like broccoli, asparagus, or green beans are healthy and vibrant additions. For something more substantial, consider a fluffy rice pilaf, mashed potatoes, or even a simple pasta with butter and herbs. Our Crispy Cauliflower would make an excellent textural side dish. The goal is to create a harmony of flavors and textures that make your meal both satisfying and enjoyable.
Storing Your Leftover Crispy Cheddar Chicken
One of the great things about making a delicious dish like Crispy Cheddar Chicken is the possibility of enjoying it again later. Proper storage and reheating are key to preserving its flavor and, crucially, its signature crispiness. While freshly baked is always best, with the right techniques, your make ahead chicken can still deliver a delightful experience as leftovers. Don’t let your efforts go to waste; learn how to keep your chicken fresh and enjoyable for subsequent meals.
Keeping Chicken Fresh
After your crispy cheddar chicken has cooled completely to room temperature (this is important to prevent condensation), transfer it to an airtight container. Placing a paper towel on the bottom of the container before adding the chicken, and perhaps another on top, can help absorb any residual moisture, which is the enemy of crispiness. Store the container in the refrigerator for up to 3-4 days. For longer storage, you can freeze the cooked chicken. Wrap individual pieces tightly in plastic wrap, then place them in a freezer-safe bag or container. Frozen crispy cheddar chicken can last for up to 2-3 months.
Reheating for Best Crunch
Reheating fried or breaded chicken often results in a soggy mess if not done correctly. To bring back that glorious crunch to your crispy cheddar chicken, avoid the microwave at all costs—it will steam the breading. The best method for reheating is the oven or an air fryer. If using the oven, preheat it to 375°F (190°C). Place the chicken on a wire rack set over a baking sheet (this allows air to circulate around the chicken, keeping it crispy) and bake for 15-20 minutes, or until heated through and the crust has re-crisped. If reheating from frozen, increase the baking time to about 30-40 minutes. An air fryer is even faster; reheat at 350°F (175°C) for 8-12 minutes, shaking the basket halfway through. These methods ensure your healthy chicken dish retains its delightful crunch.
Crispy Cheddar Chicken: Easy Ingredient Swaps
One of the beauties of cooking is the ability to adapt recipes to suit your taste preferences, dietary needs, or simply what you have on hand. Crispy Cheddar Chicken is incredibly versatile, allowing for several easy ingredient swaps that can dramatically change its flavor profile while maintaining its core appeal. This flexibility makes it a fantastic recipe to experiment with, ensuring you can always create a delicious weeknight meal even if you’re missing a specific item. These ingredient swaps are part of the make ahead chicken planning, allowing for tailored meals.
Different Cheese Options
While cheddar cheese provides a classic, sharp flavor and beautiful golden color, don’t hesitate to experiment with other cheeses. For a milder, nutty flavor, try Gruyere or Swiss cheese. If you prefer a sharper, saltier kick, finely grated Parmesan or Asiago cheese can be excellent choices. Mozzarella offers a fantastic melt and a milder taste, perfect for those who prefer a less pronounced cheese flavor. For a spicy twist, a pepper jack cheese could add a delightful zing. Just ensure whatever cheese you choose is finely shredded to blend well with the breadcrumbs and melt evenly.
Other Crumb Coating Choices
The breadcrumb coating is crucial for crispiness, and there are many avenues to explore here. Panko breadcrumbs are generally favored for their superior crunch, but traditional breadcrumbs work well too. For a gluten-free option, use crushed cornflakes, gluten-free breadcrumbs, or even finely ground pork rinds for a low-carb alternative. You can also mix in other dry ingredients for added flavor or texture. For instance, a sprinkle of sesame seeds, poppy seeds, or even finely crushed pretzels can add a unique twist to the breading, enhancing the overall chicken coating tips for a unique healthy chicken dish.
Extra Crispiness Tips for Your Chicken
While the basic recipe for Crispy Cheddar Chicken is designed for excellent results, there are a few advanced chicken coating tips and tricks you can employ to truly elevate its crunch factor. These techniques focus on optimizing moisture removal and enhancing the browning process, ensuring every bite is as satisfyingly crisp as possible. If you’re looking to achieve maximum crunch, these extra steps are worth the effort, making your healthy chicken dish even more irresistible.
Cooking Spray Trick
One of the simplest yet most effective ways to boost the crispiness of your baked chicken is to lightly spray the coated chicken pieces with cooking spray before baking. The fine mist of oil helps the breading achieve a deeper golden-brown color and a more pronounced crunch, mimicking the effects of frying without submerging the chicken in oil. This thin layer of fat conducts heat efficiently, crisping up the breadcrumbs beautifully. Make sure to spray both sides when you flip the chicken halfway through baking for even browning and crispness. For more recipes and cooking tips, make sure to visit us on Pinterest and Instagram!
Internal Temperature Check
While checking the internal temperature is primarily for food safety, it also plays a role in crispiness. Overcooking chicken can dry it out, making the breading brittle rather than pleasantly crisp. Undercooking, conversely, can leave it unpleasantly soft. By using a meat thermometer to ensure the chicken reaches exactly 165°F (74°C) and then removing it from the oven promptly, you preserve its juiciness while allowing the crust to retain its perfect texture. A perfectly cooked chicken breast will be moist inside, offering a lovely contrast to its super crispy exterior, making this a delicious weeknight meal you’ll want to make again and again.
Crispy Cheddar Chicken: Full Nutrition Facts
Understanding the nutritional value of what you eat is an increasingly important aspect of meal planning. Crispy Cheddar Chicken, when baked, can be a flavorful and relatively healthy chicken dish, fitting well into a balanced diet. While specific nutritional facts will vary slightly based on the exact ingredients used (e.g., type of breadcrumbs, amount of oil, lean vs. dark meat), we can provide a general overview that helps you appreciate this dish’s contribution to your daily intake. This information assists in making informed dietary choices for your family.
Calories and Protein Counts
A serving of baked crispy cheddar chicken typically offers a good source of lean protein. For an average 4-ounce boneless, skinless chicken breast, coated and baked, you can expect approximately 300-400 calories. The protein content will be substantial, often ranging from 30-40 grams per serving. This high protein count makes it a very satisfying meal, aiding in muscle repair and growth, and helping you feel full for longer. This makes it a great choice for a post-workout meal or just a hearty dinner to fuel your body.
Fat and Carbohydrate Info
The fat content in crispy cheddar chicken will primarily come from the cheese in the breading, the eggs, and any cooking spray or oil used. On average, a serving might contain around 15-25 grams of fat, with a portion of that being saturated fat from the cheese. The carbohydrate count is generally moderate, coming mainly from the flour and breadcrumbs used in the coating. Expect approximately 15-25 grams of carbohydrates per serving. This combination of protein, fats, and carbs makes for a balanced and energetic meal, especially when paired with a fresh vegetable side dish. It’s a make ahead chicken option that supports a wholesome diet.
Make Ahead Prep for Crispy Chicken
Life can get busy, and having delicious, healthy meal options ready to go can be a lifesaver. Crispy Cheddar Chicken is an excellent candidate for make-ahead preparation, allowing you to enjoy a homemade, delicious weeknight meal with minimal effort on cooking day. By doing some of the prep work in advance, you can streamline your dinner routine and reduce stress, making this make ahead chicken recipe a staple in your culinary repertoire. These steps ensure your healthy chicken dish is always within reach.
Coat and Refrigerate Safely
You can prepare the chicken up to the breading stage a day in advance. After coating each chicken breast thoroughly in the flour, egg, and breadcrumb-cheddar mixture, place them on a baking sheet lined with parchment paper. Ensure the pieces are not touching. Lightly cover the baking sheet with plastic wrap and refrigerate for up to 24 hours. This method not only saves time but also allows the breading to adhere even more firmly to the chicken, potentially leading to an even crispier crust when baked. When ready to cook, simply transfer the sheet directly to the preheated oven from the refrigerator.
Adjusting Bake Time
When baking chicken that has been refrigerated after coating, you might need to adjust the cooking time slightly. Since the chicken will be starting from a colder temperature, it may require an additional 5-10 minutes in the oven to reach the safe internal temperature of 165°F (74°C). Always use a meat thermometer to confirm doneness. This slight adjustment ensures that your crispy cheddar chicken is perfectly cooked through, maintaining its juicy interior and delightful crunchy exterior, even with advanced preparation. Enjoy the convenience without sacrificing quality!