Cheesy Baked Penne stands out as a beloved comfort food, cherished for its rich flavors and hearty appeal. This easy recipe brings together tender pasta, savory sauce, and gooey cheese, creating a family meal everyone will adore. Follow these 7 simple tips to perfect your pasta dish and enjoy a satisfying dinner that truly hits the spot.
Key Takeaways
- Cook pasta al dente for ideal texture.
- Thorough mixing ensures flavor in every bite.
- Seasoning is crucial; adjust to your taste.
- Resting the dish before serving creates perfect slices.
- Breadcrumbs add a delightful crunch.
- Baked penne is excellent for make-ahead meals.
- Customize with different ingredients and dietary needs.
- Proper storage allows for fresh leftovers or future freezing.
A perfect baked penne is a joy. It offers warmth and satisfaction. Every bite should burst with flavor. Simple tricks make a huge difference. Enjoy this classic comfort food.
Cheesy Baked Penne: A Classic
Why This Comforting Dish?
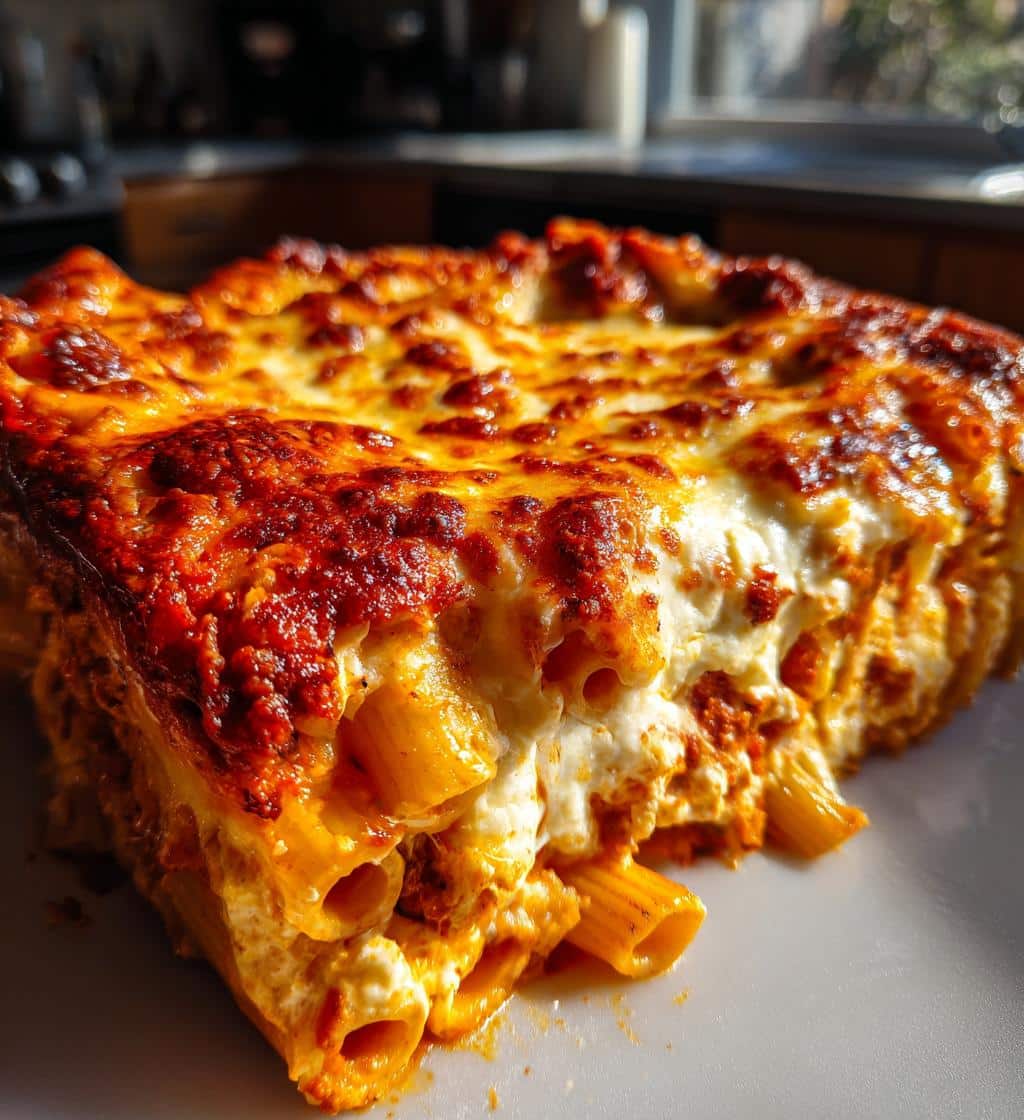
Cheesy baked penne stands as a monument to comfort food, a dish that consistently delivers warmth, satisfaction, and a touch of nostalgic bliss. Its appeal lies in its straightforward ingredients and the magical transformation they undergo in the oven, emerging as a bubbly, golden, and utterly irresistible meal. This classic pasta bake is more than just food; it’s an experience, a centerpiece that brings families together around the dinner table. The combination of perfectly cooked penne, a rich, savory sauce, and layers of melted, gooey cheese creates a textural and flavor harmony that’s hard to beat. It’s the kind of dish that nourishes both body and soul, making it a perennial favorite for home cooks everywhere. If you enjoy other pasta dishes, you might also like this salmon spinach pasta dish.
Simple, Satisfying Family Meal
In the realm of family-friendly meals, cheesy baked penne shines brightly. It’s inherently satisfying, requiring minimal fuss for maximum flavor. The ingredients are generally inexpensive and readily available, making it an accessible option for busy weeknights or relaxed weekend gatherings. Children and adults alike are drawn to its cheesy goodness and hearty portions. Moreover, it’s a versatile recipe that allows for numerous adaptations, catering to various dietary preferences and pantry contents. Whether you’re feeding a small group or a crowd, this baked penne recipe scales up beautifully, guaranteeing everyone leaves the table feeling content. Its simplicity doesn’t compromise on taste, making it a reliable go-to for a truly satisfying homemade dinner.
Ingredients for Baked Penne
Pantry Staples You Need
Crafting the perfect cheesy baked penne starts with a few essential pantry staples. You’ll need dried penne pasta, a good quality marinara or tomato sauce (homemade or store-bought), and olive oil for cooking. Onions and garlic form the aromatic foundation, lending depth and savory notes to the sauce. Herbs like dried oregano, basil, and a bay leaf will infuse your sauce with traditional Italian flavors. Don’t forget salt and freshly ground black pepper for seasoning. A touch of sugar can balance the acidity of the tomatoes, while some vegetable or chicken broth can thin the sauce to your desired consistency. These basic components are the backbone of a truly comforting and delicious main course.
Cheeses That Make It Gooey
The “cheesy” in cheesy baked penne is paramount, and selecting the right cheeses is crucial for that irresistible gooey factor. Mozzarella is a non-negotiable for its fantastic melt and stretch. For a sharper, more complex flavor, Parmesan or Pecorino Romano grated fresh elevate the dish significantly. Ricotta cheese can be incorporated in dollops for a creamy, dreamy texture, especially when layered within the pasta. A blend of these cheeses provides the best of all worlds: the stringiness of mozzarella, the salty bite of Parmesan, and the creamy pockets of ricotta. Consider adding a small amount of provolone for an extra layer of mild, buttery flavor. Using a combination ensures every spoonful is rich, decadent, and incredibly satisfying, contributing to the dish’s signature comfort food status.
Making Your Cheesy Baked Penne
Quick Pasta Cooking Steps
The journey to perfect cheesy baked penne begins with properly cooking the pasta. Bring a large pot of salted water to a rolling boil. Add your penne pasta and cook according to package directions, but aim for slightly less than al dente – about 1-2 minutes shy of the recommended time. Remember, the pasta will continue to cook in the oven, so slightly undercooking it now prevents it from becoming mushy later. Drain the pasta thoroughly but do not rinse it; the starch clinging to the penne helps the sauce adhere better. Set it aside while you prepare the other components. This quick cooking step is vital for achieving the ideal texture in the final baked dish.
Combine and Layer Everything
Once your pasta is ready, it’s time to assemble. In a large mixing bowl, combine the cooked penne with a generous portion of your prepared tomato sauce. Ensure every piece of pasta is coated evenly. In your baking dish, start with a thin layer of sauce on the bottom to prevent sticking and add moisture. Then, spread half of the pasta mixture over the sauce. Sprinkle generously with a blend of your chosen cheeses – mozzarella, Parmesan, and ricotta if you’re using it. Repeat the layers: remaining pasta, more sauce, and then a final, lavish layer of cheese on top. This layering technique ensures that every forkful is bursting with both pasta and gooey cheese. For another comforting baked dish, consider trying creamy baked mac and cheese.
Bake Until Bubbly Golden
The final, most exciting step is baking. Preheat your oven to the recommended temperature, typically around 375°F (190°C). Cover the baking dish loosely with foil to prevent the cheese from browning too quickly while allowing the flavors to meld and the pasta to finish cooking. Bake for about 20-25 minutes. Then, remove the foil and continue baking for another 10-15 minutes, or until the cheese on top is melted, bubbly, and beautifully golden brown, with some crispy edges. The sauce should also be simmering gently around the edges. This baking process brings all the components together into one cohesive, irresistible dish, ready to be the star of your dinner table.
Prepare Dish for Baking
Efficient Kitchen Workflow
An efficient kitchen workflow makes preparing cheesy baked penne a breeze. Before you even start cooking the pasta, gather all your ingredients and have them measured and prepped – this is known as “mise en place.” Chop your onions and garlic, shred your cheeses, and open your sauce jars. While the pasta boils, you can simultaneously start sautéing your aromatics for the sauce, or simply warm up a store-bought sauce. Having your baking dish ready and greased will save precious moments during assembly. This systematic approach not only speeds up the cooking process but also reduces stress, allowing you to enjoy the cooking experience more fully and avoid last-minute scrambling.
Total Time at a Glance
Knowing the total time commitment helps with meal planning. For cheesy baked penne, the active prep time is relatively quick, generally taking about 20-30 minutes, especially if you’re using a pre-made sauce. This includes boiling the pasta, sautéing aromatics, and assembling the layers. The baking time in the oven usually ranges from 30-40 minutes, depending on your oven and whether you started with hot or cold ingredients. Add an additional 10-15 minutes for resting the dish before serving, which is crucial for perfect slices. Therefore, you can expect the entire process from start to finish to be approximately 60-85 minutes. This makes it an ideal choice for a satisfying dinner that doesn’t demand hours in the kitchen.
Tip 1: Cook Pasta Al Dente
Prevent Your Penne From Mush
The cardinal rule for any baked pasta dish, especially cheesy baked penne, is to cook your pasta al dente. This Italian term translates to “to the tooth,” meaning the pasta should be firm to the bite, not soft or mushy. When preparing penne for baking, it’s even more critical to undercook it slightly—usually 1-2 minutes less than the package instructions. Why? Because the pasta will continue to absorb moisture and cook further in the hot oven as it bakes in the sauce. If you cook it fully before baking, you risk ending up with a mushy, unappealing texture. An al dente pasta ensures that each penne tube retains its shape and offers a pleasant chewiness, contributing significantly to the overall enjoyment of the dish.
Tip 2: Mix Everything Thoroughly
Flavor in Every Single Bite
One of the simplest yet most impactful tips for exceptional cheesy baked penne is to mix all the components thoroughly before layering. This means ensuring that every piece of cooked penne pasta is beautifully coated with the savory tomato sauce. Don’t just dump the sauce on top; take the time to toss the pasta and sauce together in a large bowl. This critical step guarantees that the flavors are evenly distributed throughout the dish, preventing dry, flavorless pockets of pasta. When you take a spoonful, you want a harmonious blend of pasta, sauce, and cheese in every single bite. Proper mixing also helps the cheese adhere better to the pasta, creating a more cohesive and satisfying texture. This attention to detail elevates a good baked penne to a truly great one.
Tip 3: Adjust Seasoning to Taste
Salt and Pepper Are Key
Seasoning is the soul of any dish, and cheesy baked penne is no exception. Don’t rely solely on the salt content of your store-bought sauce; always taste and adjust as you go. Salt and freshly ground black pepper are your best friends here. When cooking the pasta water, ensure it’s generously salted – it should taste like the ocean. This seasons the pasta from the inside out. As you prepare your sauce, taste it and add salt, pepper, and perhaps a pinch of sugar or a splash of red wine vinegar to brighten the flavors. Once everything is combined, taste the pasta and sauce mixture before it goes into the oven. A perfectly seasoned dish will sing with flavor, providing a balanced and enjoyable experience with every spoonful. Remember, you can always add more, but you can’t take it away!
Tip 4: Rest Before Serving
Perfect Cheesy Slices Await
The temptation to dig into a bubbly, golden-brown cheesy baked penne straight from the oven is undeniable, but patience is a virtue here. Allowing the dish to rest for 10-15 minutes after baking is a crucial step for optimal enjoyment. During this resting period, the molten cheese and hot sauce have a chance to set and firm up slightly. This prevents the dish from collapsing into a messy pile when you serve it, allowing you to cut relatively neat, individual portions. More importantly, resting allows the flavors to meld further and ensures the cheese maintains its gooey, delicious consistency without being scalding hot. The slight cooling makes for a more pleasurable eating experience and guarantees those perfect, Instagram-worthy cheesy slices.
Tip 5: Add Crunchy Breadcrumbs
For Extra Delicious Texture
While the gooey cheese top is undoubtedly a highlight of cheesy baked penne, adding a layer of crunchy breadcrumbs can elevate the dish to new textural heights. Before the final bake, after you’ve added your last layer of cheese, sprinkle a generous amount of panko breadcrumbs (or regular seasoned breadcrumbs) over the top. For an extra layer of flavor and crispiness, you can toss the breadcrumbs with a tablespoon of melted butter or olive oil, and a sprinkle of Parmesan cheese. As the dish bakes, these breadcrumbs will turn golden brown and develop a delightful crunch, providing a wonderful contrast to the soft pasta and creamy sauce below. This simple addition introduces an unexpected, delicious texture that makes every bite more exciting and satisfying, making it a great pairing for a hearty dish like cheesy chicken and rice casserole.
Tip 6: Prep Ahead for Convenience
Refrigerate Up to 24 Hours
Cheesy baked penne is a fantastic make-ahead meal, perfect for busy weeknights or when entertaining. You can assemble the entire dish, from cooking the pasta and mixing the sauce to layering it in the baking dish, up to 24 hours in advance. Once assembled, cover the dish tightly with plastic wrap or aluminum foil and refrigerate it. When you’re ready to bake, simply remove it from the fridge about 30 minutes before baking to allow it to come closer to room temperature. You might need to add an extra 10-15 minutes to the baking time to account for starting with a cold dish. This prep-ahead strategy significantly cuts down on last-minute stress, allowing you to enjoy a freshly baked, comforting meal with minimal effort right before dinner. It’s an ideal solution for meal planning.
Tip 7: Get Creative with Baked Penne
Try Different Cheeses and Pastas
While the classic cheesy baked penne is a masterpiece, don’t hesitate to get creative and customize it to your liking. Experiment with different cheese combinations beyond mozzarella and Parmesan. Provolone, fontina, Gruyère, or even a smoked cheddar can introduce exciting new flavor profiles. As for pasta, while penne is traditional, other sturdy shapes like ziti, rigatoni, or even cavatappi work wonderfully, offering different textures and ways to hold the sauce. The key is choosing a pasta that can stand up to baking without becoming overly soft. This flexibility allows you to tailor the dish to your personal preferences or what you have available in your pantry.
Add Meat or Fresh Veggies
Elevate your cheesy baked penne by incorporating additional ingredients. For a heartier meal, brown ground beef, Italian sausage, or shredded chicken and mix it into the sauce. This adds protein and a richer flavor dimension. If you prefer a vegetarian option or want to boost the nutritional content, sauté fresh vegetables like spinach, mushrooms, bell peppers, zucchini, or roasted butternut squash. Add them to the sauce or layer them with the pasta and cheese. Just ensure any vegetables are cooked until tender-crisp before adding to avoid a watery dish. These additions allow for endless variations, making the recipe adaptable to any palate. Don’t forget to visit our Pinterest for more ideas.
Make it Gluten-Free Easily
Making cheesy baked penne gluten-free is surprisingly simple, allowing everyone to enjoy this comforting classic. The main adjustment is substituting traditional wheat-based penne pasta with a high-quality gluten-free alternative. Most major pasta brands offer excellent gluten-free penne made from corn, rice, or a blend of grains that hold up beautifully to baking. Ensure your sauce and any other added ingredients (like broth or breadcrumbs, if using) are also certified gluten-free. With these simple swaps, you can create a delicious, safe, and satisfying gluten-free cheesy baked penne that tastes just as amazing as the original, making it an inclusive meal for all.
Storing and Reheating Baked Penne
Keep Leftovers Fresh in Fridge
One of the best qualities of cheesy baked penne is how well it holds up as leftovers. To store, allow the baked penne to cool completely to room temperature. Then, transfer it to an airtight container. It will keep fresh in the refrigerator for up to 3-4 days. For reheating individual portions, a microwave works well; simply cover and heat until warmed through. For larger portions, place the penne in an oven-safe dish, cover it with foil, and reheat at 300°F (150°C) for 20-30 minutes, or until hot and bubbly. A splash of extra sauce or broth can help keep it moist. Leftovers often taste even better the next day, as the flavors have had more time to meld.
Freezing for Future Meals
Cheesy baked penne is also an excellent candidate for freezing, making it ideal for meal prepping or having emergency dinners on hand. You can freeze it baked or unbaked. For freezing baked penne, cool completely, then wrap individual portions or the entire dish tightly in plastic wrap, followed by aluminum foil, or store in freezer-safe containers. It will keep well for up to 2-3 months. To reheat from frozen, thaw overnight in the refrigerator, then bake as directed (you might need to add extra time). Alternatively, you can bake it directly from frozen, covered with foil, for a longer period (around 60-90 minutes) until hot in the center. Don’t forget to follow our recipes on Instagram for more cooking inspiration.