Super Moist Banana Bread is a truly delightful treat, perfect for any time of day. This recipe simplifies the baking process, ensuring a tender, flavorful loaf every time. Using ripe bananas and the right techniques will make your homemade version incredibly delicious. Get ready to create a family favorite.
Key Takeaways
- Utilize very ripe bananas for maximum flavor and moisture.
- Properly mix wet and dry ingredients to achieve a super moist texture.
- Follow precise baking times and temperatures for a perfectly cooked loaf.
- Allow the bread to cool completely for the best texture and easy slicing.
- Store your banana bread correctly to maintain its freshness.
Baking super moist banana bread is rewarding. Simple steps yield amazing results. Ripe bananas are key. A warm slice brings joy. Share this delicious banana bread with loved ones.
Unlock Irresistible Super Moist Banana Bread
Creating truly irresistible banana bread starts with understanding the core elements that contribute to its deliciousness. Our focus here is on achieving that coveted “super moist” quality, a texture that makes every bite a sheer pleasure. This isn’t just about mixing ingredients; it’s about harnessing the natural power of ripe fruit and thoughtful baking techniques to craft something truly special. Whether you’re a seasoned baker or new to the kitchen, the principles for a tender, flavorful loaf remain the same, setting the foundation for success.
The magic of ripe bananas
The secret weapon for the best banana bread lies in very ripe bananas. These aren’t just yellow with a few spots; we’re talking about bananas that are almost entirely brown or black, soft to the touch, and intensely fragrant. As bananas ripen, their starch converts into natural sugars, intensifying their sweetness and flavor. This transformation is crucial for a depth of taste you simply can’t get from firmer, less ripe fruit. Beyond sweetness, ripe bananas contribute significant moisture, breaking down easily to integrate smoothly into the batter, ensuring a consistently moist crumb throughout the loaf. Don’t throw out those forgotten bananas on your counter—they’re destined for greatness in your next desserts creation!
Why this bread is super moist
The “super moist” designation isn’t accidental; it’s a result of careful ingredient selection and preparation. First, the ripe bananas provide natural hydration. Secondly, a combination of oil or melted butter, often paired with ingredients like sour cream or yogurt, adds a rich fat content that locks in moisture. Unlike recipes relying solely on butter, which can sometimes yield a drier crumb, the inclusion of oil helps create a more tender and lasting moistness. Additionally, baking soda, while acting as a leavening agent, also reacts with the acidic bananas to produce a soft, delicate texture. This perfect harmony ensures that each slice remains incredibly soft and delightful for days.
Gathering Your Banana Bread Magic Ingredients
Every great recipe begins with the right ingredients, and our super moist banana bread is no exception. Having everything measured and ready before you start—a practice known as “mise en place”—will make your baking process smoother and more enjoyable. From the basics to the delightful additions, each component plays a vital role in creating the perfect loaf that will be loved by all who try it. Pay attention to the quality of your ingredients, as they directly impact the final flavor and texture of your homemade banana bread.
Essential items for baking
For a foundational, truly delicious banana bread, you’ll need standard baking staples. These include all-purpose flour, granulated sugar for sweetness, and baking soda as your leavening agent to help the bread rise. Salt is crucial for balancing flavors. Eggs bind the ingredients together and add richness, while melted butter or a neutral oil (like vegetable or canola) provides moisture and tenderness. A splash of vanilla extract enhances the overall aroma and taste, complementing the banana flavor beautifully. And, of course, the star of the show: those wonderfully ripe, mashed bananas. Ensure your ingredients are fresh; for example, old baking soda can affect rise and texture.
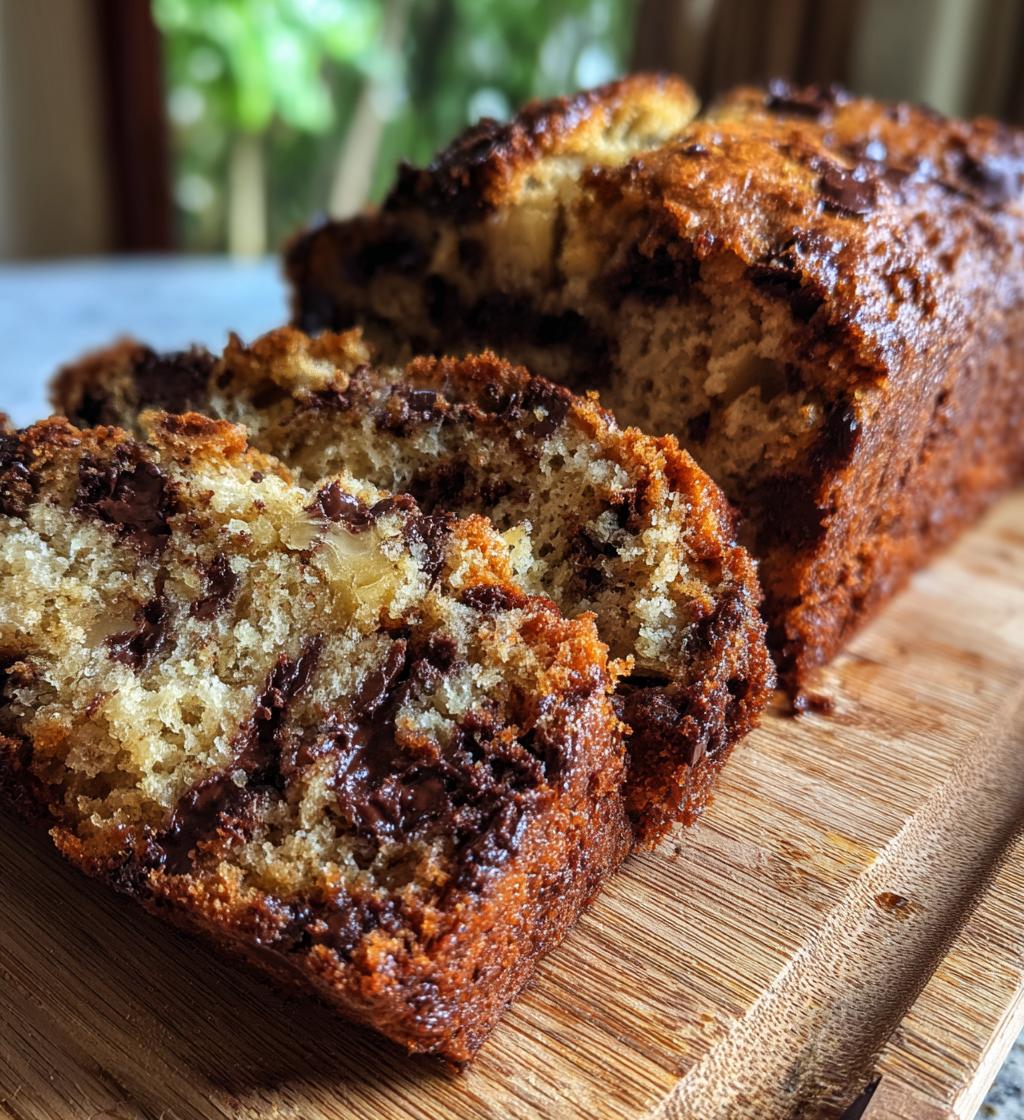
Sweet chocolate chip additions
While classic banana bread is wonderful on its own, the addition of chocolate chips elevates it to an entirely new level of indulgence. Semisweet chocolate chips are a popular choice, offering a perfect balance against the sweetness of the bananas. However, feel free to experiment with milk chocolate for a sweeter profile or dark chocolate for a more intense, slightly bitter contrast. You can also mix in white chocolate chips for a different kind of sweetness. About 1 to 1.5 cups is usually ideal for a standard loaf, ensuring a lovely distribution throughout the batter without overpowering the banana flavor. If you’re a fan of mixing chocolate into your baked goods, you might also enjoy our recipe for Peanut Butter Brownie Swirl Cookies.
Prepping for Super Moist Banana Bread Success
Success in baking often hinges on meticulous preparation. Before you even think about mixing ingredients, taking a few moments to set up your baking environment will save you time and prevent potential mishaps. Proper oven calibration and pan preparation are critical steps that ensure your banana bread bakes evenly and releases cleanly. These small efforts contribute significantly to the overall quality and presentation of your final product, making the entire process more rewarding and less stressful for the home baker.
Setting up your oven
The first and most critical step in preparing for baking is preheating your oven. This isn’t just a suggestion; it’s a necessity for even baking. A properly preheated oven ensures that the banana bread batter starts cooking immediately upon entering, allowing the leavening agents to activate effectively and the loaf to rise consistently. Set your oven to the specified temperature (typically 350°F or 175°C) and allow it at least 15-20 minutes to reach and stabilize at that temperature. Using an oven thermometer can help verify accuracy, as many ovens can be off by several degrees.
Greasing the loaf pan
No one wants their beautifully baked banana bread to stick to the pan. Properly preparing your loaf pan is essential for easy removal and an intact loaf. There are a few methods: you can generously grease the pan with butter or cooking spray, then dust it lightly with flour, tapping out any excess. For an even easier release, consider lining your pan with parchment paper, leaving an overhang on the sides. This creates “handles” that allow you to lift the baked bread right out of the pan. Both methods prevent sticking and help achieve that perfect, golden-brown crust.
Mixing Irresistible Banana Bread Batter
The mixing stage is where the magic truly begins, transforming individual ingredients into a cohesive, flavorful batter. Achieving the ideal texture for your super moist banana bread requires careful attention to how you combine each component. From mashing the bananas to gently folding in the dry ingredients, each step is designed to ensure a tender crumb and even distribution of flavor. Overmixing is the enemy of light and fluffy baked goods, so a delicate hand is key to preserving that perfect moistness.
Mashing bananas perfectly
The consistency of your mashed bananas significantly impacts the final texture of your bread. For that signature super moist quality, you want your bananas to be well-mashed but still retain a few small lumps. This provides pockets of intense banana flavor and adds to the bread’s delightful texture. You can use a fork, a potato masher, or even your stand mixer on low speed to achieve this. Avoid pureeing them completely, as a little texture is desirable. The riper the bananas, the easier they will be to mash, ensuring smooth incorporation into the wet ingredients.
Combining wet ingredients
In a separate bowl, it’s time to bring together your wet ingredients. This typically includes the mashed bananas, melted butter or oil, eggs, sugar, and vanilla extract. Whisk these together until they are well combined and smooth. This step ensures that the sugar dissolves properly and all the liquid components are evenly distributed throughout the batter. Good incorporation here means a consistent texture and flavor in every slice of your homemade banana bread. Don’t be shy about whisking vigorously at this stage to achieve a homogenous mixture.
Folding in flour and chips
Once your wet ingredients are perfectly blended, it’s time to gently incorporate the dry ingredients (flour, baking soda, salt). The key word here is “gently.” Add the dry mixture to the wet ingredients and mix only until just combined. Overmixing the flour develops the gluten too much, leading to a tough, dense bread rather than a tender, super moist one. Finally, fold in your chocolate chips or any other desired add-ins. A few gentle stirs are all it takes to distribute them evenly without overworking the batter. This careful approach guarantees a light and airy crumb, true to the “super moist” promise.
Baking Your Chocolate Chip Loaf
The moment of truth arrives when your carefully prepared banana bread batter enters the oven. Baking is both an art and a science, and understanding the ideal conditions for your chocolate chip loaf will ensure it emerges perfectly golden-brown, cooked through, and wonderfully moist. Paying close attention to temperature and timing, along with knowing how to test for doneness, are crucial steps in transforming batter into a comforting, delicious treat for your family and friends. This stage truly brings all your previous efforts to fruition.
Oven temperature and time
Consistent oven temperature is paramount for baking success. For most banana bread recipes, a temperature of 350°F (175°C) is ideal. This temperature allows the bread to rise properly without drying out or burning the crust prematurely. Baking time typically ranges from 50 to 70 minutes, depending on your oven and the size and material of your loaf pan. It’s important to resist the urge to open the oven door frequently, especially during the initial baking phase, as this can cause temperature fluctuations that negatively impact the bread’s rise and texture. Patience is a virtue when you’re baking and waiting for the delicious aromas to fill your kitchen.
Checking for doneness
Knowing when your banana bread is perfectly done is key to avoiding an undercooked center or an overbaked, dry loaf. The most reliable method is the classic toothpick test. Insert a wooden toothpick or a thin skewer into the center of the loaf. If it comes out clean or with a few moist crumbs attached, your bread is ready. If it comes out with wet batter, continue baking for another 5-10 minutes and test again. Additionally, the crust should be a rich, golden-brown color, and the top of the loaf should spring back lightly when gently pressed. For more on the science behind your delicious creations, check out this Wikipedia article on baking.
Cooling for Perfect Super Moist Texture
Once your banana bread emerges from the oven, golden and fragrant, the baking process isn’t quite over. The cooling phase is just as important as the mixing and baking stages for achieving that desirable super moist texture and preventing crumbling. Rushing this step can lead to a less-than-perfect loaf, affecting both its structure and overall enjoyment. Allowing proper cooling time ensures the bread sets correctly, making it easier to slice and preserving its delightful moistness.
Resting in the pan
Immediately upon removing the loaf pan from the oven, resist the urge to unmold your banana bread. Allow it to rest in the pan for about 10-15 minutes. During this crucial period, the bread continues to cook slightly from the residual heat of the pan, a process known as “carryover cooking.” This resting time also allows the internal structure of the bread to stabilize and firm up, making it less likely to break or crumble when you transfer it. It helps to loosen the bread from the sides of the pan naturally, preparing it for the next step.
Moving to a wire rack
After the initial rest in the pan, carefully invert the loaf onto a wire cooling rack. If you used parchment paper, simply lift it out using the overhangs. Allow the banana bread to cool completely on the wire rack. Cooling on a rack permits air circulation around all sides of the loaf, preventing condensation from forming on the bottom, which could make the crust soggy. Complete cooling can take anywhere from 1 to 2 hours, or even longer for larger loaves. This patience is rewarded with a firm, evenly textured, and perfectly sliceable super moist banana bread.
Serving Your Delicious Banana Bread
After all your efforts in baking, the most rewarding part is finally serving and enjoying your super moist banana bread. This versatile treat can be savored in numerous ways, making it suitable for any occasion, from a quick breakfast to an afternoon snack or even a light dessert. Its comforting aroma and rich flavor make it a universally loved baked good, and there are many delightful ways to enhance its appeal for yourself and your loved ones. Get ready to indulge in homemade goodness.
Best ways to enjoy
A warm slice of super moist banana bread is often best enjoyed simply as is, allowing its natural sweetness and tender texture to shine. However, many people adore it with a spread of softened butter, which melts into the warm bread, adding a layer of creamy richness. Another popular choice is a thin smear of cream cheese, offering a tangy contrast that complements the sweet banana flavor beautifully. For an extra treat, try lightly toasting a slice, which brings out its nutty notes and creates a slightly crispy exterior while keeping the interior moist. Whether you prefer it plain or dressed up, each bite is a little piece of comfort.
Pairings and ideas
Beyond simple spreads, banana bread pairs wonderfully with a variety of beverages and accompaniments. A hot cup of coffee or tea makes for a classic combination, perfect for breakfast or an afternoon break. For a more indulgent experience, serve it with a scoop of vanilla bean ice cream or a dollop of whipped cream, especially if the bread is still slightly warm. It also makes a fantastic base for fruit compotes or a drizzle of caramel sauce. Think about serving it alongside a fruit salad for a balanced breakfast, or as part of a brunch spread with savory items. The possibilities are endless for enjoying this versatile and delicious homemade banana bread.
Nutritional Info: Banana Bread Magic
Understanding the nutritional aspects of your homemade super moist banana bread can be helpful, especially if you’re mindful of your dietary intake. While it’s certainly a treat, banana bread also contains natural fruits and some key nutrients. Keep in mind that homemade recipes can vary greatly based on ingredients chosen, such as the type of flour, amount of sugar, and fat used. The following information provides a general overview, but for precise figures, specific ingredient tracking would be necessary for your unique recipe.
Calories per slice
The calorie count for a slice of super moist banana bread can vary significantly based on the recipe and slice size. A typical slice might range from 200 to 350 calories. Factors like the amount of added sugar, butter or oil, and whether you include mix-ins like chocolate chips or nuts will all impact the final calorie count. For example, adding chocolate chips and walnuts will increase both the calorie and fat content. If you’re watching your intake, consider adjusting portion sizes or opting for lighter ingredient substitutions, like using applesauce for some of the oil.
Key nutrient breakdown
Beyond calories, banana bread offers a mix of nutrients. Bananas themselves provide potassium, vitamin B6, and dietary fiber. The flour contributes carbohydrates, and if whole wheat flour is used, it adds more fiber. Eggs provide protein and other vitamins. While it’s not a primary source of protein or a low-sugar item, it does offer some beneficial components. The fat content comes from butter or oil, and if nuts are added, they contribute healthy fats and protein. It’s a satisfying treat that can be part of a balanced diet when enjoyed in moderation. Remember that homemade always allows for control over the quality and quantity of ingredients.
Tips for Irresistible Banana Bread
Achieving truly irresistible super moist banana bread goes beyond just following a recipe; it involves understanding a few key tips that can elevate your baking from good to absolutely fantastic. These insights focus on selecting the best core ingredient and enhancing texture and flavor with thoughtful additions. Mastering these small details will ensure your homemade banana bread consistently turns out incredibly flavorful, perfectly moist, and a delight for anyone who takes a bite. It’s about maximizing potential.
Choosing the best bananas
As mentioned earlier, the secret to outstanding banana bread lies in the ripeness of your bananas. For the deepest banana flavor and maximum sweetness, always opt for bananas that are very ripe, with peels that are heavily speckled brown or even almost entirely black. At this stage, their starches have converted to sugars, making them incredibly soft and easy to mash, and imparting a rich, intense banana flavor to your bread. If your bananas aren’t ripe enough, you can speed up the process by placing them in a paper bag for a day or two, or even baking them unpeeled in a low oven for 15-20 minutes until soft.
Adding nuts for crunch
While chocolate chips are a popular addition, including nuts can add a delightful textural contrast and a subtle nutty flavor that complements the sweet bananas perfectly. Toasted walnuts are a classic choice, offering a slightly bitter counterpoint and a satisfying crunch. Pecans are another excellent option, providing a buttery, rich taste. You can also experiment with chopped almonds or even macadamia nuts for a different twist. Toasting the nuts lightly before adding them to the batter enhances their flavor significantly. Aim for about 1/2 to 1 cup of chopped nuts, folded in gently with the flour and chocolate chips, to ensure even distribution without weighing down the batter.
Storing Your Super Moist Bread
Once you’ve baked your delicious super moist banana bread, keeping it fresh is key to enjoying its wonderful texture and flavor for as long as possible. Proper storage techniques prevent it from drying out, becoming stale, or going bad prematurely. Whether you plan to enjoy it over a few days or want to save some for later, understanding the best ways to store your homemade banana bread will ensure every slice is as delightful as the first.
Keeping it fresh
To maintain the super moist texture of your banana bread, store it at room temperature for the first 2-3 days. The most important thing is to keep it away from direct sunlight and heat. After it has fully cooled, wrap the entire loaf tightly in plastic wrap or aluminum foil. This barrier prevents air from circulating and drying out the bread. For longer storage, you can transfer it to the refrigerator, where it will stay fresh for up to a week. However, refrigerated bread might become slightly denser, so letting it come to room temperature or gently warming it before serving is often preferred.
Airtight container tips
Using an airtight container is an excellent way to store your banana bread, whether on the counter or in the refrigerator. After wrapping the loaf, place it inside an airtight container or a large zip-top bag. This creates a double layer of protection against air exposure, which is the primary cause of staleness. If storing for more than a few days, or if you’ve baked multiple loaves, freezing is a fantastic option. Wrap individual slices or the whole loaf tightly in plastic wrap, then a layer of foil, and place in a freezer-safe bag or container. Frozen banana bread can last for 2-3 months and thaws beautifully, retaining much of its original moistness.
Quick Prep and Bake Times
One of the many appealing aspects of baking super moist banana bread is how relatively quick and straightforward the entire process can be. From gathering your ingredients to pulling a golden-brown loaf from the oven, it’s a project that fits well into a busy schedule, yet yields incredibly satisfying results. Knowing approximate prep and bake times can help you plan your baking day, ensuring you have ample time to create this delightful homemade treat without feeling rushed.
How long it takes
Typically, the preparation for super moist banana bread is quite fast. Mashing bananas, combining wet and dry ingredients, and folding in any additions usually takes no more than 15-20 minutes. This efficient prep time makes it an ideal recipe for a spontaneous baking session. The baking time itself is longer, generally ranging from 50 to 70 minutes, depending on your oven and loaf pan. While the bread bakes, your kitchen will be filled with an irresistible aroma. Factor in an additional 1-2 hours for cooling, though impatient bakers can enjoy a warm slice sooner. The total active time is minimal, making it a rewarding endeavor.
Enjoying homemade goodness
There’s something uniquely satisfying about homemade banana bread. The aroma that fills your home, the anticipation as it bakes, and the first warm, tender slice—it’s an experience that transcends a simple recipe. This quick prep and bake time means you don’t need to dedicate an entire afternoon to enjoy this goodness. It’s an accessible pleasure that brings comfort and joy, whether shared with family, offered to guests, or simply savored as a personal treat with your morning coffee. The relative speed makes it even more appealing, allowing you to whip up a batch whenever the craving strikes.
Common Questions About Banana Bread
Even with a straightforward recipe, bakers often encounter common questions or minor issues when making banana bread. Addressing these frequently asked questions can help you troubleshoot problems, refine your technique, and even inspire you to try new variations. Understanding the “why” behind certain baking outcomes can empower you to become a more confident and skilled baker, ensuring your super moist banana bread turns out perfectly every time. Learning from experience is part of the baking journey, and these insights can guide you.
Troubleshooting baking issues
One common issue is dense banana bread. This is often caused by overmixing the batter once the flour has been added, which develops too much gluten. Mix only until the ingredients are just combined. If your bread is raw in the middle but burnt on the top, your oven might be too hot or the loaf pan might be too high. Try lowering the oven temperature slightly, moving the pan to a lower rack, or tenting the top with foil partway through baking. If the bread sticks to the pan, ensure you’ve adequately greased and floured it, or used parchment paper. Slight adjustments can make a big difference.
Variations to try next
Once you’ve mastered the super moist chocolate chip banana bread, the possibilities for variations are endless! Experiment with different spices like cinnamon, nutmeg, or a hint of allspice for a warming flavor profile. You can also add other fruits such as chopped dried cranberries, raisins, or even shredded coconut for extra texture and sweetness. Nuts like walnuts or pecans are classic additions for a satisfying crunch. For a richer flavor, try adding a swirl of cream cheese filling before baking, or a streusel topping. Don’t be afraid to personalize your recipe; that’s part of the fun of baking homemade treats. Find more cooking inspiration on our Pinterest and Instagram pages!