Heart shaped breadsticks offer a delightful way to show affection through food. This easy recipe helps you craft warm, golden brown, fluffy breadsticks. They are a delicious treat for any special occasion or a simple meal. Enjoy the homemade joy of baking these savory snacks for family and friends.
Key Takeaways
- Make adorable heart-shaped breadsticks easily.
- Simple ingredients create a delicious, versatile treat.
- Baking homemade breadsticks is a rewarding experience.
- Perfect for sharing love and enhancing any meal.
- Customize flavors and enjoy golden brown perfection.
Baking can be truly delightful. Homemade breadsticks are always special. Shape them into hearts for fun. Share these lovely treats often. Spreading joy is simple.
Heart Shaped Breadsticks: A Delicious Treat
Heart shaped breadsticks are more than just a savory snack; they’re a gesture of affection baked into every bite. Creating these charming treats at home adds a personal touch that store-bought items simply cannot replicate. The process is surprisingly straightforward, yielding warm, fluffy breadsticks with a delightful aroma that fills your kitchen. These homemade breadsticks are a delicious treat that can brighten any day, making ordinary moments feel extraordinary. The visual appeal of the heart shape alone makes them incredibly inviting, hinting at the care and love put into their preparation. They are a wonderful way to showcase your baking skills while delivering a truly satisfying culinary experience for yourself and your loved ones. Get inspired by our other recipes and baking ideas on Pinterest for more homemade joy.
Why Make These Lovely Bites?
Making your own heart shaped breadsticks offers several advantages. Firstly, you control the ingredients, ensuring freshness and quality. Secondly, the aroma of fresh baking bread is incredibly comforting and creates a welcoming atmosphere. Thirdly, the act of shaping them into hearts is a fun, creative activity, especially if you involve children. It’s a wonderful opportunity for family fun in the kitchen. Finally, the taste of warm, freshly baked breadsticks, crisp on the outside and soft on the inside, is unparalleled. They are a fantastic alternative to store-bought options, providing a healthier and tastier savory snack. You can also see more delightful creations on our Instagram page.
Perfect for Any Special Occasion
While often associated with romantic gestures, heart shaped breadsticks are incredibly versatile and suitable for a wide array of special occasions. Think Valentine’s Day, anniversaries, birthdays, or even baby showers. They make a thoughtful addition to a brunch spread, a charming appetizer for a dinner party, or a heartwarming snack for a movie night. Imagine serving these golden brown delights with a flavorful dip at a family gathering – they’re sure to be a conversation starter and a crowd-pleaser. Beyond celebrations, they can simply make an everyday meal feel more significant, adding a touch of homemade joy and thoughtfulness to your table. They are a delightful way to show care and affection, anytime you wish.
Simple Ingredients for Breadsticks
Creating delightful heart shaped breadsticks doesn’t require an extensive list of obscure ingredients. In fact, you likely have most of the basic pantry staples needed already on hand, making this an accessible and easy recipe for any home cook. The concept of a breadstick itself relies on simplicity, focusing on wholesome flavors that provide a satisfying and comforting bite. Focusing on quality ingredients, even basic ones, will significantly impact the final taste and texture of your fluffy breadsticks. This foundational approach also allows for effortless customization later, should you wish to experiment with different flavor profiles and make these breadsticks truly your own.
Basic Pantry Staples Needed
For the core breadstick dough, you’ll need just a few fundamental items. All-purpose flour forms the base, providing structure. Active dry yeast is crucial for leavening, giving your breadsticks their light and airy texture. Warm water activates the yeast, while a touch of sugar feeds it, aiding in the rising process. Salt enhances the overall flavor, balancing the sweetness and richness. Finally, olive oil or another neutral oil adds moisture, tenderness, and a hint of richness, contributing to that desirable golden brown crust. Ensure your yeast is fresh for the best results; old yeast can prevent your dough from rising properly, affecting the fluffy texture you desire.
Optional Flavor Boosters
While plain breadsticks are delicious on their own, a variety of optional flavor boosters can elevate their taste and appeal. Consider kneading in dried herbs like oregano, basil, or Italian seasoning for an aromatic touch. A sprinkle of garlic powder or finely minced fresh garlic can add a savory kick. For a cheesy delight, incorporate grated Parmesan or a blend of Italian cheeses directly into the dough. Brushing the tops with melted butter mixed with garlic and herbs just before or after baking is another popular method to intensify flavor. Even a dash of chili flakes can add a subtle warmth. These simple additions allow for versatile flavors, making each batch unique.
Crafting Your Breadstick Dough
The journey to perfect heart shaped breadsticks begins with crafting the ideal breadstick dough. This stage is fundamental, setting the foundation for both the texture and flavor of your finished product. Paying attention to the details here ensures a smooth, pliable dough that is easy to work with and rises beautifully. It’s an exciting part of the baking process, transforming simple ingredients into something truly special. Understanding each component helps in creating a dough that yields those coveted fluffy breadsticks, crisp on the outside and tender within. For more ideas on dough preparation, explore the “bread” section of Carina Recipes.
Mixing Flour and Yeast
The first step in making the breadstick dough involves combining your dry ingredients. In a large mixing bowl, whisk together the all-purpose flour and salt. In a separate, smaller bowl, activate your active dry yeast by dissolving it in warm water (around 105-115°F or 40-46°C) with a pinch of sugar. The sugar feeds the yeast, and the warm water wakes it up. Let this mixture sit for 5-10 minutes until it becomes foamy; this indicates the yeast is active and alive. If it doesn’t foam, your yeast might be old or the water temperature was off, and it’s best to start again. Properly activated yeast is the key to ensuring your breadsticks achieve that desired light, airy texture. Learn more about the science behind leavening agents like yeast on Wikipedia.
Adding Water and Oil
Once your yeast is frothy, incorporate it into the dry ingredients. Make a well in the center of your flour mixture and pour in the activated yeast solution, then add the olive oil. Begin mixing with a wooden spoon or a stand mixer fitted with a dough hook. Gradually bring the flour from the sides into the wet ingredients until a shaggy dough forms. At this point, the dough might still look a bit rough and sticky, but don’t worry, kneading will smooth it out. Avoid adding too much additional flour too early, as over-flouring can lead to tough breadsticks. Continue mixing until just combined before kneading.
Kneading and Rising Breadstick Dough
After successfully combining ingredients, the next crucial steps for perfect heart shaped breadsticks are kneading and rising the dough. These processes transform a shaggy mixture into a smooth, elastic mass, ready for shaping. Proper kneading develops gluten, providing structure and chewiness, while sufficient rising time allows yeast to work its magic, creating that coveted light and airy texture. It’s a stage requiring patience and understanding, but the rewards are truly worth the effort, promising delicious homemade breadsticks every time.
How to Get Smooth Dough
Kneading is a vital step for developing gluten in your breadstick dough. Once the ingredients are roughly combined, turn the dough out onto a lightly floured surface. Begin to knead by pushing the dough away from you with the heels of your hands, then folding it back towards you. Rotate the dough slightly and repeat. This action strengthens the gluten strands, making the dough smooth, elastic, and less sticky. Knead for about 8-10 minutes by hand, or 5-7 minutes in a stand mixer with a dough hook on medium speed, until the dough is smooth and springs back when gently poked. A properly kneaded dough is easier to handle and will produce a superior texture in your finished golden brown breadsticks.
Key to Light, Airy Texture
The rising, or proofing, of your breadstick dough is where the yeast truly shines, contributing significantly to the light, airy texture. After kneading, form the dough into a ball and place it in a lightly oiled bowl, turning once to coat. Cover the bowl with plastic wrap or a clean kitchen towel and place it in a warm, draft-free spot. The ideal temperature for rising is around 75-80°F (24-27°C). Allow the dough to rise until it has doubled in size, which typically takes 1 to 1.5 hours, depending on the warmth of your environment. This slow, steady rise allows flavors to develop and air pockets to form, resulting in fluffy breadsticks with a perfect texture. Don’t rush this process; patience is key for homemade joy.
Shaping Heart Shaped Breadsticks Easily
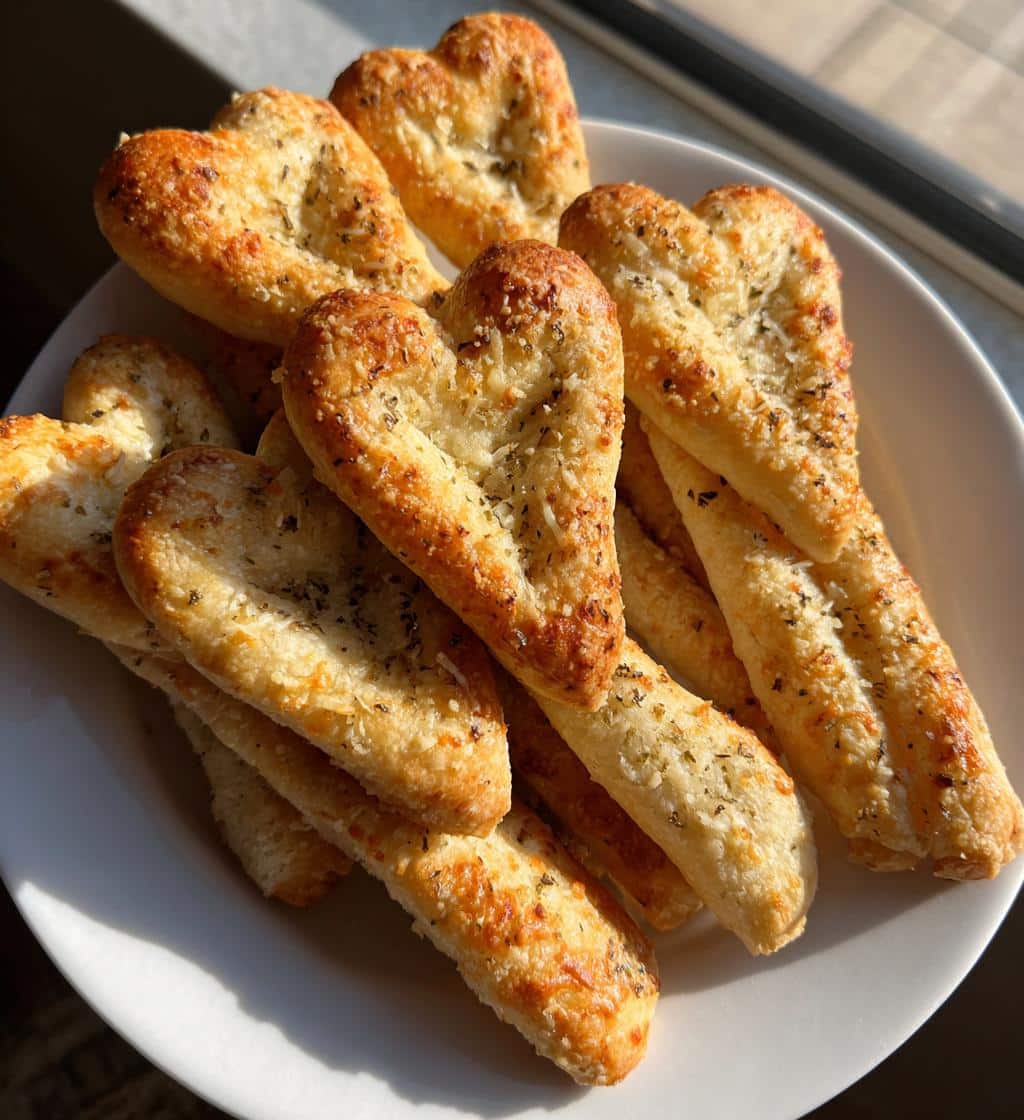
Once your breadstick dough has risen beautifully, the most enjoyable part begins: shaping those adorable heart shaped breadsticks! This step allows for creativity and a bit of playful fun, especially if you have little helpers in the kitchen. Don’t be intimidated by the idea of shaping; it’s much simpler than it sounds, and the charm of homemade items often lies in their slight imperfections. The goal is to create a recognizably heart-like shape that will bake into a golden brown, appealing treat. This hands-on process connects you directly to your food, adding to the homemade joy of sharing these special items.
Fun Ways to Form Hearts
There are a couple of easy methods to form your breadstick dough into hearts. First, gently punch down the risen dough and divide it into small, even pieces. Roll each piece into a rope, about 6-8 inches long. Then, take one rope and form a “U” shape. Bring the two ends of the “U” together at the top, pinching them firmly to create the top indent of the heart. Curve the bottom of the “U” to form the pointed base. Another method is to roll out the dough to about ¼-inch thickness and use a heart-shaped cookie cutter, though this might result in more scraps. Either way, focus on gentle handling to maintain the dough’s airy structure. Place the shaped hearts on a baking sheet lined with parchment paper.
No Need for Perfection
It’s important to remember that when shaping your heart shaped breadsticks, perfection is neither required nor expected. In fact, the slight variations in each heart contribute to their rustic, homemade charm. Don’t stress if some hearts look a bit lopsided or if the points aren’t perfectly sharp. The effort and thought behind making them are what truly matter. These breadsticks are meant to be a delicious treat, enjoyed for their taste and the sentiment they convey. Embrace the unique character of each piece; it tells a story of homemade joy and a personal touch. Plus, they will still bake up golden brown and delicious regardless of minor aesthetic differences.
Baking Golden Brown Breadsticks
After the shaping process, the next exciting stage is baking your heart shaped breadsticks to a beautiful golden brown. This step transforms the raw dough into irresistible, aromatic treats with a satisfying texture. Proper oven temperature and precise timing are key to achieving breadsticks that are perfectly cooked through, wonderfully fluffy on the inside, and crisp on the outside. Baking is not just about heat; it’s about balance, ensuring even cooking and a delightful finish. This is where your homemade joy truly comes to life, culminating in a delicious treat ready to be enjoyed.
Oven Temperature and Time
Preheat your oven to 375°F (190°C) well in advance to ensure it reaches and maintains the correct temperature. A consistently hot oven is crucial for the breadsticks to rise quickly and bake evenly, developing that desirable golden brown crust. Carefully arrange your shaped heart breadsticks on a baking sheet lined with parchment paper, leaving a little space between each one to allow for expansion. Bake for approximately 12-18 minutes. Baking time can vary slightly depending on your oven’s calibration and the thickness of your breadsticks, so it’s always good to keep a close eye on them, especially during the last few minutes. For other baking ideas, check out this Crispy Parmesan Chicken with a Rich Garlic Sauce recipe.
When Are They Done?
Knowing when your heart shaped breadsticks are perfectly baked is simple. Look for a beautiful golden brown color across the entire surface. They should also sound hollow when gently tapped on the bottom. If they appear pale or feel soft, they likely need a few more minutes in the oven. Be careful not to overbake, as this can lead to dry, tough breadsticks instead of the light, airy texture you’ve worked to achieve. Once baked, transfer the breadsticks to a wire rack to cool slightly. Serving them warm is highly recommended for the best flavor and texture, ensuring a truly delicious treat. For another delightful dinner, try our Creamy Chicken Alfredo Lasagna Rolls.
Nutrition Facts: Per Heart Breadstick
Understanding the nutritional value of your homemade heart shaped breadsticks can be helpful, especially if you’re mindful of your dietary intake. While these are a delicious treat, being aware of their caloric and macronutrient content allows for balanced enjoyment. Keep in mind that exact figures can vary based on specific ingredients, portion size, and any optional flavor boosters added. This section provides general estimations to help you incorporate these savory snacks into a healthy eating plan, ensuring you can still enjoy the homemade joy without compromise.
Calories and Macronutrients
A typical plain heart shaped breadstick, roughly 1 ounce (28g), might contain approximately 80-100 calories. The primary macronutrients would be carbohydrates, providing around 15-20 grams per breadstick, largely from the flour. Protein content is usually modest, about 2-3 grams, while fat content is low, typically 1-2 grams, mainly from the olive oil. These numbers do not account for any added butter, cheese, or sugary toppings. If you’re looking for a healthier dinner option, consider making our Easy Butter Chicken Recipe, which offers a balanced meal.
Healthy Snack Information
When consumed in moderation, heart shaped breadsticks can fit into a balanced diet as a relatively healthy snack. They offer a good source of carbohydrates for energy. To enhance their health profile, consider using whole wheat flour for added fiber, or reduce the amount of added sugar if any. Pairing them with a healthy dip like hummus, a yogurt-based sauce, or even a vegetable-rich salsa can boost nutrient intake and make them a more satisfying savory snack. Homemade versions generally contain fewer preservatives and artificial ingredients than their store-bought counterparts, contributing to their appeal as a wholesome, delicious treat.
Irresistible Ways to Share Love
Heart shaped breadsticks are inherently designed to share. Their charming form and comforting taste make them an ideal vehicle for expressing affection and bringing people together. Whether it’s a casual family dinner or a special gathering, these homemade breadsticks serve as a delicious treat that fosters warmth and connection. They represent more than just food; they embody the care and effort put into their creation, making them a truly irresistible way to share love. This section explores how to best present and distribute your golden brown creations for maximum impact and heartfelt appreciation.
Pairing with Delicious Dips
The versatility of heart shaped breadsticks truly shines when paired with a variety of delicious dips. Their mild, savory flavor makes them an excellent complement to both classic and creative accompaniments. Consider serving them with a vibrant marinara sauce for a classic Italian experience, or a creamy garlic-herb dip for an added layer of richness. A homemade pesto, a spicy queso, or even a simple olive oil and balsamic vinegar blend can elevate the breadsticks into a gourmet appetizer. For those who enjoy a healthier option, a fresh tzatziki or hummus would be perfect. Experiment with different dips to discover your favorite combinations and add exciting, versatile flavors to your spread.
Gifting Warm, Homemade Joy
There are few things as heartwarming as receiving a gift of warm, homemade food, and heart shaped breadsticks fit this bill perfectly. Package a freshly baked batch in a rustic bread bag, tied with a ribbon, and present them to a neighbor, friend, or family member. This simple act can convey immense thoughtfulness and spread genuine homemade joy. They make wonderful hostess gifts, get-well treats, or even just a surprise gesture to brighten someone’s day. The warmth and aroma of freshly baked breadsticks are comforting and inviting, making them an ideal way to share love and make any meal special for those you care about.
Creative Breadstick Flavor Variations
While classic plain heart shaped breadsticks are a delicious treat, don’t hesitate to experiment with creative flavor variations. The breadstick dough provides a fantastic canvas for a myriad of additions, allowing you to customize your batch. These modifications not only enhance taste but also add visual appeal and aromatic delight. Exploring various herbs, spices, and glazes ensures your homemade breadsticks can be a unique culinary creation every time, offering truly versatile flavors for your guests or family.
Herbs and Spices Ideas
Incorporating herbs and spices directly into your breadstick dough or sprinkling them on top before baking can significantly boost flavor. For an Italian flair, mix in dried oregano, basil, rosemary, and a touch of garlic powder. A pinch of red pepper flakes can add a subtle heat. For a Mediterranean twist, consider za’atar or a blend of dried mint and thyme. Onion powder, smoked paprika, or even everything bagel seasoning can offer unique savory profiles. Freshly chopped chives or parsley folded into the dough before the second rise will also infuse vibrant, fresh notes, creating a delicious and aromatic savory snack. Experiment to find your favorite combinations.
Brush with Melted Butter
One of the simplest yet most effective ways to enhance the flavor and appearance of your heart shaped breadsticks is by brushing them with melted butter. This can be done either before baking to help achieve a richer golden brown crust, or immediately after they come out of the oven for a glossy finish and an infusion of buttery goodness. For an extra layer of flavor, whisk minced garlic, dried herbs (like parsley or dill), or a sprinkle of Parmesan cheese into the melted butter before brushing. This simple step adds moisture, richness, and an irresistible aroma that truly makes these homemade breadsticks an unforgettable, delicious treat. It’s a key step to achieving a perfect texture.
Best Tips for Perfect Breadsticks
Achieving truly perfect heart shaped breadsticks involves more than just following the steps; it also means understanding the nuances of baking. A few key tips can make all the difference, transforming good breadsticks into exceptional ones. These insights focus on common pitfalls and how to avoid them, ensuring that your efforts result in light, airy texture and a beautiful golden brown finish every time. By paying attention to these details, you’ll consistently create a delicious treat that embodies the homemade joy of baking.
Don’t Rush Rising Time
Patience is arguably the most important ingredient when it comes to baking bread. The rising time for your breadstick dough is critical for developing both flavor and texture. Resist the urge to shorten this period, even if your kitchen is particularly warm. A slow, steady rise allows the yeast to produce more flavorful compounds and ample carbon dioxide, which creates those desirable air pockets, ensuring a light, airy texture. If the dough hasn’t doubled in size, it’s not ready, and forcing it into the oven will result in dense, heavy breadsticks instead of fluffy breadsticks. Give it the time it needs; your taste buds will thank you.
Watch Them in the Oven
Even with a precisely set oven temperature and recommended baking time, vigilance is key when your heart shaped breadsticks are in the oven. Ovens can vary, and what works perfectly in one might overbake or underbake in another. Start checking your breadsticks a few minutes before the recommended baking time. Look for that characteristic golden brown hue and listen for the hollow sound when tapped. If one side is browning faster, rotate the baking sheet. Removing them at just the right moment ensures they are cooked through without becoming dry or burnt, preserving their perfect texture and making them a delicious treat.
Sharing Love with Heart Breadsticks
Beyond their delicious taste and charming appearance, heart shaped breadsticks carry a deeper significance: they are a powerful symbol of sharing love and connection. Making and sharing these homemade treats transcends the simple act of eating; it’s about conveying affection, thoughtfulness, and care. Whether offered to a significant other, a family member, or a friend, these golden brown breadsticks become a tangible expression of warmth. They have a unique ability to make any meal special, transforming everyday moments into cherished memories and spreading genuine homemade joy with every bite.
A Thoughtful Gesture
Presenting someone with homemade heart shaped breadsticks is truly a thoughtful gesture. It shows you’ve invested time and effort specifically for them, something far more personal than a store-bought item. This kind of care resonates deeply, making the recipient feel valued and appreciated. It’s perfect for cheering someone up, celebrating a small victory, or simply letting them know you’re thinking of them. The comforting aroma and delicious taste of warm, fluffy breadsticks can provide immense comfort and happiness, turning a simple offering into a meaningful act of kindness and a memorable delicious treat.
Make Any Meal Special
Don’t reserve your heart shaped breadsticks just for grand celebrations. They possess the magical ability to make any meal special, regardless of its simplicity. Serve them alongside a weeknight pasta dish to instantly elevate the experience, or use them as a charming accompaniment to a casual soup or salad lunch. Even a simple spread of cheese and olives becomes more elegant with these unique breadsticks. Their presence adds a touch of homemade joy and sophistication, turning routine dining into a memorable event. They truly are a versatile and delicious treat that can enhance any table, any day.
Frequently Asked Breadstick Questions
As with any homemade delicacy, you might have questions about handling, storing, and preparing your heart shaped breadsticks to ensure their freshness and convenience. Knowing the answers helps in planning and allows you to enjoy your delicious treat at its best. Proper storage is key to maintaining perfect texture and flavor, while understanding make-ahead options simplifies baking, enabling you to share homemade joy effortlessly. Here are common inquiries for your easy recipe.
Storing Leftover Breadsticks
To keep leftover heart shaped breadsticks fresh, allow them to cool completely on a wire rack first. Once cooled, store them in an airtight container or a resealable plastic bag at room temperature for up to 2-3 days. For longer storage, wrap individual breadsticks tightly in plastic wrap, then place them in a freezer-safe bag or container for up to 1-2 months. To reheat, thaw frozen breadsticks, then warm them in a preheated oven at 350°F (175°C) for 5-7 minutes until soft and warm, regaining their golden brown crispness.
Can I Prepare Ahead?
Yes, preparing your heart shaped breadsticks ahead is a fantastic way to streamline your baking.
- Dough Preparation: Prepare dough up to the first rise. Punch down, oil bowl, cover, and refrigerate up to 24 hours. Let warm to room temperature before shaping and baking.
- Shaped but Unbaked: Shape breadsticks, arrange on baking sheet, cover loosely, and refrigerate up to 12 hours. Proof at room temp for 30 minutes before baking.
- Partially Baked (Par-baked): Bake shaped breadsticks for half the time (7-10 minutes) until lightly golden. Cool, then freeze. Bake from frozen at 375°F (190°C) for 8-12 minutes until fully golden brown and heated through.
These methods offer flexibility, ensuring you enjoy warm, homemade breadsticks with minimal last-minute effort, making them a true delight.