Easy naan bread is simpler to make at home than you think. This recipe guides you through creating delicious, soft flatbread using common kitchen items. You will enjoy the process and the fresh taste of homemade Indian bread, perfect for any meal or snack.
Key Takeaways
- Homemade naan is achievable with basic ingredients and clear steps.
- Proper yeast activation is crucial for soft, airy flatbread.
- The recipe includes prep, cooking, and nutritional details for planning.
- Enjoy freshly cooked naan with various delicious pairings.
Baking naan at home truly satisfies. Simple steps yield warm, fresh bread. The aroma fills your kitchen. It’s a delightful culinary reward. Enjoy this easy, delicious treat.
Get Ready for Easy Naan Bread
Making your own naan bread at home is a wonderfully rewarding experience, transforming simple ingredients into a soft, chewy, and flavorful flatbread. Forget store-bought; this easy naan bread recipe brings the authentic taste of homemade naan right to your kitchen. The beauty of this recipe lies in its simplicity, proving that you don’t need complicated techniques to achieve delicious results. Preparing to bake is half the battle won, and with a little organization, you’ll be well on your way to enjoying freshly cooked Indian bread.
Gather your simple ingredients
Before you begin, ensure you have all your simple ingredients laid out. This not only saves time but also prevents any last-minute rushes. You’ll be working with everyday pantry staples that, when combined, create the magic of soft naan. Having everything measured and ready to go makes the mixing process smooth and enjoyable, especially for those new to baking. Think of it as setting the stage for a delightful culinary performance where you are the star baker of your very own homemade naan.
Prepare your kitchen workspace
A clean and organized workspace is essential for any successful baking endeavor. Clear your counters, ensuring you have enough room for mixing, kneading, and shaping your naan dough. Gather your bowls, measuring cups, spoons, and a rolling pin. If you have a stand mixer, make sure it’s accessible. A little foresight in preparing your kitchen workspace will make the entire process of creating this easy naan bread much more efficient and enjoyable. Get ready to roll up your sleeves and dive into making some incredible flatbread!
All Your Naan Bread Ingredients
The secret to a truly soft and pliable homemade naan lies in its carefully chosen ingredients. This recipe prioritizes simple, readily available items that contribute to the distinctive texture and taste of Indian bread. Understanding the role of each component is key to achieving that perfect naan that puffs up beautifully and melts in your mouth. From the foundational flour to the enriching dairy, every ingredient plays a vital part in crafting your easy naan bread.
List of dry items
For your dry ingredients, you will need all-purpose flour, active dry yeast, sugar, and salt. The flour forms the structure of your naan dough. Active dry yeast is crucial for leavening, giving the naan its characteristic airy pockets and soft texture. Sugar not only adds a touch of sweetness but also acts as food for the yeast, helping it activate and rise effectively. Salt balances the flavors and strengthens the gluten structure in the dough. Ensure your yeast is fresh for the best results, as this directly impacts the softness of your finished naan.
- 2 ½ cups all-purpose flour, plus more for dusting
- 1 teaspoon active dry yeast
- 1 teaspoon granulated sugar
- ½ teaspoon salt
Wet ingredients for dough
The wet ingredients bring everything together, creating a pliable and extensible naan dough. You’ll need warm water, plain yogurt, and a touch of olive oil or melted butter. Warm water is essential for activating the yeast, so ensure it’s not too hot (which can kill the yeast) or too cold (which won’t activate it). Plain yogurt adds tenderness and a slight tang to the naan, contributing to its authentic flavor and soft texture. A little olive oil or melted butter enriches the dough, making it more manageable and adding to the overall deliciousness of your homemade naan. These simple additions make a significant difference in the final product.
- ¾ cup warm water (105-115°F / 40-46°C)
- ¼ cup plain yogurt
- 2 tablespoons olive oil or melted butter
Start Your Easy Naan Dough
Beginning your naan dough involves a couple of critical steps that ensure a light, fluffy, and perfectly textured naan. The activation of yeast is paramount, as it’s what gives your bread its signature rise and delightful chewiness. Once your yeast is bubbling happily, combining all your elements becomes a straightforward process, leading you closer to that amazing homemade naan. This stage sets the foundation for all the deliciousness to come.
Activate yeast and sugar
In a small bowl, combine your warm water (ensure it’s within the ideal temperature range of 105-115°F), the granulated sugar, and the active dry yeast. Give it a gentle stir and then let it sit for about 5-10 minutes. During this time, the yeast will “bloom” – it will become foamy and bubbly on the surface. This is a clear indicator that your yeast is active and ready to work its magic. If your yeast doesn’t bloom, it might be old or the water temperature was off, and you’ll need to start this step again for a successful naan recipe.
Combine all elements
Once your yeast is active, it’s time to bring all the ingredients together. In a large mixing bowl (or the bowl of a stand mixer fitted with a dough hook), combine the all-purpose flour and salt. Pour in the activated yeast mixture, the plain yogurt, and the olive oil (or melted butter). Mix on low speed, or by hand with a wooden spoon, until a shaggy dough forms. Continue mixing until all the flour is incorporated and the dough begins to come together. It might look a bit sticky at this point, but don’t worry; the kneading process will transform it into a smooth, elastic naan dough.
Kneading and Rising Naan Dough
The process of kneading and allowing your naan dough to rise is where the real magic happens, developing the gluten structure and creating the airy texture that makes homemade naan so irresistible. These steps are fundamental to achieving the soft, pliable Indian bread you desire. Patience here will be greatly rewarded, ensuring your easy naan bread is light and delicious, ready to complement any meal or stand alone as a delightful treat.
Knead dough until smooth
Once your ingredients are combined, turn the dough out onto a lightly floured surface. Knead the dough for about 8-10 minutes. If using a stand mixer, knead with the dough hook for 6-8 minutes on medium-low speed. The dough will start off sticky, but as you knead, it will become smooth, elastic, and less sticky. You’ll know it’s ready when it springs back slowly when gently poked. Proper kneading is crucial for developing the gluten, which gives naan its chewiness and helps it puff up during cooking. This step is vital for a truly soft naan.
Let the dough rise
After kneading, lightly grease a clean bowl with a little olive oil. Place the naan dough in the bowl, turning it once to coat with oil. Cover the bowl tightly with plastic wrap or a clean kitchen towel. Place it in a warm, draft-free spot and let it rise for 1 to 1.5 hours, or until it has doubled in size. A warm oven (turned off, but slightly warmed) or a sunny spot on your counter works well. This rising period, known as bulk fermentation, allows the yeast to produce carbon dioxide, creating those desirable air pockets and contributing significantly to the soft and airy texture of your homemade naan. For more baking insights, explore our baking method articles.
Shaping Each Naan Bread Piece
Shaping is a crucial step that transforms your risen naan dough into individual pieces, ready for cooking. The goal is to create flat, oval or teardrop shapes that are characteristic of traditional naan. This process isn’t just about aesthetics; uniform thickness ensures even cooking and helps achieve that perfect puffiness. With a little practice, you’ll be shaping beautiful pieces of easy naan bread in no time, moving closer to enjoying your freshly made flatbread.
Divide dough into balls
Once your naan dough has beautifully doubled in size, gently punch it down to release the air. Turn the dough out onto a lightly floured surface. Divide the dough into 8 equal pieces. A kitchen scale can help ensure even portions, leading to uniformly sized naan. Roll each piece into a smooth ball. Place the dough balls on a lightly floured tray or plate, cover them with a clean kitchen towel, and let them rest for about 10-15 minutes. This short rest allows the gluten to relax, making the dough easier to roll out without it springing back too much.
Roll out flat circles
Now comes the fun part: rolling out your naan bread. Take one dough ball at a time, keeping the others covered. On a lightly floured surface, use a rolling pin to roll each ball into an oval or teardrop shape, about 6-8 inches long and ¼ inch thick. Don’t worry if they aren’t perfectly uniform; homemade naan often has a charming rustic quality. Try to keep the thickness consistent across the piece to ensure even cooking. If the dough springs back, let it rest for another minute or two before continuing to roll. This technique ensures you get that classic shape for your easy naan bread, ready for the skillet.
Cooking Naan Bread to Perfection
Cooking naan bread is a swift and exciting process that brings your homemade naan to life. The key is high heat and quick cooking to achieve that beautiful puff and slight char. This stage transforms your simple dough into a delightful, soft flatbread that rivals any restaurant offering. Getting the skillet to the right temperature is paramount for a successful outcome, ensuring each piece of easy naan bread is cooked to perfection.
Heat up your skillet
For truly excellent naan, a very hot cooking surface is essential. Heat a heavy-bottomed skillet, cast-iron pan, or griddle over medium-high heat until it’s smoking slightly. Do not add any oil to the pan at this stage. The intense heat is what causes the naan to puff up almost instantly, creating those signature air pockets. A well-heated pan ensures that the naan cooks quickly on the outside while remaining soft and tender on the inside, preventing it from drying out. This step is critical for a beautiful, soft naan.
Cook both sides evenly
Carefully place one rolled-out piece of naan dough onto the hot, dry skillet. You’ll notice bubbles forming on the surface almost immediately. Cook for 1-2 minutes, or until you see large bubbles and the underside has golden-brown spots. Flip the naan over and cook for another 1-2 minutes on the second side, until it’s also nicely browned and cooked through. The rapid cooking at high heat gives naan its characteristic texture and appearance. For more on the origins of this popular Indian bread, Naan, you can visit its Wikipedia page.
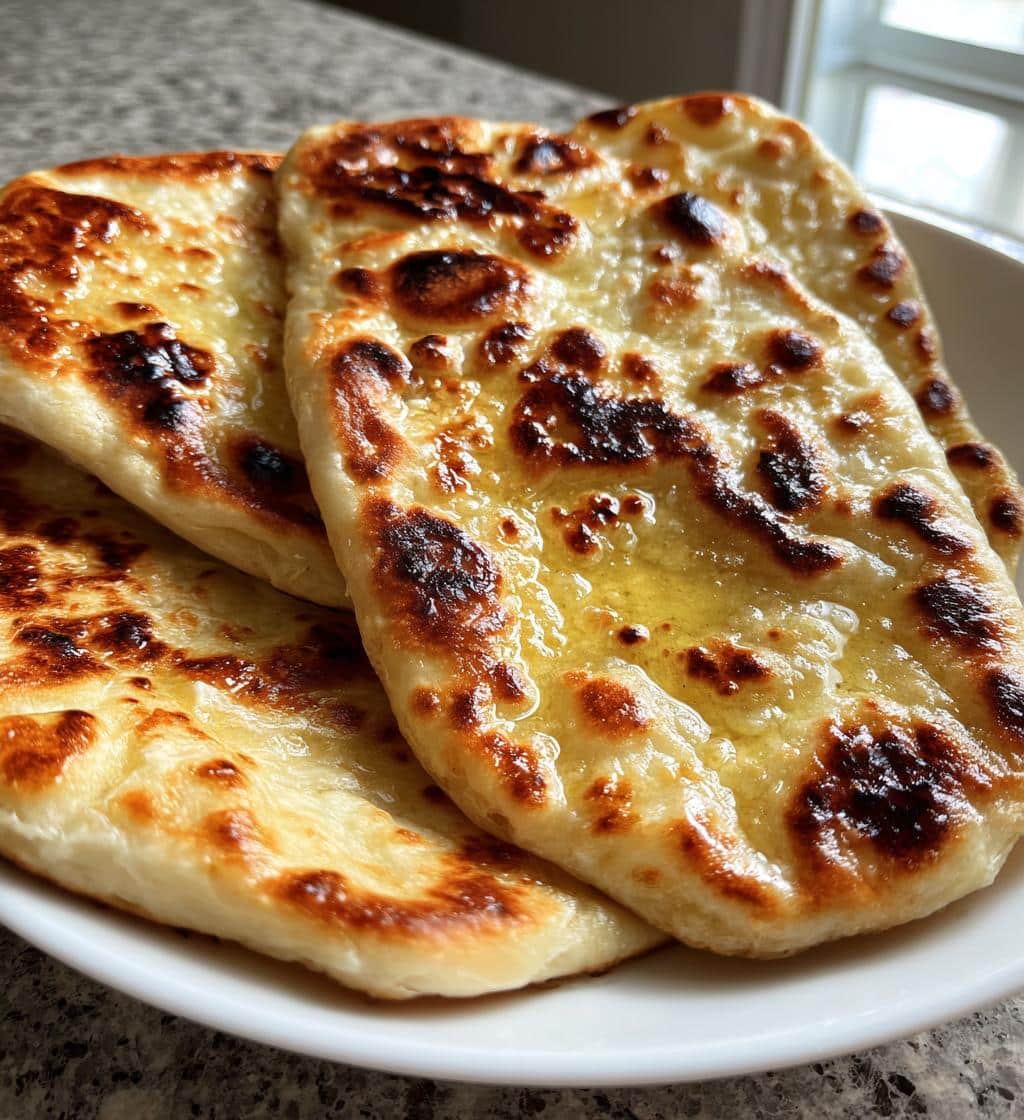
Add butter if desired
As soon as each naan is cooked, transfer it to a plate. If desired, immediately brush the hot naan with melted butter or ghee. This step adds a rich, savory flavor and a beautiful sheen to your easy naan bread. The butter also helps to keep the naan soft and moist. Stack the cooked naans and cover them with a clean kitchen towel to keep them warm and soft while you cook the remaining pieces. This ensures that every piece of homemade naan is warm and ready to enjoy.
Serving Easy Homemade Naan Bread
Serving your easy homemade naan bread is the culmination of your baking efforts. This delicious flatbread is incredibly versatile and pairs well with a multitude of dishes, making it a fantastic addition to any meal. Whether you’re enjoying it fresh off the skillet or alongside a flavorful curry, knowing what to expect in terms of yield helps with meal planning. The joy of homemade naan truly comes to life when shared and savored.
How many naans to expect
This easy naan bread recipe typically yields 8 pieces of naan. This amount is perfect for a family meal or for having some delicious leftovers to enjoy later. Each piece is generously sized, making it a satisfying accompaniment to your main course. Serve your homemade naan warm, either plain or brushed with a little extra butter or ghee. It’s fantastic for scooping up sauces, or simply enjoyed on its own. It’s a delightful addition to any meal, from a simple soup to a hearty Easy Butter Chicken or even a non-traditional pairing like Creamy Chicken Alfredo Lasagna Rolls.
Times for This Naan Recipe
Understanding the time commitment for this naan recipe makes it even more appealing for busy cooks. Despite its homemade appeal, the process is surprisingly efficient, allowing you to enjoy fresh, soft naan without spending hours in the kitchen. Breaking down the times for prep, cooking, and rising helps in planning your baking session, making this easy naan bread a truly convenient and delicious option.
Quick prep time needed
The actual hands-on preparation time for this easy naan bread is remarkably quick. You’ll need approximately 15-20 minutes to gather your simple ingredients, activate the yeast, and mix the naan dough. This includes the initial mixing until the dough comes together. Even with kneading, the active prep time remains minimal, making it a perfect project for a weeknight dinner or a relaxed weekend meal when you crave fresh Indian bread.
How long to cook
Cooking each piece of naan bread is incredibly fast. Once your skillet is hot, each naan takes only 2-4 minutes to cook, flipping once. Since you cook them one at a time (or two if your skillet is large enough), the total cooking time for all 8 pieces will be approximately 15-20 minutes. This quick cooking ensures that your homemade naan is fresh and warm just as your main meal is ready to be served.
Total time from start
From start to finish, including yeast activation, mixing, kneading, rising, and cooking, the total time for this naan recipe is approximately 2 hours. The majority of this is passive rising time, during which you can attend to other tasks. This makes it a very manageable recipe, yielding delicious soft naan with a reasonable time investment for such a rewarding culinary experience.
Naan Bread Nutritional Information
While homemade naan is a delicious treat, it’s helpful to have an idea of its nutritional content, especially if you’re mindful of your diet. This easy naan bread recipe provides a wonderful alternative to less wholesome options, offering a satisfying and flavorful addition to your meal. Understanding the calories and main nutrients can help you integrate this Indian bread into a balanced eating plan.
Calories and main nutrients
A single serving of this easy naan bread (one piece) typically contains around 180-220 calories, depending on the exact ingredients and portion size. It primarily provides carbohydrates, which are your body’s main source of energy. It also contains some protein from the flour and yogurt, as well as a small amount of dietary fiber. These main nutrients contribute to a fulfilling and energy-rich component of your meal, making your homemade naan both delicious and substantial.
Fat and protein details
Each piece of naan will generally have about 4-6 grams of fat, mainly from the olive oil or melted butter and the plain yogurt used in the dough. This contributes to the naan’s tender texture and rich flavor. Protein content usually ranges from 6-8 grams per serving, coming from both the flour and yogurt. This makes your soft naan a more rounded side dish than some other bread options, contributing to satiety and muscle support. For specific dietary needs, adjustments to ingredients, like using low-fat yogurt or reducing added oil, can be considered.
Helpful Tips for Naan Baking
Achieving consistently perfect easy naan bread involves a few key techniques and understandings. These helpful tips are designed to guide you through common baking nuances, ensuring your homemade naan turns out wonderfully soft, pliable, and flavorful every single time. Paying attention to these details will elevate your naan recipe from good to extraordinary, cementing your status as a skilled baker of Indian bread.
Yeast activation matters
As mentioned, proper yeast activation is non-negotiable for soft, airy naan. Always ensure your water is warm, not hot or cold, and that your yeast blooms with a foamy top before proceeding. If your yeast doesn’t show signs of life, don’t waste your other simple ingredients; start again with fresh yeast. This single step is the foundation for a successful rise and the beautiful internal structure of your homemade naan.
Adjust flour as needed
The amount of flour can vary slightly depending on factors like humidity and the specific brand of flour you’re using. If your naan dough feels too sticky after kneading, add a tablespoon of flour at a time until it’s more manageable but still soft. Conversely, if it feels too dry or stiff, a tiny bit of water can help. Trust your touch; the goal is a soft, pliable, and elastic dough, not a dry or overly sticky one. This flexibility ensures your naan recipe is adaptable to your kitchen conditions, leading to perfect results every time. Remember these tips when preparing other dishes, perhaps a delicious Crispy Parmesan Chicken with Garlic Sauce.
Storing Your Easy Naan Leftovers
One of the great things about making easy naan bread is that if you have any leftovers, they can be stored and enjoyed later. Proper storage ensures your homemade naan stays as fresh and delicious as possible, making it a convenient option for quick meals or snacks throughout the week. Knowing how to keep your naan fresh means you can always have a tasty Indian bread on hand.
Keep in an airtight container
To keep your easy naan bread fresh, allow it to cool completely after cooking. Once cooled, store the naan in an airtight container or a resealable plastic bag at room temperature for up to 2-3 days. For longer storage, you can freeze individual naans wrapped tightly in plastic wrap and then placed in a freezer-safe bag for up to 2-3 months. To reheat, sprinkle with a little water and warm in a microwave, oven, or on a skillet until soft and pliable again. This way, your soft naan is always ready for a quick snack or meal.
Enjoying Your Fresh Naan Treat
The moment you pull your easy naan bread from the skillet, warm and fragrant, is incredibly satisfying. This homemade naan is not just a side; it’s a versatile flatbread that can elevate countless meals. Whether you’re using it to scoop up rich sauces or as a base for a mini-pizza, its soft and chewy texture makes every bite a pleasure. Get ready to truly enjoy your fresh naan treat!
Perfect pairings for naan
Homemade naan is incredibly versatile and can be paired with a wide array of dishes. It’s the classic accompaniment to Indian curries like butter chicken, tandoori chicken, or dal. Beyond traditional pairings, naan is fantastic with hummus or other dips, used as a base for personal pizzas, or even as a wrap for grilled meats and vegetables. It also pairs wonderfully with stews and soups, providing a delightful way to soak up every last drop. For more culinary inspiration and ideas, check out Carina Recipes on Pinterest and Instagram. The possibilities are endless for enjoying your soft naan, a truly delicious and easy flatbread. You might also be interested in the broader world of flatbreads, a diverse category that includes naan.