Easy Cream Puff Cake is a delightful dessert, combining crispy choux pastry with a rich, creamy filling. This homemade treat, often called sweet cream puffs, offers a perfect balance of textures and flavors. Follow our simple steps for a fluffy delight that impresses everyone. It’s a quick recipe you’ll adore.
Key Takeaways
- Master the simple yet satisfying process of making choux pastry dough for light and airy puffs.
- Create a rich, creamy filling that perfectly complements the delicate pastry shells.
- Learn effective baking techniques to achieve golden brown perfection and hollow puffs.
- Assemble your easy cream puff cake with confidence, ensuring a beautiful and delicious presentation.
- Gain expert tips for storage, variations, and achieving the best possible texture and taste.
Making this dessert is truly rewarding. Crisp shells hold a sweet cloud. Fresh ingredients create amazing taste. Everyone enjoys a delightful bite. It is a perfect homemade treat.
What is Easy Cream Puff Cake?
A Quick Look at the Recipe
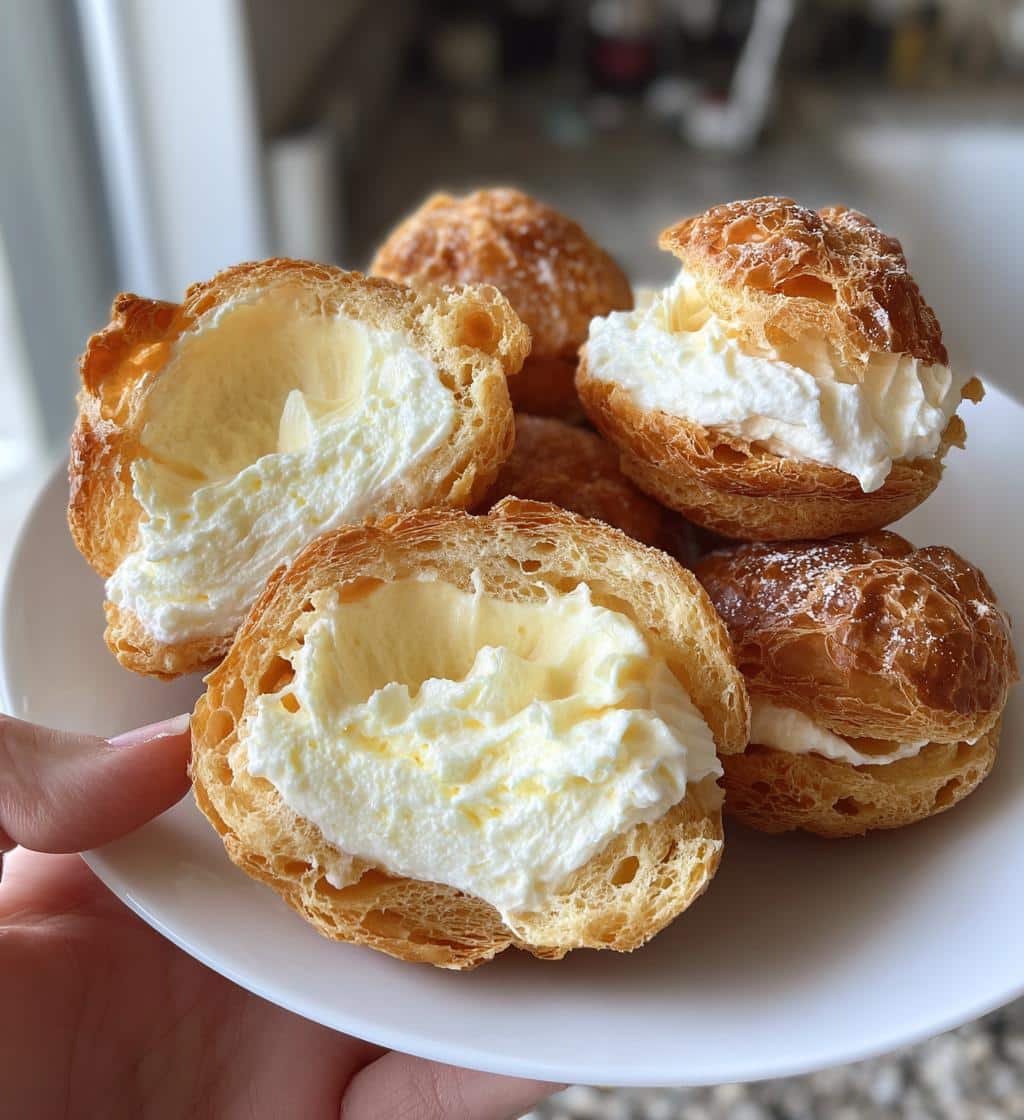
An Easy Cream Puff Cake is a stunning dessert built from individual choux pastry puffs, generously filled with a sweet, creamy mixture, and often stacked or arranged like a cake. This recipe simplifies the traditional process, making it accessible for home bakers. The foundation is the choux pastry dough, a classic French batter that puffs up dramatically when baked, creating hollow, light and airy shells. These shells are then filled with a velvety, often cream cheese or whipped cream-based, creamy filling. Unlike a typical cake, it offers a delightful textural contrast: a slightly crisp exterior giving way to a tender, ethereal interior, all enveloping a cloud of sweet cream. It’s a sophisticated-looking dessert that’s surprisingly simple to master, promising a homemade treat that tastes incredibly indulgent. This quick recipe requires careful steps, but the result is always worth the effort, delivering a truly unique dessert experience.
Why You’ll Love This Dessert
You’ll quickly fall in love with this easy cream puff cake for numerous reasons. Firstly, its elegant appearance makes it a showstopper at any gathering, looking far more complex than it actually is to prepare. The combination of the delicate, crisp choux pastry and the luscious, sweet creamy filling is simply irresistible, offering a pleasing contrast in every bite. It’s a versatile dessert; while often served as a “cake,” individual sweet cream puffs are perfect for portion control or a casual treat. This recipe is designed to be straightforward, breaking down the steps for creating the choux pastry dough and assembling the final product. It’s a wonderful opportunity to bake a classic dessert with confidence, resulting in a fluffy delight that will earn you rave reviews. Moreover, preparing it at home ensures the freshest ingredients and that delightful homemade taste often lacking in store-bought options. For another delightful sweet, try our Quick Italian Cream Cake.
Essential Ingredients for Fluffy Delight
Pantry Staples for Puffs
Creating the perfect choux pastry dough for your fluffy delight requires just a few basic pantry staples. You’ll need water, unsalted butter, all-purpose flour, and eggs. The water and butter form the base, cooked together until the butter is fully melted and the mixture comes to a rolling boil. It’s crucial to use unsalted butter to control the overall saltiness of your sweet cream puffs. All-purpose flour is then added vigorously, forming a cohesive dough ball. This mixture, known as panada, needs to cool slightly before the eggs are incorporated one by one. The eggs are vital; they provide the necessary moisture and leavening for the puffs to rise and become hollow and light and airy during baking. Ensuring your ingredients are fresh and measured accurately will set you up for success in achieving that wonderful golden brown exterior.
Creamy Filling Components
The heart of your easy cream puff cake lies in its creamy filling. This decadent mixture typically combines cream cheese, powdered sugar (also known as confectioners’ sugar), vanilla extract, and heavy whipping cream. The cream cheese provides a delightful tang and stability, creating a richer texture than plain whipped cream. Powdered sugar sweetens the filling and helps stabilize the whipped cream, preventing it from weeping. A good quality vanilla extract enhances the overall flavor, adding warmth and depth to the sweetness. Finally, heavy whipping cream is whipped to stiff peaks, then gently folded into the cream cheese mixture. This aeration is what gives the filling its light, fluffy consistency, making it the perfect complement to the delicate choux pastry. Some variations might include a touch of lemon zest for brightness or different flavorings, but these core components ensure a truly satisfying and perfectly balanced filling for your homemade treat. To learn more about the pastry itself, consult the Wikipedia page on Choux Pastry.
Crafting Your Choux Pastry Dough
Boiling Water and Butter
The first critical step in crafting your choux pastry dough is combining water and butter. In a medium saucepan, add the measured water and unsalted butter. Place the saucepan over medium-high heat. Allow the mixture to come to a full, rolling boil, ensuring that all the butter has completely melted before proceeding. This step is more important than it might seem, as the temperature of this liquid base directly impacts how well the flour will cook in the next stage. A proper boil ensures that the butter is fully emulsified, creating a stable foundation for your choux. Do not rush this step; patience here pays off in the final texture of your light and airy cream puffs.
Mixing Flour to Form a Ball
Once your water and butter mixture is boiling, immediately remove the saucepan from the heat and add all of the all-purpose flour at once. Stir vigorously with a wooden spoon until the mixture comes together and forms a cohesive ball of dough that pulls away from the sides of the pan. Continue to stir and cook the dough over medium heat for another 1-2 minutes, pressing it against the bottom of the pan to “dry it out.” This process helps to evaporate excess moisture and properly cook the flour, which is essential for the choux pastry dough to puff up correctly during baking. You’ll notice a thin film forming on the bottom of the pan, indicating that the dough has been sufficiently dried. This crucial step prepares the dough for accepting the eggs.
Adding Eggs for Perfect Texture
After the dough has been sufficiently dried, transfer it to a large mixing bowl or the bowl of a stand mixer. Allow it to cool for a few minutes until it’s warm to the touch but not hot. This prevents the eggs from scrambling when added. Add the eggs one at a time, mixing well after each addition until the egg is fully incorporated into the dough before adding the next. The dough will initially look separated or curdled, but continue mixing, and it will eventually come together into a smooth, glossy, and thick batter. The final consistency should be soft enough to pipe but firm enough to hold its shape—it should slowly fall off a spoon in a V-shape. Achieving this perfect texture is key to getting light and airy, golden brown cream puffs that are ready for their sweet creamy filling. This precise process is what makes the choux pastry dough so unique.
Baking Your Easy Cream Puff Cake
Preheating Oven and Spooning Dough
Proper oven preheating is paramount for baking your easy cream puff cake to perfection. Preheat your oven to the specified temperature (typically between 400°F and 425°F or 200°C and 220°C). A hot oven provides the initial burst of heat needed for the choux pastry dough to rapidly expand, creating those coveted hollow centers. Line a baking sheet with parchment paper or a silicone mat. Using a pastry bag fitted with a large round tip, pipe the dough into rounds of your desired size, usually about 1.5 to 2 inches in diameter, leaving ample space between each puff to allow for expansion. If you don’t have a pastry bag, you can simply use two spoons to drop dollops of dough onto the baking sheet. For a smooth, golden brown finish, you can gently smooth any peaks on the piped dough with a wet fingertip. Consistent puff size ensures even baking.
Achieve Golden Brown Perfection
Baking the choux pastry to achieve golden brown perfection and a light and airy texture is a two-stage process. Initially, bake at a higher temperature for a short period (e.g., 15-20 minutes) to create steam, which causes the puffs to rise dramatically. Crucially, do not open the oven door during this initial phase, as the sudden drop in temperature can cause the puffs to collapse. After this initial bake, reduce the oven temperature (e.g., to 350°F or 175°C) and continue baking for another 15-25 minutes, or until the puffs are deeply golden brown and feel very light and dry when picked up. The longer, lower temperature bake helps to dry out the interior, preventing the puffs from becoming soggy after cooling. Once baked, turn off the oven, crack the door open slightly, and let the puffs cool inside for about 10-15 minutes. This slow cooling further helps to prevent collapse and maintain their crispness. These golden brown shells are now ready for their creamy sweet filling.
Preparing the Creamy Sweet Filling
Blending Cream Cheese Mixture
The heart of your easy cream puff cake is its luscious, creamy sweet filling. Begin by ensuring your cream cheese is softened to room temperature, as this will prevent lumps and ensure a smooth mixture. In a large bowl, using an electric mixer, beat the softened cream cheese until it is light and fluffy. Gradually add the powdered sugar, beating until fully incorporated and the mixture is smooth and creamy. This blending creates a stable and flavorful base for your filling. You can also add vanilla extract at this stage, along with any other desired flavorings like a hint of lemon zest or a dash of almond extract, to further enhance the sweet cream puffs. The goal is a perfectly smooth consistency before you introduce the whipped cream.
Whipping Cream to Stiff Peaks
Next, in a separate, chilled bowl, whip your heavy cream until it forms stiff peaks. For best results, ensure both your bowl and beaters are very cold – you can even place them in the freezer for 10-15 minutes before whipping. This helps the cream whip faster and achieve a firmer texture. Start whipping on medium speed, gradually increasing to high, until the cream is thick and holds its shape. Be careful not to over-whip, as it can quickly turn into butter. Stiff peaks mean that when you lift the beaters, the cream stands straight up without collapsing. This light and airy whipped cream is essential for creating the fluffy delight of your creamy filling. For more dessert inspiration, check out our Snickerdoodle Cobbler recipe.
Folding for Smooth Consistency
With your cream cheese mixture blended and your heavy cream whipped to stiff peaks, the final step is to combine them. Gently fold the whipped cream into the cream cheese mixture using a rubber spatula. Start by adding about a third of the whipped cream to the cream cheese base and mix it in to lighten the base. Then, add the remaining whipped cream in two additions, folding carefully until just combined. The key is to be gentle, preserving the airiness of the whipped cream. Overmixing will deflate the cream, resulting in a dense rather than fluffy delight. The final creamy filling should be smooth, homogenous, and light, ready to be piped into your golden brown choux pastry shells. This folding technique ensures a perfectly smooth consistency that is both rich and delicate, making your sweet cream puffs truly special. Be sure to check Carina Recipes on Pinterest for visual inspiration.
Assembling Your Easy Cream Puff Cake
Cutting Puffs for Filling
Once your choux pastry shells have cooled completely and are ready for their creamy filling, the next step is to prepare them for assembly. Using a serrated knife, carefully slice each puff horizontally about two-thirds of the way up, creating a “lid” and a larger base. Alternatively, you can make a small hole at the bottom of each puff with a sharp knife or the tip of a piping bag and pipe the filling directly into the center. The slicing method often makes for a more visually appealing presentation and allows you to generously add the cream mixture, ensuring every bite is full of delicious filling. Handle the golden brown puffs gently as they are delicate, especially when freshly baked and cooled.
Generously Adding Cream Mixture
Now for the most satisfying part: filling your sweet cream puffs with the delightful creamy filling. You can use a spoon to dollop the filling into the bottom half of each sliced puff, or for a neater and more professional look, transfer the filling to a piping bag fitted with a large star or round tip. Pipe a generous amount of the cream mixture into the base of each puff. Ensure the filling mounds slightly, so when you place the “lid” back on, it creates a beautiful, full-looking cream puff. The amount of filling is key to achieving that perfect balance of crispy pastry and rich, soft cream. Arrange your filled puffs on a serving platter or stack them creatively to form your easy cream puff cake. A light dusting of powdered sugar or a drizzle of chocolate sauce can be added for extra visual appeal and flavor. This homemade treat is now ready to impress.
Quick Prep and Cooking Times
Total Time for This Dessert
One of the appealing aspects of this easy cream puff cake is its relatively quick prep and cooking times, especially considering the impressive result. While there are several stages to the recipe – making the choux pastry dough, baking the puffs, preparing the creamy filling, and finally assembling – each step is straightforward. Typically, the hands-on preparation time, including making the dough and the filling, is around 45-60 minutes. The baking time for the puffs themselves usually ranges from 30-45 minutes, depending on your oven and puff size. Allowing for cooling time for the puffs before filling, the total estimated time from start to a ready-to-serve easy cream puff cake is approximately 2 to 2.5 hours. This makes it a fantastic quick recipe for entertaining, allowing you to create a stunning dessert without spending an entire day in the kitchen. It truly is a satisfying homemade treat to whip up for any occasion.
Servings to Expect From Recipe
The number of servings you can expect from this recipe largely depends on the size of your individual sweet cream puffs and how you choose to assemble them. A standard recipe typically yields between 24-30 medium-sized cream puffs, which can be arranged into a lovely “cake” formation or served individually. If you’re creating a larger, more elaborate croquembouche-style cake, you might adjust the quantities to make more puffs. For individual servings, each person might enjoy one or two puffs, making this recipe suitable for gatherings of 12-15 people. If serving as a full “cake,” a slice would typically include several puffs. This flexibility allows you to scale the recipe slightly or plan your presentation according to your needs, whether for a small family dessert or a larger celebration. The rich creamy filling ensures even a single puff is a satisfying fluffy delight.
Nutrition Facts for Your Dessert
Calories and Macronutrient Breakdown
Understanding the nutrition facts for your easy cream puff cake can be helpful for dietary planning. As a sweet and indulgent dessert, cream puffs are typically calorie-dense, primarily due to the butter and eggs in the choux pastry dough and the cream cheese and heavy cream in the rich creamy filling. A typical serving will contain a significant amount of carbohydrates from the sugar and flour, fats from the butter and dairy, and protein from the eggs and dairy. The exact calorie and macronutrient breakdown (fats, proteins, carbohydrates) will vary based on precise ingredient measurements, the type of dairy used, and the serving size. For a precise calculation, you might use an online recipe nutrition calculator with your exact ingredient quantities. Remember, this homemade treat is designed for enjoyment, making it a delicious occasional indulgence rather than an everyday staple.
Dietary Information Per Serving
Beyond the macronutrients, the dietary information per serving for your easy cream puff cake also includes other considerations. While rich in flavor and satisfying, sweet cream puffs are generally high in saturated fat and sugar. They typically do not offer a significant amount of dietary fiber or a wide range of vitamins and minerals, though they do provide some calcium from the dairy. Individuals with specific dietary restrictions or health goals, such as managing blood sugar or fat intake, should consume them in moderation. For those seeking alternatives, creative variations can include reducing sugar content or exploring dairy-free options, which are discussed later in this article. Enjoying this fluffy delight as part of a balanced diet allows you to savor the experience without overthinking, especially since it’s a homemade treat made with fresh ingredients. This quick recipe provides a delightful way to satisfy a sweet craving.
Expert Tips for Fluffy Delight
Oven Door and Dough Temperature
Achieving a truly fluffy delight with your easy cream puff cake hinges on a couple of critical expert tips regarding temperature. Firstly, it’s absolutely vital not to open the oven door during the initial high-heat baking phase of the choux pastry dough. Opening the door causes a sudden drop in temperature, which can make your puffs collapse and prevent them from hollowing out properly. Resist the urge to peek! Secondly, pay close attention to the dough temperature when adding the eggs. The panada (flour and butter mixture) must cool down enough so it’s warm, but not hot, to the touch. If the dough is too hot, the eggs will scramble, ruining the texture. If it’s too cool, the eggs won’t incorporate properly. Aim for a temperature where you can comfortably touch it without burning your finger. These two temperature-related tips are paramount for ensuring your sweet cream puffs achieve their signature light and airy interior and golden brown exterior.
Whipping Cream to Avoid Graininess
Another common pitfall when making the creamy filling is ending up with a grainy texture. To avoid this and ensure a smooth, velvety fluffy delight, several tips are key. Always use very cold heavy whipping cream and a chilled bowl and beaters. Cold conditions help the fat globules in the cream emulsify more effectively, leading to a smoother, more stable whipped cream. Start whipping on medium speed and gradually increase to high as the cream thickens. Watch it carefully and stop just as stiff peaks form. Over-whipping is the main culprit for graininess, as it begins to separate the fat from the liquid, leading to a butter-like texture. When folding the whipped cream into the cream cheese mixture, do so gently and sparingly, just until combined, to maintain the airy consistency. This careful approach guarantees a luscious, smooth creamy filling for your homemade treat. For more baking techniques, visit our baking category.
Creative Variations for Your Puffs
Adding Chocolate or Fresh Fruit
While the classic easy cream puff cake is a standalone masterpiece, there are countless creative variations to elevate your sweet cream puffs. For chocolate lovers, consider incorporating cocoa powder into the choux pastry dough for chocolate puffs, or pipe melted chocolate inside the shells before filling. A drizzle of dark, milk, or white chocolate ganache over the finished puffs adds both visual appeal and a rich flavor. Alternatively, you can fold mini chocolate chips into the creamy filling for delightful surprises. Fresh fruit offers a wonderful contrast to the richness of the cream. Sliced strawberries, raspberries, blueberries, or even kiwi can be gently folded into the filling or arranged beautifully around the base and on top of the cream puffs. A combination of fruit and chocolate provides a truly decadent experience, turning your homemade treat into an even more personalized fluffy delight. Try our Peanut Butter Brownie Swirl Cookies for another dessert idea.
Dairy-Free and Healthier Options
For those with dietary restrictions or looking for healthier alternatives, modifying your easy cream puff cake is entirely possible. For dairy-free options, substitute dairy butter with a plant-based butter alternative in the choux pastry dough. For the creamy filling, use a dairy-free cream cheese alternative and whip up a can of chilled full-fat coconut cream (just the thick cream at the top) in place of heavy whipping cream. Ensure all other ingredients, like vanilla extract, are also dairy-free. To create healthier options, you can reduce the amount of powdered sugar in the filling, perhaps sweetening with a sugar substitute or a touch of maple syrup (being mindful of consistency). While the choux pastry itself is inherently rich, portion control is also a simple way to enjoy this fluffy delight more healthily. Exploring these variations allows everyone to enjoy a wonderful homemade treat, adapting the quick recipe to suit various preferences. More insights on cream puffs are available on Wikipedia’s Cream Puff page, and for daily inspiration, check out Carina Recipes on Instagram.
Storing Easy Cream Puff Cake
Refrigeration Guidelines for Leftovers
Proper storage is crucial for maintaining the freshness and deliciousness of your easy cream puff cake, especially when it contains a creamy filling. Due to the dairy-based filling, cream puffs must be refrigerated. Place any leftover cream puffs in an airtight container to protect them from absorbing odors from other foods in the refrigerator and to prevent them from drying out. Store them in the coldest part of your refrigerator. Generally, filled sweet cream puffs are best enjoyed within 1-2 days of assembly. Beyond that, the choux pastry dough tends to soften as it absorbs moisture from the filling, losing its light and airy crispness. While still edible, the texture won’t be as desirable. If you have unfilled puffs, they can be stored at room temperature in an airtight container for up to 2 days, or frozen for longer storage, and filled just before serving.
Keeping Your Puffs Fresh
To maximize the freshness of your easy cream puff cake, consider assembling it closer to the time of serving. If you’re preparing ahead, bake and cool the choux pastry dough shells completely, storing them unfilled. Unfilled, golden brown puffs can be kept in an airtight container at room temperature for up to two days. For longer storage, you can freeze unfilled puffs in a single layer on a baking sheet until solid, then transfer them to a freezer-safe bag for up to one month. When ready to use, simply thaw and crisp them up in a warm oven for a few minutes. Prepare the creamy filling separately and keep it refrigerated. Assemble your sweet cream puffs just a few hours before serving, or even right before, to ensure the pastry remains perfectly crisp and the creamy filling is fresh and luscious. This strategy guarantees a fluffy delight every time, making it truly a premium homemade treat.
Enjoying Your Sweet Cream Puffs
Serving Suggestions for Guests
Enjoying your easy cream puff cake is a delightful experience, and how you serve it can make it even more special for your guests. These sweet cream puffs are elegant enough for formal gatherings yet comforting enough for casual get-togethers. For a beautiful presentation, arrange the filled puffs on a tiered dessert stand or a large platter, perhaps dusted with powdered sugar or adorned with fresh berries and mint leaves. A drizzle of chocolate sauce or caramel can add an extra layer of indulgence. Serve them as individual treats, allowing guests to pick their own, or as a show-stopping centerpiece if assembled into a larger cake formation. Pair them with coffee, tea, or a light dessert wine for a sophisticated touch. The light and airy texture combined with the rich creamy filling makes for an unforgettable ending to any meal, truly a fluffy delight that your guests will adore. This quick recipe yields a dessert that always impresses.
Warming for a Fresh Taste
While most cream puffs are served chilled for the best creamy filling experience, a unique serving suggestion for unfilled puffs (or freshly baked ones) is to slightly warm them. If you have leftover unfilled choux pastry dough shells, or if you’ve frozen them and thawed them, a quick refresh in the oven can revive their crispness and bring out a fresh-baked aroma. Simply place the unfilled golden brown puffs on a baking sheet and warm them in a preheated oven at 300°F (150°C) for about 5-7 minutes. Allow them to cool for a few minutes before filling with your chilled creamy mixture. This technique provides that delightful “just baked” sensation, enhancing the light and airy quality of the pastry. It’s a fantastic way to ensure every homemade treat feels fresh and inviting, even if prepared in advance. However, avoid warming already-filled puffs, as the creamy sweet filling will melt.