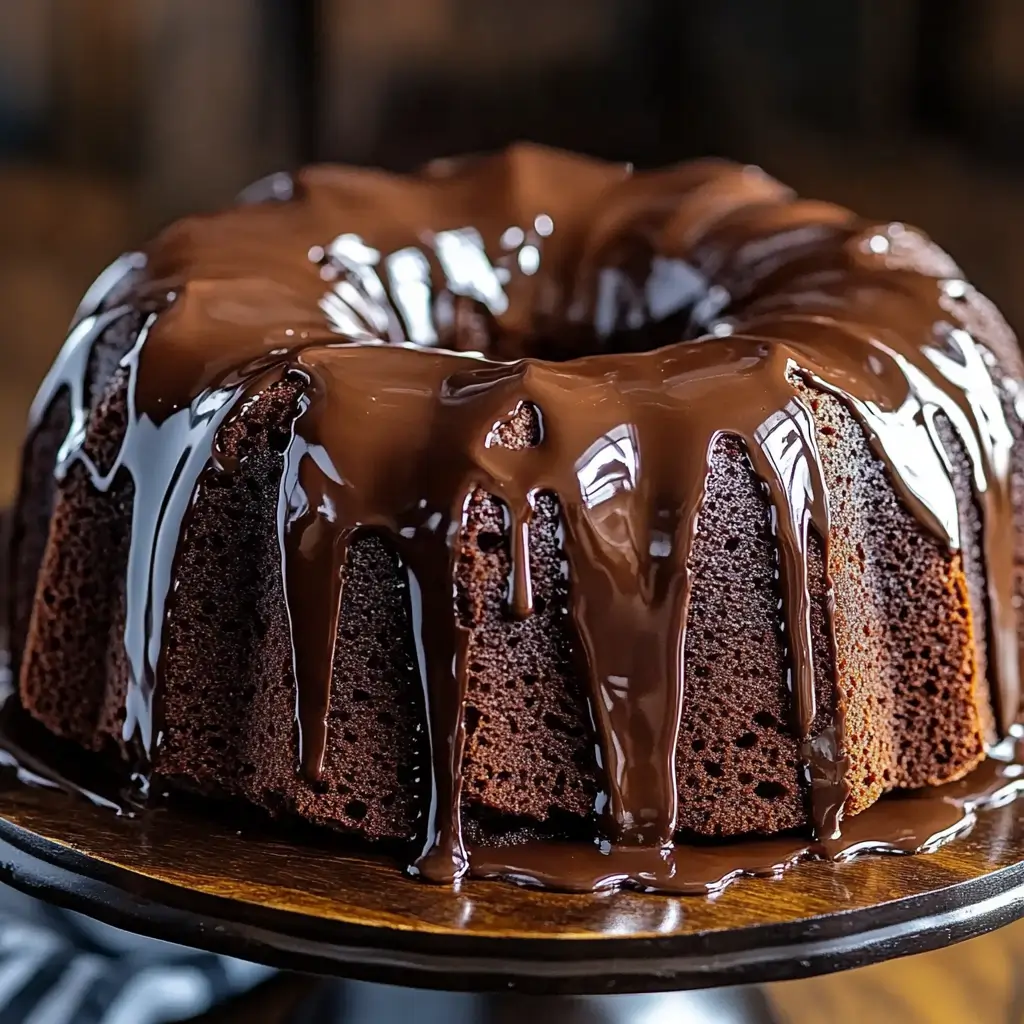
This easy brownie cake recipe is your ticket to a delightfully rich and fudgy dessert. Perfect for any celebration, this homemade brownie cake features moist layers and creamy chocolate frosting. Simple steps ensure a stunning result everyone will adore. Get ready to bake a truly memorable sweet treat!
Key Takeaways
- Master a simple, fudgy brownie cake recipe from scratch.
- Learn quick prep and bake times for a layered dessert.
- Achieve perfect chocolate frosting and creative decorating ideas.
- Benefit from expert baking tips for moist layers and proper storage.
Baking a homemade brownie cake is rewarding. The aroma fills your kitchen. Each fudgy bite brings pure joy. It’s a perfect dessert. Share this sweet happiness with loved ones.
About This Chocolate Brownie Cake
There’s nothing quite like a homemade dessert to bring smiles, and this chocolate brownie cake is designed to do just that. Our easy brownie recipe transforms simple ingredients into a show-stopping, rich, and fudgy brownie cake that’s perfect for any occasion. Forget complicated techniques; this recipe focuses on straightforward steps that guarantee delicious results, even for novice bakers. The result is a beautifully layered confection with a dense, moist crumb, topped with a velvety smooth chocolate frosting that’s utterly irresistible. We’ve poured our best baking tips into this guide to ensure your success, covering everything from ingredient selection to the final decorative touches. You’ll be proud to serve this delightful creation.
Quick Prep and Bake Times
One of the best features of this particular recipe is its efficiency. We understand that time in the kitchen is precious, which is why we’ve optimized this easy brownie recipe for quick prep and bake times. The batter comes together swiftly, requiring minimal fuss and special equipment. You can realistically have your brownie layers cooling on a rack in under an hour, making this a fantastic option for a spontaneous treat or when you need a dessert in a hurry. The straightforward instructions mean you spend less time measuring and more time enjoying the baking process.
Servings and What You Need
This recipe is designed to yield a generously sized two-layer chocolate brownie cake, typically serving 10-12 people. It’s ideal for family gatherings, potlucks, or making a grand statement at a birthday party. Before you begin, gather all your ingredients, including pantry staples like flour, sugar, cocoa powder, and butter. You’ll also need two 8-inch round cake pans for the layers. For other delightful treats, consider exploring our desserts category, where you can find everything from quick Italian cream cake to other delectable sweets. Having all your tools and ingredients ready will ensure a smooth baking experience, making your journey to a glorious fudgy brownie cake a breeze. For more information on the history of brownies, you can visit Wikipedia’s Brownie page.
Ingredients for Your Brownie Cake
Crafting the perfect fudgy brownie cake begins with selecting the right ingredients. Quality components are the foundation of any outstanding dessert, ensuring both incredible flavor and texture. For this homemade brownie cake, we focus on a balance of rich chocolate, tenderizing fats, and just enough sugar to sweeten without overwhelming the deep cocoa notes. We’ve meticulously chosen proportions to deliver that classic dense, moist, and delightfully chewy brownie experience in a layered cake format. Pay attention to the types of cocoa and chocolate you use, as they significantly impact the final taste profile of your chocolate brownie frosting and the cake itself.
For the Fudgy Brownie Base
To achieve that signature fudgy texture, you’ll need all-purpose flour, granulated sugar, unsweetened cocoa powder (natural or Dutch-processed works, though Dutch often yields a darker, less acidic flavor), baking powder for a slight lift, salt to balance the sweetness, unsalted butter, large eggs, and pure vanilla extract. The combination of melted butter and cocoa creates a rich, deep chocolate flavor that forms the heart of this easy brownie recipe. Using good quality cocoa makes a noticeable difference, contributing to the overall decadence of the cake. These baking tips are crucial for achieving the perfect base.
What You Need for Frosting
No special occasion cake is complete without a luscious frosting. For our chocolate brownie frosting, you’ll need unsalted butter (softened), unsweetened cocoa powder, powdered sugar (confectioners’ sugar), a splash of milk (dairy or non-dairy), and a touch more vanilla extract. This combination whips up into a creamy, dreamy frosting that complements the rich brownie layers without being overly sweet. It’s a simple brownie cake frosting that comes together quickly, providing a smooth canvas for assembly and decoration. The quality of your cocoa here will again shine through, so opt for a brand you enjoy.
Optional Fun Decorations
While the chocolate brownie frosting is beautiful on its own, adding optional fun decorations can truly elevate your layered brownie cake. Consider chocolate shavings, sprinkles (chocolate or colorful), mini chocolate chips, fresh berries like raspberries or strawberries, or even a drizzle of caramel or chocolate sauce. These additions allow you to customize your homemade brownie cake to suit any theme or personal preference, making it even more appealing as a dessert recipe for special moments. Don’t be afraid to get creative and personalize your creation!
Start This Easy Brownie Cake Recipe
Getting started with this easy brownie cake recipe is a straightforward process, designed to minimize stress and maximize enjoyment. The initial steps set the foundation for your delicious layered brownie cake, ensuring that your baking environment is optimized for success. We’ll focus on proper oven preparation and the crucial first mixing stages that help create the signature fudgy texture of this homemade brownie cake. By taking a few moments to correctly prepare your tools and ingredients, you’re already well on your way to baking the best brownie cake you’ve ever tasted. These initial baking tips are key to a smooth journey.
Preheat Oven and Prep Pans
First things first: preheat your oven to 350°F (175°C). This ensures a consistently hot baking environment, which is vital for even baking and proper rise. While the oven preheats, prepare your two 8-inch round cake pans. Grease them thoroughly with butter or non-stick spray, then flour them, tapping out any excess. For an extra layer of non-stick insurance and easy removal, line the bottoms with parchment paper circles. This careful preparation is a small but mighty step in our easy brownie recipe, preventing sticking and ensuring your beautiful fudgy brownie cake layers release perfectly every time. Proper pan preparation is a fundamental baking tip that can prevent many common baking frustrations, especially for layered cakes.
Mix Melted Butter and Sugar
In a large mixing bowl, combine the melted unsalted butter with the granulated sugar. Whisk these two ingredients together until they are well combined and smooth. This step is more than just mixing; the warmth of the melted butter helps dissolve the sugar, which contributes to the moist and fudgy texture of the brownie layers. It also lays the groundwork for incorporating the subsequent ingredients without overmixing, a common pitfall in brownie baking. This initial blend creates a rich, sweet base that will ultimately become your delectable chocolate brownie cake. Achieving a smooth mixture here ensures uniform sweetness throughout your simple brownie cake, setting the stage for the rest of the recipe.
Making the Brownie Batter Correctly
The secret to a truly fudgy brownie cake lies in how you mix the batter. Overmixing can lead to a tough, dry cake, while under-mixing might leave pockets of uncombined ingredients. This section details the precise steps to combine your wet and dry ingredients, ensuring a perfectly textured, moist, and rich homemade brownie cake. By following these baking tips carefully, you’ll create a smooth, glossy batter that bakes into the best brownie cake layers, ready for your decadent chocolate brownie frosting. This easy brownie recipe is all about precision in simplicity.
Add Eggs and Vanilla
Once your melted butter and sugar mixture is smooth and slightly cooled (so it doesn’t scramble the eggs), it’s time to incorporate the eggs and vanilla extract. Add the eggs one at a time, mixing well after each addition until just combined. The eggs contribute to the fudginess and richness of the brownie layers, while the vanilla enhances the overall chocolate flavor. Be careful not to overbeat at this stage; we’re aiming for incorporation, not aeration. Overbeating can introduce too much air, leading to a more cake-like rather than fudgy brownie. This step is crucial for the perfect texture of your special occasion cake.
Sift and Combine Dry Mix
In a separate medium bowl, whisk together your dry ingredients: the all-purpose flour, unsweetened cocoa powder, baking powder, and salt. Sifting these ingredients together is a key baking tip; it breaks up any lumps in the flour and cocoa, ensuring a smooth, uniform batter. This also evenly distributes the baking powder and salt, so your brownie cake layers rise consistently and are perfectly seasoned. A well-combined dry mix prevents pockets of unmixed ingredients, which can negatively impact the texture and taste of your easy brownie recipe.
Gently Fold Wet and Dry
Now, gradually add the dry ingredient mixture to the wet ingredients in small batches. Using a spatula, gently fold the dry into the wet until just combined. The key word here is “gently.” Avoid vigorous mixing, as this develops the gluten in the flour, resulting in a tougher brownie. A few streaks of flour are acceptable; overmixing is the enemy of a fudgy brownie cake. Once barely combined, stop. This careful folding technique ensures a tender, chewy crumb for your homemade brownie cake, making it the best brownie cake you’ll ever bake and savor as a dessert recipe.
Baking Perfect Brownie Cake Layers
Baking the layers for your fudgy brownie cake is a critical step where attention to detail pays off. The goal is to achieve a dense, moist, and perfectly cooked brownie layer that remains delightfully chewy. This section guides you through dividing the batter, timing the bake, and most importantly, cooling the layers correctly. Following these baking tips will ensure your homemade brownie cake foundation is impeccable, ready to be transformed into a stunning layered dessert with creamy chocolate brownie frosting. Precision here is key for an easy brownie recipe that yields professional results.
Divide Batter into Pans
Once your brownie batter is perfectly mixed, it’s time to divide it evenly between your two prepared 8-inch round cake pans. An easy way to ensure even layers is to use a kitchen scale; simply place each pan on the scale and pour half of the batter into each. If you don’t have a scale, eyeball it, making sure the batter appears roughly equal in both pans. Gently spread the batter to the edges of the pan with a spatula, creating a smooth, even surface. Even distribution is crucial for uniform baking, preventing one layer from being thicker or thinner than the other in your special occasion cake.
Bake Until Just Fudgy
Transfer the pans to your preheated oven and bake for approximately 25-30 minutes. The baking time can vary depending on your oven, so it’s important to keep an eye on them. The trick to a fudgy brownie cake is not to overbake. You want the edges to be set, and a toothpick inserted into the center should come out with moist crumbs attached, but not wet batter. If the toothpick comes out completely clean, your brownies might be on their way to being dry and cake-like, rather than fudgy. This is one of the most important baking tips for any brownie. For other delicious dessert ideas, check out our peanut butter brownie swirl cookies.
Cool Layers Completely
Once baked, remove the brownie layers from the oven and let them cool in their pans on a wire rack for about 10-15 minutes. This allows them to firm up slightly before you attempt to remove them. After this initial cooling, carefully invert the pans to release the brownie layers onto the wire rack to cool completely. This step is non-negotiable! Attempting to frost warm brownie layers will result in a melty, messy chocolate brownie frosting situation. Complete cooling can take several hours, or you can even chill them in the refrigerator for an hour or so once they’ve reached room temperature. Patience here ensures your easy brownie recipe assembly goes smoothly.
Whip Up Creamy Chocolate Frosting
A truly magnificent fudgy brownie cake demands an equally glorious chocolate brownie frosting. This recipe delivers a rich, creamy, and spreadable frosting that perfectly complements the dense brownie layers without being overly sweet. It’s an easy brownie recipe component that comes together quickly, elevating your homemade brownie cake to a dessert masterpiece. The texture and flavor of this frosting are designed to make your layered brownie cake a showstopper, adding that essential velvety finish. For insights into the art of frosting, you might enjoy visiting Wikipedia’s page on Frosting.
Beat Butter and Cocoa
In a large mixing bowl, using an electric mixer, beat the softened unsalted butter until it’s light and fluffy. This usually takes about 2-3 minutes. Then, add the unsweetened cocoa powder to the butter. Beat them together until well combined, scraping down the sides of the bowl as needed. This initial step ensures that the cocoa is fully incorporated into the butter, preventing any dry pockets and creating a rich chocolate base for your frosting. The deep color and intense chocolate flavor of this homemade brownie cake frosting will be evident from this stage. This blend sets the stage for a truly decadent chocolate brownie cake.
Add Sugar, Milk, and Vanilla
Next, gradually add the powdered sugar, about a cup at a time, beating well after each addition until smooth. The frosting will become very thick. Once all the sugar is incorporated, slowly drizzle in the milk (starting with less and adding more as needed) and the vanilla extract. Beat on medium-high speed until the frosting is light, fluffy, and spreadable. You might need a little more or less milk to reach your desired consistency. The goal is a smooth, pipeable frosting that holds its shape, perfect for covering your simple brownie cake layers. This step is crucial for achieving the ideal texture for your special occasion cake, ensuring your chocolate brownie cake looks as good as it tastes.
Assemble Your Chocolate Brownie Cake
Assembling your chocolate brownie cake is where all your careful baking comes together, transforming individual layers into a stunning, cohesive dessert. This stage allows you to create a beautiful, layered brownie cake that’s not only delicious but also visually appealing. With the right techniques, even a novice can achieve a professional-looking finish. We’ll cover leveling the layers, applying the rich chocolate brownie frosting, and stacking everything perfectly to create a homemade brownie cake that’s ready for any special occasion. These assembly baking tips are crucial for an easy brownie recipe with an elegant presentation.
Level Cake Tops (If Needed)
After your brownie layers have completely cooled, inspect their tops. If they’ve domed slightly during baking, you’ll want to gently level them. Using a long, serrated knife, carefully slice off the raised portion to create a flat surface. This step is important for a stable, even layered brownie cake. Flat layers stack neatly, preventing your cake from wobbling or leaning. While brownies typically don’t dome as much as traditional cakes, a quick trim ensures the best possible foundation for your chocolate brownie cake, making the frosting and stacking process much smoother. This simple baking tip ensures a polished final look.
Frost First Brownie Layer
Place one leveled brownie layer onto your serving plate or cake stand. Dollop a generous amount of your creamy chocolate brownie frosting onto the center of this layer. Using an offset spatula or the back of a spoon, carefully spread the frosting evenly across the top, extending it almost to the edges. Don’t worry about perfection at this stage; you’ll have another chance with the outer layer. This first layer of frosting acts as a delicious glue, securing the top layer and adding another dimension of flavor to your fudgy brownie cake. This creates the essential base for your easy brownie recipe stack.
Stack and Frost Entire Cake
Carefully place the second brownie layer directly on top of the first, aligning it as best as possible. Now, dollop the remaining chocolate brownie frosting onto the top of the second layer. Spread it evenly across the top, then work your way down the sides of the cake, using your spatula to create a smooth, even coating. For a rustic look, you can swirl the frosting. For a cleaner finish, use a bench scraper or a long, straight spatula to smooth the sides. Chill the cake briefly if the frosting becomes too soft to work with. This final frosting step completes your impressive homemade brownie cake, ready to be decorated for a special occasion cake.
Decorate Your Easy Brownie Cake
Decorating your easy brownie cake is the final flourish that transforms a simple brownie cake into a stunning centerpiece. It’s where your creativity can truly shine, making this dessert recipe personal and perfect for any special occasion. Whether you opt for elegant simplicity or a playful design, thoughtful decorations elevate the entire presentation of your fudgy brownie cake. These simple touches can enhance the appeal of your homemade brownie cake and make it even more memorable. Let’s make this layered brownie cake truly yours!
Fun Ideas for Toppings
The possibilities for decorating your chocolate brownie cake are endless! For a classic look, sprinkle chocolate shavings or curls over the top and sides. If you’re celebrating a birthday or a festive event, colorful sprinkles are always a hit. Mini chocolate chips or chocolate chunks pressed into the sides or sprinkled on top add extra texture and chocolatey goodness. Fresh berries like raspberries or strawberries provide a beautiful contrast in color and a burst of fresh flavor. You could also drizzle melted chocolate or a caramel sauce over the top for an elegant touch. For more inspiration, check out our Pinterest page for visual ideas that will make your special occasion cake truly stand out. Don’t be afraid to experiment and make this homemade brownie cake uniquely yours.
Tips for This Easy Brownie Cake
To ensure your fudgy brownie cake turns out perfectly every time, there are a few key baking tips worth keeping in mind. These insights are designed to help you avoid common pitfalls and achieve the best possible texture and flavor for your homemade brownie cake. Mastering these techniques will make this easy brownie recipe even more enjoyable and your results consistently delicious. From baking to cooling, attention to these details will elevate your dessert recipe, making every slice of your layered brownie cake a delightful experience.
Don’t Overbake Brownie Layers
This is arguably the most crucial baking tip for any brownie-based dessert. Overbaking is the quickest way to turn a fudgy brownie cake into a dry, cakey one. Always err on the side of underbaking slightly. The layers should appear set at the edges, but a toothpick inserted into the center should come out with moist crumbs attached, not completely clean. Remember, brownies continue to cook slightly from residual heat even after they’re removed from the oven. Pull them out when they still look just a little underdone in the very center for that ultimate fudgy texture. This ensures your easy brownie recipe maintains its signature moistness.
Cool Cakes Fully Before Frosting
Patience is a virtue, especially when it comes to frosting. Attempting to frost warm brownie layers is a recipe for disaster; your beautiful chocolate brownie frosting will melt and slide right off, creating a messy situation. Allow the brownie layers to cool completely to room temperature, which can take several hours. If you’re short on time, you can place the cooled layers in the refrigerator for about an hour to speed up the process. A fully chilled cake is much easier to work with, resulting in a cleaner, more professional-looking layered brownie cake that holds its shape beautifully. This step is non-negotiable for a neat homemade brownie cake.
Make Brownie Layers Ahead
To make the baking process even easier and more convenient, consider baking the brownie layers a day in advance. Once completely cooled, wrap each layer tightly in plastic wrap and store them at room temperature for up to 24 hours, or in the refrigerator for up to 3 days. This not only breaks up the workload but also allows the flavors to meld and the brownies to become even fudgier. When you’re ready to assemble, simply prepare your chocolate brownie frosting and proceed. This flexibility makes our easy brownie recipe perfect for planning ahead for a special occasion cake, ensuring a stress-free baking experience.
FAQs for Easy Brownie Cake Recipe
We’ve gathered some frequently asked questions to help you master this easy brownie cake recipe. Understanding these common queries can enhance your baking experience and ensure your fudgy brownie cake turns out perfectly every time. From prep to storage, these baking tips address concerns that can arise when making a homemade brownie cake. Our goal is to make this dessert recipe as straightforward and enjoyable as possible, so you can confidently create a delicious layered brownie cake that everyone will love.
Can I Make This Ahead?
Absolutely! This easy brownie cake is an excellent make-ahead dessert. You can bake the brownie layers up to 2-3 days in advance. Once completely cooled, wrap each layer tightly in plastic wrap and store them at room temperature or in the refrigerator. You can also make the chocolate brownie frosting a day ahead and store it in an airtight container in the fridge; just be sure to re-whip it briefly before frosting. Assembling the cake closer to serving time ensures the freshest taste and best appearance for your special occasion cake.
How to Store Leftovers?
To store any leftover fudgy brownie cake, place it in an airtight container. If you have a cake dome, that works perfectly too. Store the cake at room temperature for up to 2-3 days, or in the refrigerator for up to 5 days. Bringing refrigerated slices to room temperature for about 15-30 minutes before serving can enhance the moistness and flavor. This simple brownie cake stores beautifully, making it convenient for enjoying over several days.
Freeze This Brownie Cake?
Yes, this homemade brownie cake freezes exceptionally well! You can freeze individual unfrosted brownie layers, wrapped tightly in plastic wrap and then foil, for up to 3 months. For a fully assembled and frosted cake, freeze it unwrapped until the frosting is solid (about 1-2 hours), then wrap it tightly in plastic wrap and foil. Thaw the frozen cake in the refrigerator overnight, then bring it to room temperature before serving. Freezing is a fantastic way to preserve your delicious dessert recipe for future enjoyment or for an impromptu celebration.
More Questions on Brownie Cake
Beyond the basics, you might have additional questions about customizing or troubleshooting your fudgy brownie cake. This section addresses some more specific queries and offers advanced baking tips to help you adapt this easy brownie recipe to various dietary needs or preferences. Our aim is to empower you to confidently bake the best brownie cake, making your homemade brownie cake experience even more rewarding. Dive into these insights to perfect your layered brownie cake for any circumstance or special occasion cake.
Gluten-Free Option Available?
Yes, you can absolutely make this a gluten-free brownie cake! Simply substitute the all-purpose flour with a 1:1 gluten-free baking flour blend that contains xanthan gum. Follow the rest of the easy brownie recipe as written. The fudgy texture of brownies makes them very forgiving for gluten-free conversions. Always check your other ingredients, like cocoa powder and baking powder, to ensure they are certified gluten-free if cross-contamination is a concern for a specific dietary need. This adjustment means everyone can enjoy a slice of this delicious chocolate brownie cake.
Can I Double the Recipe?
You can certainly double this easy brownie recipe. If you double it, you will likely need two sets of 8-inch round pans to maintain the layer thickness, or you can bake it in a larger pan (like a 9×13 inch rectangular pan) for a single-layer sheet cake. Be aware that baking times will increase if using a single, larger pan, so adjust accordingly and rely on the toothpick test for doneness. Double all ingredients accurately to maintain the perfect balance for your layered brownie cake. Consider other larger scale dessert options like our snickerdoodle cobbler if you need to feed a crowd.
What About Cracked Layers?
Cracked brownie layers can sometimes happen, but don’t fret! If your layers crack a little when you’re cooling or handling them, remember that the chocolate brownie frosting is your best friend. Once the cake is assembled and frosted, any minor cracks will be completely hidden. For larger cracks, you can use a bit of extra frosting as a “spackle” before applying the main layer of frosting. The fudgy nature of this homemade brownie cake means that even slightly imperfect layers will still taste amazing, and the frosting will work wonders for appearance. Share your baking journey and successes with us on Instagram @CarinaRecipes20!
Enjoy Your Delicious Brownie Cake!
Great for Birthdays and Parties
Congratulations, you’ve just created a truly delicious and impressive chocolate brownie cake! This fudgy brownie cake is more than just a dessert recipe; it’s a celebration in itself, perfect for any special occasion. Whether it’s a birthday bash, a holiday gathering, or just a sweet ending to a family dinner, this homemade brownie cake is guaranteed to be a crowd-pleaser. Its rich flavor, moist texture, and beautiful layered appearance make it a standout. Enjoy the fruits of your labor and share this delightful creation with your loved ones, knowing you’ve crafted a truly memorable treat. Every bite of this easy brownie recipe will be savored.