Red Velvet Oreo Cheesecake is a delightful dessert combining rich red velvet flavor with crushed Oreo cookies in a creamy cheesecake. This recipe will guide you through each step, ensuring a beautiful and delicious result. Impress your friends and family with this homemade masterpiece, perfect for any special occasion or simple indulgence.
Key Takeaways
- Master the crust with finely crushed Oreos for a stable base.
- Achieve a silky-smooth cheesecake filling using room temperature ingredients.
- Utilize a water bath during baking to prevent common cheesecake cracks.
- Ensure proper cooling and overnight chilling for optimal texture and taste.
- Decorate with chocolate ganache, cream cheese frosting, and extra Oreos for a stunning finish.
Baking cheesecake feels incredibly rewarding. The sweet aroma fills your kitchen beautifully. A perfect slice brings immense joy. Share this special dessert with loved ones. It’s truly worth the delightful effort.
Your Red Velvet Oreo Cheesecake Journey
Embarking on the creation of a Red Velvet Oreo Cheesecake is a culinary adventure that promises a rich, creamy, and visually stunning dessert. This recipe merges the classic tang and vibrant color of red velvet cake with the beloved crunch of Oreo cookies, all nestled within a smooth, decadent cheesecake. Whether you are an experienced baker or new to cheesecake making, our detailed instructions will guide you through every phase, from the initial preparation to the final decorative touches. The result is a dessert that not only tastes incredible but also looks like it came from a professional patisserie. Get ready to impress your guests and satisfy your sweet cravings with this truly special treat.
Getting Started with Prep
Proper preparation is the cornerstone of any successful baking project, especially for a delicate dessert like cheesecake. Begin by gathering all your ingredients and ensuring they are at room temperature, a crucial step for achieving a smooth, lump-free filling. This usually means taking out cream cheese, eggs, and sour cream at least an hour or two before you plan to start mixing. Read through the entire recipe once to familiarize yourself with the process and timing. Prepare your springform pan by greasing it and wrapping the outside with heavy-duty aluminum foil, creating a watertight barrier for the water bath. Pre-heating your oven to the correct temperature is also vital to ensure even baking from the very beginning. Having your tools and ingredients ready simplifies the process and allows for a more enjoyable baking experience.
Total Time and Servings
While the Red Velvet Oreo Cheesecake is undeniably impressive, it does require a bit of time and patience. The active preparation time for this recipe typically ranges from 45 minutes to an hour, involving crust creation, filling mixing, and water bath setup. Baking will take approximately 60-75 minutes. However, the most crucial part of the process is the cooling and chilling phase, which requires several hours at room temperature followed by an overnight refrigeration (at least 8 hours). This extended chilling time is non-negotiable for the cheesecake to properly set, develop its full flavor, and achieve that signature dense yet creamy texture. Once ready, this recipe yields one 9-inch cheesecake, which generously serves 12-16 people, making it perfect for gatherings, holidays, or simply having delicious leftovers to enjoy throughout the week.
All Ingredients for This Cheesecake
Creating a truly magnificent Red Velvet Oreo Cheesecake begins with selecting the right ingredients. Each component plays a vital role in achieving the perfect balance of flavor, texture, and visual appeal. From the crunchy base to the velvety filling and the luscious toppings, quality ingredients make all the difference. We focus on common pantry staples combined with a few star items that define this dessert’s unique character. Always opt for full-fat dairy products for the creamiest, most decadent results. Freshness matters, especially for ingredients like eggs and vanilla extract, which contribute significantly to the overall taste profile. Having everything measured out and ready before you start mixing will ensure a smooth and enjoyable baking process.
What You Need for the Crust
The foundation of our Red Velvet Oreo Cheesecake is a simple yet incredibly flavorful crust. For this, you will need a generous amount of Oreo sandwich cookies, specifically the red velvet flavored ones if you can find them, otherwise regular Oreos with a touch of red food coloring will work for aesthetic purposes. These cookies will be crushed finely to create a crumb that forms the base. To bind the crumbs together and create a sturdy crust, you’ll also need melted unsalted butter. The butter helps compact the crumbs and ensures the crust holds its shape after baking. A pinch of granulated sugar can be added for extra sweetness, though the Oreos are already quite sweet. The combination of these two primary ingredients creates a rich, chocolatey, and slightly crunchy base that perfectly complements the creamy cheesecake filling. Make sure your butter is fully melted but not boiling hot when you mix it with the crumbs to avoid a greasy crust.
Cheesecake Filling Essentials
The heart of any cheesecake lies in its filling, and for our red velvet version, we aim for supreme creaminess and rich flavor. Key ingredients include several blocks of full-fat cream cheese, which must be softened to room temperature for a smooth consistency. You’ll also need granulated sugar to provide sweetness and structure. For the signature red velvet flavor and color, we incorporate a small amount of unsweetened cocoa powder, a splash of white vinegar, and plenty of red food coloring (gel food coloring provides the best vibrancy). Large eggs, also at room temperature, are essential for binding the mixture and providing richness, while a touch of vanilla extract enhances all the flavors. To add moisture and a slight tang, full-fat sour cream is used. Finally, an ample amount of chopped Oreo cookies are folded into the filling, adding textural contrast and an extra layer of cookie flavor. Each ingredient contributes to the complex profile of this luxurious cheesecake.
Crust for Red Velvet Oreo Cheesecake
A perfect cheesecake begins with an outstanding crust. Our Red Velvet Oreo Cheesecake calls for a robust and flavorful base that can stand up to the rich, creamy filling. This section details how to achieve a perfectly crushed Oreo crust that is both stable and delicious. The beauty of an Oreo crust is its simplicity and the delightful contrast it provides to the smooth cheesecake above. Taking the time to prepare it correctly ensures your dessert has the ideal foundation, preventing crumbling and providing a pleasant texture with every bite. The combination of chocolatey cookie crumbs and melted butter creates an aromatic base that is irresistible and truly elevates the entire cheesecake experience.
Crushing Oreo Wafers Smoothly
To achieve a uniformly textured crust, crushing the Oreo wafers smoothly is paramount. You have a couple of excellent methods for this. The easiest and most efficient way is to use a food processor. Simply place the entire package of Oreo cookies (cream filling included) into the food processor and pulse until fine crumbs form. Be careful not to over-process, as you want crumbs, not a paste. If you don’t have a food processor, a heavy-duty zip-top bag and a rolling pin work wonderfully. Place the Oreos in the bag, seal it, and then roll over them with the rolling pin until they are finely crushed. Aim for a consistency similar to coarse sand, without large chunks. Once crushed, transfer the crumbs to a medium bowl, add the melted butter, and mix thoroughly until all crumbs are moistened. This ensures that the crust will bind together properly when pressed into the pan.
Baking the Crust Golden
After preparing your Oreo crumb mixture, it’s time to form and bake the crust. Press the moistened crumbs firmly and evenly into the bottom of a 9-inch springform pan. You can use the bottom of a flat glass or a measuring cup to help compact the crumbs for a dense, stable base. Once pressed, pre-bake the crust in a preheated oven at 350°F (175°C) for about 8-10 minutes. This short bake time helps to set the crust, making it less likely to get soggy once the cheesecake filling is added and baked. It also enhances the flavor of the Oreo crumbs, giving them a slightly toasted, richer taste. Keep a close eye on it to prevent burning. After baking, remove the crust from the oven and let it cool completely on a wire rack before adding the cheesecake filling. This cooling step is important to ensure the crust maintains its crispness and doesn’t transfer too much heat to your delicate filling.
Crafting Smooth Cheesecake Filling
The secret to an incredibly decadent Red Velvet Oreo Cheesecake lies in its filling – specifically, how smooth and lump-free it is. Achieving this velvety texture requires attention to detail, especially regarding ingredient temperature and mixing technique. This section will guide you through the process of combining your ingredients to create a rich, vibrant, and utterly delicious cheesecake batter. The goal is to incorporate air judiciously and blend everything just enough to be smooth without overworking the mixture, which can lead to cracks. A perfectly smooth filling sets the stage for a flawless cheesecake that melts in your mouth with every bite, highlighting the delightful red velvet and Oreo flavors beautifully.
Mixing Cream Cheese Perfectly
The first and most critical step for a smooth filling is ensuring your cream cheese is at room temperature. This allows it to soften considerably, making it easy to beat into a creamy, lump-free consistency. In a large mixing bowl, beat the softened cream cheese with an electric mixer on medium speed for about 2-3 minutes until it is completely smooth and fluffy. Scrape down the sides of the bowl frequently to ensure all parts are incorporated. Next, gradually add the granulated sugar, continuing to beat until it’s fully combined and the mixture is light and airy. The sugar helps to break down any remaining tiny lumps in the cream cheese, further contributing to the silky texture. Over-mixing at this stage can incorporate too much air, which can cause cracks later, so mix until just combined and smooth.
Adding Eggs and Vanilla
Once your cream cheese and sugar mixture is perfectly smooth, it’s time to incorporate the remaining wet ingredients. Add the eggs one at a time, beating on low speed until just combined after each addition. It’s crucial not to overmix the eggs; over-beating them can introduce too much air into the batter, which can expand during baking and then deflate, leading to cracks on the surface of your cheesecake. After the eggs, stir in the sour cream, vanilla extract, cocoa powder, white vinegar, and a generous amount of red food coloring. The white vinegar and cocoa powder are traditional components of red velvet, enhancing its subtle tang and depth of flavor. Beat on low speed until the color is uniform and all ingredients are just blended. The mixture should be a vibrant red and perfectly smooth. For another delightful dessert experience, consider trying our Peanut Butter Brownie Swirl Cookies.
Folding in Chopped Oreos
The final touch for our Red Velvet Oreo Cheesecake filling is the addition of chopped Oreo cookies. After ensuring your cheesecake batter is smooth and beautifully red, gently fold in the coarsely chopped Oreo pieces. You don’t want to use finely crushed Oreos here; instead, aim for small, irregular chunks that will provide delightful pockets of crunch and flavor throughout the creamy filling. Use a spatula for this step, carefully folding the cookies into the batter until they are evenly distributed. Avoid overmixing, as this can crush the cookie pieces further or incorporate unwanted air. The goal is to maintain distinct cookie pieces that will offer a wonderful textural contrast to the soft cheesecake. This step completes the filling, making it ready to be poured over your prepared Oreo crust.
Baking Your Red Velvet Oreo Cheesecake
Baking a cheesecake can seem daunting, but with the right techniques, you can achieve a perfectly cooked, crack-free dessert. The key to success often lies in understanding how heat affects the delicate custard-like filling. For cheesecakes, a gentle, even heat is preferred, which is why the water bath method is highly recommended. This process creates a moist baking environment that prevents the cheesecake from drying out and cracking, ensuring a smooth, elegant finish. Patience during the baking and cooling phases is crucial for the best results. Following these steps carefully will yield a cheesecake with that ideal creamy texture and a beautifully set appearance, ready to be decorated and enjoyed by everyone. For more baking insights, explore our Vanilla Bean Creme Brulee Cheesecake Cupcakes.
Preparing the Water Bath
A water bath, also known as a bain-marie, is indispensable for baking cheesecakes. It provides a moist, gentle, and even heat around the cheesecake, preventing it from drying out, cracking, and cooking too quickly. To prepare, first wrap the outside of your springform pan tightly with several layers of heavy-duty aluminum foil. This creates a barrier against water seeping in. Place the foil-wrapped pan into a larger roasting pan. Pour your prepared cheesecake filling into the cooled Oreo crust in the springform pan. Carefully place the roasting pan, with the cheesecake inside, onto the middle rack of your preheated oven. Then, pour hot (but not boiling) water into the larger roasting pan until it comes about halfway up the sides of the springform pan. Be very cautious not to splash any water into the cheesecake batter itself. This setup ensures a consistently moist environment during baking, crucial for a smooth top.
Baking for Perfect Texture
Once your cheesecake is nestled in its water bath within the oven, it’s time to bake it to perfection. Bake at 325°F (160°C) for approximately 60-75 minutes. The baking time can vary slightly depending on your oven, so it’s important to know what to look for. The cheesecake is done when the edges are set and slightly puffed, but the center (about 2-3 inches in diameter) still has a slight wobble when you gently shake the pan. It should not look wet or liquidy in the center, but rather like a firm jiggle. Avoid opening the oven door too frequently, as sudden temperature changes can also contribute to cracks. Once you observe the desired wobble, turn off the oven but leave the cheesecake inside with the oven door ajar for about an hour. This gradual cooling prevents thermal shock, which can cause the cheesecake to crack or sink. This step is critical for a smooth, even surface.
Cooling and Chilling Your Cheesecake
The cooling and chilling phases are just as vital as baking for achieving a cheesecake with the perfect texture and flavor. Rushing these steps can result in a cracked, crumbly, or unset dessert. Proper cooling allows the cheesecake to firm up gradually and uniformly, while chilling intensifies its density, flavor, and overall stability. This process requires patience, but the waiting period is well worth it for a truly professional-looking and tasting result. Understanding the science behind cooling and chilling ensures your Red Velvet Oreo Cheesecake will be a triumph, ready to slice beautifully and impress any connoisseur of desserts.
Gradual Cool Down Process
After baking, the gradual cool-down process is crucial for preventing cracks. As mentioned, leaving the cheesecake in the turned-off oven with the door slightly ajar for an hour allows it to adjust to the ambient temperature slowly. Once this hour is up, carefully remove the roasting pan from the oven. Remove the springform pan from the water bath (discarding the water) and place it on a wire rack to cool completely at room temperature. This will take another 2-3 hours. Do not attempt to chill it before it has reached room temperature, as sudden temperature drops can still cause cracking. The goal is to allow the internal structure of the cheesecake to slowly stabilize, resulting in a smooth, even top without any unsightly fissures. Be patient during this phase, as it is a critical step towards cheesecake perfection.
Refrigerate Overnight for Best
Once your cheesecake has cooled completely to room temperature, it’s ready for its final and arguably most important transformation: refrigeration. Cover the springform pan loosely with plastic wrap to prevent condensation from forming on the surface and place it in the refrigerator. The cheesecake should chill for a minimum of 8 hours, but ideally overnight. This extended chilling time allows the cheesecake to fully set, firm up, and develop its rich, dense, and creamy texture. The flavors also meld and deepen during this period, enhancing the overall taste experience. Attempting to slice the cheesecake before it is thoroughly chilled will likely result in a messy, unset dessert. Patience here is truly a virtue, as an overnight chill guarantees a cheesecake that holds its shape beautifully and provides the ultimate sensory delight when served.
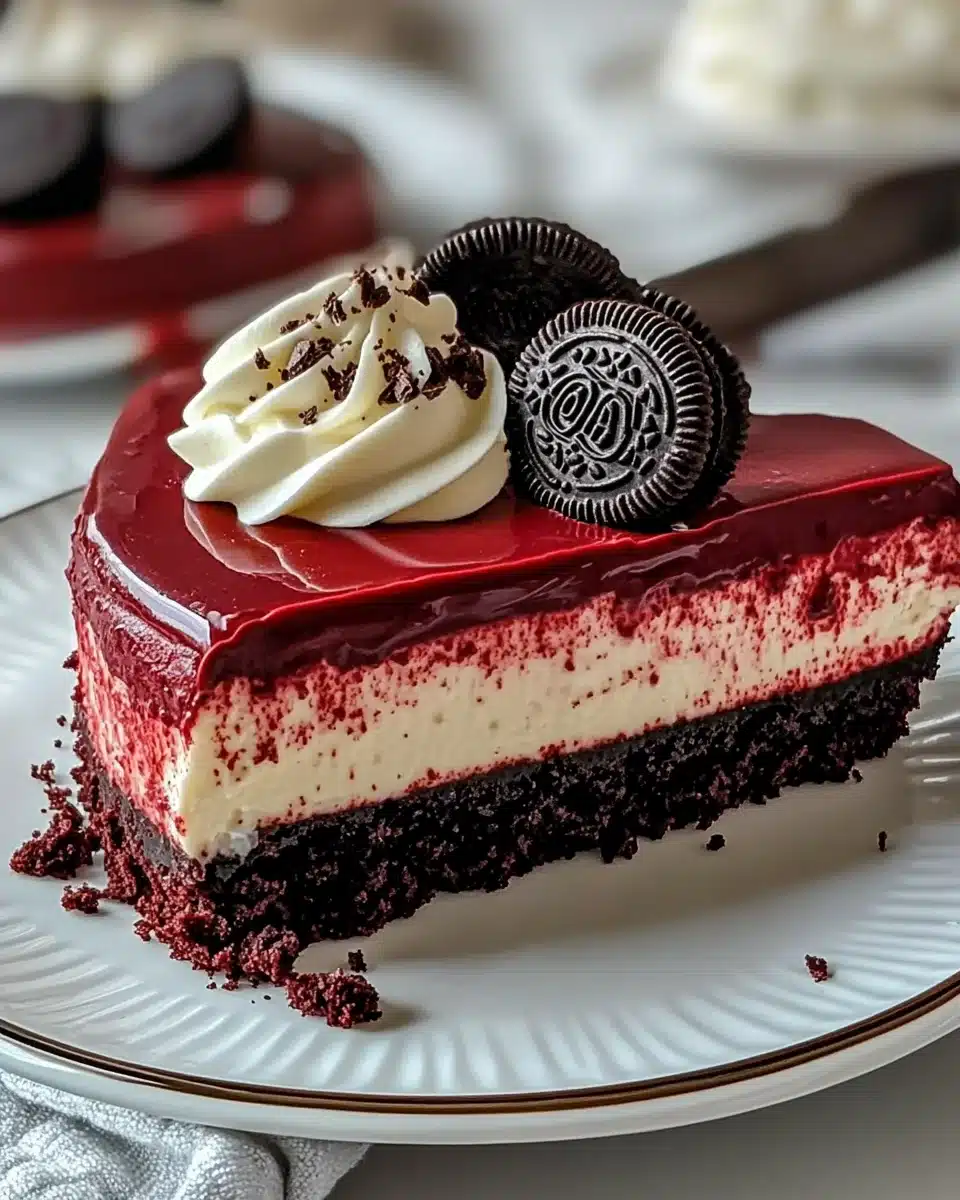
Decorating Red Velvet Oreo Cheesecake
The decoration of your Red Velvet Oreo Cheesecake is where you can truly let your creativity shine, transforming a delicious dessert into a stunning centerpiece. While the cheesecake itself is already impressive, adding thoughtful garnishes elevates its visual appeal and enhances its flavor profile. This section will guide you through creating simple yet elegant toppings that complement the rich red velvet and Oreo flavors, making your cheesecake irresistible to both the eyes and the palate. Whether you opt for a minimalist approach or a lavish display, these decorating ideas will help you achieve a professional finish that will leave a lasting impression on your guests and make for perfect photos, too! For more dessert inspiration, check out our Instagram at @carinarecipes20.
Simple Chocolate Ganache
A simple chocolate ganache adds a glossy, decadent layer to your Red Velvet Oreo Cheesecake. To make it, heat heavy cream until it just simmers (do not boil). Remove from heat and pour it over finely chopped dark or semi-sweet chocolate in a heatproof bowl. Let it sit for 5 minutes to melt the chocolate, then whisk gently from the center outwards until smooth and shiny. Allow the ganache to cool slightly until it thickens to a pourable consistency, but not so thick that it won’t spread. Once the cheesecake is chilled and firm, carefully remove it from the springform pan. You can then gently pour the ganache over the top, letting it drip artfully down the sides, or simply create a smooth, even layer across the surface. This adds a rich chocolate note that beautifully contrasts the red velvet flavor.
Adding Cream Cheese Frosting
No red velvet dessert is complete without a luscious cream cheese frosting! This tangy and sweet topping is the perfect complement to the rich cheesecake. For a classic cream cheese frosting, beat softened cream cheese with unsalted butter until creamy. Gradually add powdered sugar and a splash of vanilla extract, beating until light and fluffy. Make sure your cream cheese and butter are at room temperature to prevent lumps. You can pipe the frosting around the edge of the cheesecake, create swirls on top of the ganache (once set), or even cover the entire top for a more dramatic effect. The cool, tangy cream cheese frosting provides a wonderful balance to the sweetness of the cheesecake and the chocolate ganache, making each bite an exquisite experience.
Final Oreo Toppings
To tie everything together and reinforce the “Oreo” aspect of your Red Velvet Oreo Cheesecake, a final garnish of crushed or whole Oreo cookies is essential. After applying your ganache and cream cheese frosting, take a few extra red velvet Oreos (or regular Oreos) and chop them into coarse pieces. You can scatter these generously over the top of the cheesecake, focusing on the edges or creating a mound in the center. Alternatively, for a more structured look, you can place whole or half Oreos around the perimeter of the cheesecake. The dark chocolatey cookies provide a fantastic textural contrast to the smooth frosting and ganache, and their familiar shape instantly signals the delicious flavor profile of the dessert. This final touch makes your cheesecake not only incredibly tasty but also visually unmistakable and perfectly themed.
Tips for a Perfect Cheesecake
Achieving a truly perfect cheesecake, especially one as intricate as a Red Velvet Oreo Cheesecake, involves more than just following the recipe steps. It requires attention to detail and understanding certain key principles that govern cheesecake baking. These tips are designed to help you avoid common pitfalls and ensure your dessert turns out flawless every single time. From ingredient preparation to mixing techniques and baking environment, each piece of advice contributes to that coveted creamy texture, crack-free surface, and incredible flavor profile. Embrace these techniques, and you’ll be well on your way to becoming a cheesecake master, delighting everyone with your culinary skills. For more baking wisdom and delicious ideas, visit our Pinterest page!
Room Temperature Ingredients
This is arguably the most crucial tip for any cheesecake recipe. Ensuring that all cold ingredients, especially cream cheese, eggs, and sour cream, are at proper room temperature (around 68-70°F or 20-21°C) before you begin mixing is non-negotiable. Cold ingredients do not emulsify properly, leading to a lumpy batter that will result in a grainy or unevenly textured cheesecake. Room temperature cream cheese beats smoothly, incorporating easily with sugar and other ingredients without forming stubborn lumps. Similarly, room temperature eggs blend more uniformly into the mixture, contributing to a lighter, airier texture and preventing the need for excessive mixing, which can introduce too much air. Plan ahead by taking these ingredients out of the refrigerator at least 1-2 hours before you start baking.
Don’t Overmix the Filling
While beating the cream cheese and sugar until smooth is important, excessive mixing once the eggs are added is a common cause of cracked cheesecakes. Over-mixing incorporates too much air into the batter. During baking, this air expands, causing the cheesecake to puff up. As it cools, the air contracts, and the cheesecake deflates rapidly, often leading to unsightly cracks on the surface. To avoid this, beat the cream cheese and sugar until just smooth. Then, add eggs one at a time, mixing on low speed only until each egg is barely incorporated. Scrape down the sides of the bowl often to ensure everything is evenly mixed without over-aerating the batter. Gentle handling of the batter after the eggs are in is key to a smooth, unblemished surface.
Water Bath Benefits
Using a water bath (bain-marie) might seem like an extra step, but its benefits for cheesecake are immense and make it well worth the effort. The water bath provides a consistently moist and gentle heat environment, which prevents the edges of the cheesecake from baking faster than the center, thus reducing the risk of cracking. The steam from the water also keeps the top surface of the cheesecake from drying out and maintains a creamy, custard-like texture throughout. Without a water bath, cheesecakes are prone to a dry, often curdled texture around the edges and a greater likelihood of developing cracks as they cool. It helps the cheesecake cook evenly and slowly, resulting in that signature silky smooth consistency that everyone loves. Always remember to wrap your springform pan thoroughly with foil to prevent water seepage.
Serving Your Delicious Cheesecake
After all the effort of baking and chilling, the moment of truth arrives: serving your spectacular Red Velvet Oreo Cheesecake. Proper slicing and serving techniques ensure that each piece looks as perfect as it tastes, providing a delightful experience for everyone. This section will guide you on how to present your cheesecake beautifully and also how to store any leftover slices to maintain their freshness and flavor. A well-served cheesecake is a testament to your baking prowess, offering a slice of creamy, flavorful bliss that is sure to be the highlight of any meal or celebration. Get ready to enjoy the fruits of your labor!
Slice and Enjoy
To achieve clean, professional-looking slices of your chilled Red Velvet Oreo Cheesecake, a few tricks are helpful. First, make sure your cheesecake is thoroughly chilled, preferably overnight. Before each cut, dip a sharp, thin knife into hot water and wipe it clean with a paper towel. This warms the blade and allows it to glide smoothly through the dense cheesecake without dragging or sticking. Make a clean cut, then repeat the process of heating and wiping the knife before each subsequent slice. This prevents frosting and crumbs from transferring between slices. Serve your slices immediately, allowing guests to savor the creamy texture and rich flavor. A small spatula or pie server can help you gently lift each slice onto a plate, preserving its pristine shape and decoration. This careful approach makes serving a breeze and keeps your presentation impeccable.
Storing Leftover Slices
If you’re lucky enough to have leftover Red Velvet Oreo Cheesecake, proper storage is key to maintaining its freshness and deliciousness. The best way to store cheesecake is in an airtight container in the refrigerator. If you don’t have a container large enough for the whole cheesecake, individual slices can be placed in smaller containers or wrapped tightly in plastic wrap. This prevents the cheesecake from absorbing odors from other foods in the refrigerator and keeps it from drying out. Cheesecake will typically stay fresh in the refrigerator for 3-5 days. For longer storage, you can freeze individual slices. Place slices on a baking sheet to freeze solid, then wrap each frozen slice tightly in plastic wrap followed by aluminum foil. Frozen cheesecake can last for up to 1-2 months. Thaw frozen slices in the refrigerator overnight before serving. For another tasty dessert recipe, check out our Quick Italian Cream Cake.
Understanding Cheesecake Nutrition Facts
When indulging in a luxurious dessert like Red Velvet Oreo Cheesecake, it’s natural to be curious about its nutritional content. While cheesecake is certainly a treat and not typically considered a health food, understanding its general nutrition can help in making informed dietary choices. This section provides a general overview of what you might expect in terms of calorie count per slice, acknowledging that precise figures can vary based on specific ingredients and serving sizes. It’s a reminder that desserts like this are meant to be enjoyed in moderation, offering a moment of pure culinary delight without guilt.
Per Slice Calorie Count
The calorie count per slice of Red Velvet Oreo Cheesecake can vary significantly based on the exact ingredients used (e.g., full-fat vs. reduced-fat cream cheese, amount of sugar, size of the slice) and the specific recipe. However, a typical 1/12th slice of a rich, homemade cheesecake with a cookie crust, cream cheese filling, and toppings can range anywhere from 400 to 600 calories. This estimate includes the calories from the Oreo crust, the cream cheese, sugar, eggs, butter, and any added ganache or frosting. While it’s a high-calorie dessert, it’s also incredibly rich and satisfying, meaning a smaller slice can often be enough to curb a sweet craving. Enjoying this decadent treat as an occasional indulgence, rather than a regular staple, is the best approach for a balanced diet. Always remember that homemade versions allow for some control over ingredients, potentially offering slight variations in nutritional value.
Why Make This Stunning Dessert
Beyond its delicious taste and beautiful appearance, there are many compelling reasons to dedicate time to making a Red Velvet Oreo Cheesecake. This dessert isn’t just a treat; it’s an experience. It offers a unique blend of familiar flavors in an unexpected and exciting format, making it a standout choice for various occasions. Choosing to bake this cheesecake allows you to create something truly special and personalized, far surpassing the quality and flavor of store-bought alternatives. It’s a culinary project that yields immense satisfaction and earns significant appreciation from anyone who gets to enjoy a slice of your masterpiece.
Flavorful and Impressive
The Red Velvet Oreo Cheesecake truly stands out for its exceptional flavor profile and impressive presentation. The rich, slightly tangy red velvet flavor, enhanced by a hint of cocoa, perfectly complements the sweet, crumbly texture of the Oreo cookie crust and the chunks folded into the creamy filling. This harmonious blend creates a multi-layered taste sensation that is both familiar and exciting. Visually, the vibrant red hue, contrasted with dark chocolate and often topped with white cream cheese frosting, makes it an incredibly appealing dessert that catches the eye. Whether you’re hosting a dinner party, celebrating a holiday, or simply want to treat yourself to something extraordinary, this cheesecake is guaranteed to impress. Its unique combination of flavors and striking appearance makes it a memorable dessert that will have everyone asking for the recipe. It’s more than just a dessert; it’s a conversation starter and a true showstopper.
Common Questions About Cheesecake
Even seasoned bakers can encounter challenges when making cheesecake. Many common questions arise around achieving the perfect texture, preventing issues like cracking, and ensuring the dessert is a success. This section addresses one of the most frequent concerns: how to prevent those frustrating cracks on the surface of your beautiful cheesecake. Understanding the reasons behind these issues can empower you to troubleshoot and perfect your technique, leading to consistently stunning results. By demystifying some of the common cheesecake dilemmas, we aim to build your confidence and help you create impeccable desserts every time.
Preventing Cheesecake Cracks
Preventing cracks in your cheesecake is a goal for many bakers, as a smooth, unblemished surface contributes greatly to its aesthetic appeal. The main culprits for cracks are rapid temperature changes and over-mixing. To combat this, ensure all your ingredients are at room temperature to avoid over-mixing your batter, which incorporates too much air. Use a water bath during baking; this creates a moist, even heating environment that prevents the edges from cooking and drying out faster than the center. Crucially, allow the cheesecake to cool very gradually. After baking, turn off the oven and leave the cheesecake inside with the door slightly ajar for at least an hour. Then, transfer it to a wire rack to cool completely to room temperature before refrigerating overnight. Avoid opening the oven door frequently during baking. By minimizing sudden temperature shifts and handling the batter gently, you significantly reduce the chances of developing cracks, leading to a beautifully smooth and perfect Red Velvet Oreo Cheesecake every time.