Peanut Butter Cake with M&M’s is a truly irresistible homemade dessert, combining rich, creamy peanut butter flavors with fun candy crunch. This recipe offers an easy baking experience, resulting in a moist cake perfect for any sweet treat craving or special occasion celebration. Gather your ingredients for decadent layers!
Key Takeaways
- Proper oven and pan preparation ensures perfect cake layers.
- Mixing dry and wet ingredients separately then combining creates a smooth batter.
- Gently folding M&M’s into the batter adds delightful texture.
- Cool cakes completely before frosting for best results.
- Whip butter and sugar thoroughly for creamy, rich peanut butter frosting.
- Decorate with extra M&M’s for a festive, crunchy finish.
Baking this cake is simple. It brings joy to any baker. The aroma fills your kitchen. Each bite is pure bliss. Share this sweet treat.
Start Your Delicious Peanut Butter Cake
Oven and Pan Prep
Preheating your oven to 350°F (175°C) is the crucial first step for any successful baking endeavor. While the oven warms, take time to prepare your two 8-inch round cake pans. Generously grease them with butter or non-stick cooking spray, ensuring every crevice is covered. Afterward, dust them lightly with all-purpose flour, tapping out any excess. This creates a non-stick barrier that prevents your cake layers from adhering to the pan. For an even easier release, you can also line the bottoms with parchment paper, allowing the edges of the paper to extend slightly for easy lifting. This meticulous baking preparation is vital; it sets the foundation for perfectly shaped, easily removable cake layers, contributing significantly to the aesthetic and structural integrity of your delicious peanut butter cake. Don’t rush this stage; careful prep ensures a smooth process from oven to serving plate.
Gather Cake Ingredients Easily
Success in baking often hinges on organized preparation, a practice known as “mise en place.” Before you even think about mixing, ensure all your ingredients are measured, at room temperature (if required), and ready to go. This approach streamlines the process, prevents forgotten items, and contributes to a smoother, more enjoyable baking experience for this homemade dessert. You’ll need specific items for both the dry and wet components of your M&M’s peanut butter cake batter.
Dry Mix Ingredients
- 2 ½ cups all-purpose flour
- 1 ½ cups granulated sugar
- 1 tablespoon baking powder
- ½ teaspoon baking soda
- ½ teaspoon salt
Wet Mix Ingredients
- ½ cup (1 stick) unsalted butter, softened
- ¾ cup creamy peanut butter
- 2 large eggs, at room temperature
- 1 cup whole milk, at room temperature
- 2 teaspoons vanilla extract
Having your butter and eggs at room temperature is especially important for emulsification, which prevents a curdled batter and ensures a smooth, consistent texture in your final cake. The type of creamy peanut butter you select will also profoundly influence the cake’s flavor profile, so choose a high-quality brand you love.
Mix Your Cake Batter
Mixing the ingredients correctly is where the magic truly happens for any peanut butter cake. The sequence and technique you use will directly impact the cake’s lightness, moisture, and overall texture. This structured approach ensures a perfectly blended batter, avoiding common pitfalls like overmixing or uneven distribution of ingredients.
Combine Dry Items
In a large mixing bowl, thoroughly whisk together the all-purpose flour, granulated sugar, baking powder, baking soda, and salt. Use a whisk to aerate these dry ingredients, which helps to create a lighter, fluffier cake texture. Ensure there are no lumps and that everything is evenly combined. Setting this dry mixture aside allows you to focus on the wet ingredients without rushing, preventing accidental overmixing when they are eventually brought together.
Blend Wet Items
In a separate, medium-sized bowl, using an electric mixer on medium speed, cream together the softened unsalted butter and creamy peanut butter until the mixture is light and fluffy, usually taking 2-3 minutes. This step incorporates air and creates a smooth base. Beat in the large eggs one at a time, ensuring each egg is fully incorporated before adding the next. Finally, stir in the whole milk and vanilla extract until just combined. Be careful not to overmix these wet ingredients, as their primary purpose here is to create a rich, emulsified base for your decadent sweet treat.
Mix Wet into Dry
Gradually add the wet mixture to the dry ingredients, mixing on low speed until just combined. It is absolutely crucial not to overmix the batter at this stage. Overmixing develops the gluten in the flour too much, which can result in a tough, dense cake rather than the desired moist and fluffy texture. Mix only until no streaks of flour remain visible. The batter for this homemade dessert should be smooth and somewhat thick. This careful combination technique is also essential in other delicious recipes, like our Peanut Butter Brownie Swirl Cookies, ensuring a consistent and delightful result every time.
Bake The Peanut Butter Cake Layers
With your meticulously prepared batter, the next exciting phase is baking. This is where the mixture transforms into those irresistible, golden-brown cake layers. The addition of M&M’s candy brings a fun element to the cake, adding both color and a delightful textural contrast that makes each bite even more enjoyable.
Fold in M&M’s
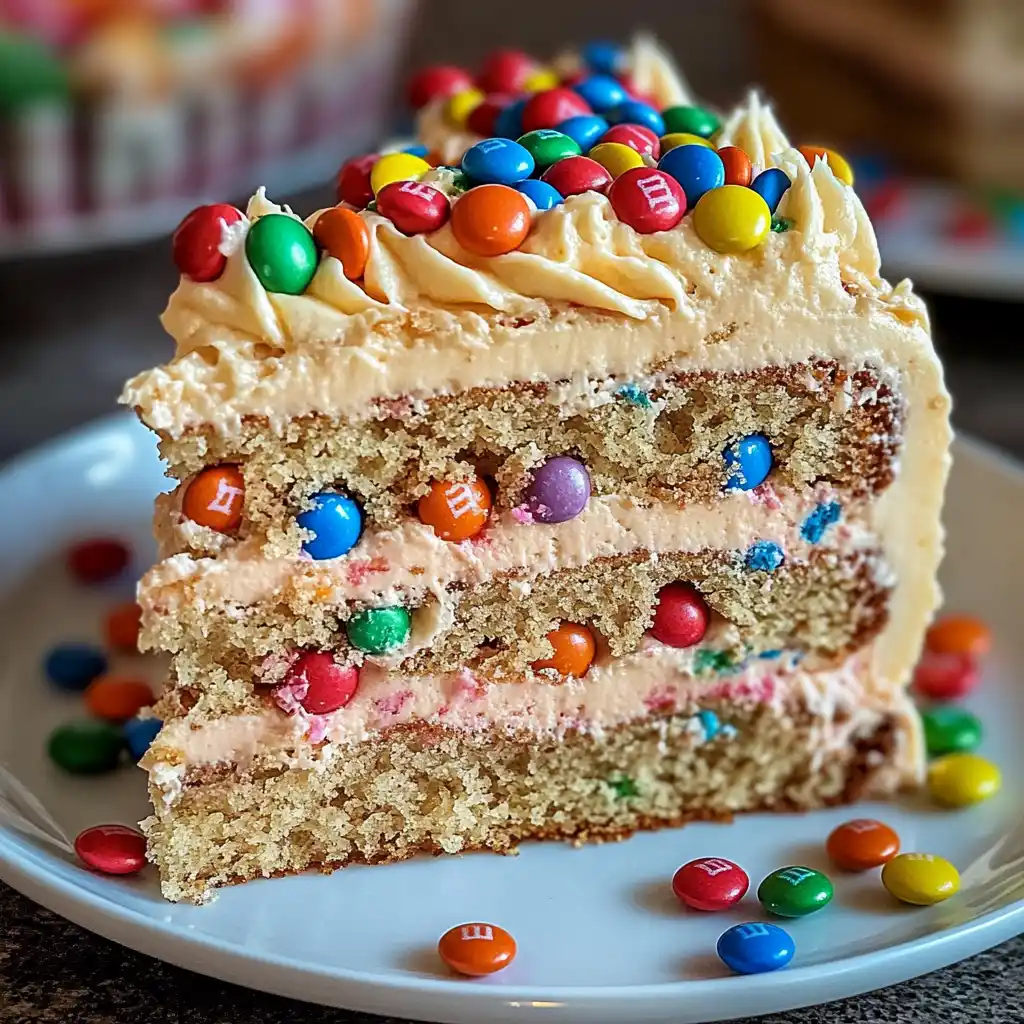
Before dividing the batter, gently fold in about 1 cup of M&M’s candy. Use a spatula for this step rather than an electric mixer, which could crush the candies. The goal is to distribute the M&M’s evenly throughout the batter without overworking it. These iconic, colorful M&M’s candies not only provide bursts of chocolatey goodness but also introduce a pleasing crunch that complements the soft cake texture. This makes every slice of your peanut butter cake a delightful surprise.
Fill Cake Pans
Carefully divide the M&M-studded batter evenly between the two prepared 8-inch cake pans. Use an offset spatula to spread the batter smoothly and evenly to the edges of each pan. For best results, gently tap the filled pans a few times on your counter. This helps to release any trapped air bubbles, promoting an even rise and preventing large air pockets from forming within the cake layers during baking.
Bake Until Done
Place the cake pans into your preheated 350°F (175°C) oven and bake for approximately 30-35 minutes. Baking times can vary slightly depending on your specific oven, so begin checking for doneness around the 25-minute mark. The cakes are ready when a wooden skewer or toothpick inserted into the center comes out clean. The tops should be golden brown and spring back gently when lightly touched. Avoid opening the oven door too frequently during the initial baking period, as a sudden drop in temperature can cause the cakes to sink in the center.
Cooling Cakes Before Frosting
Patience is perhaps the most important ingredient when it comes to cooling cakes. Rushing this stage is a common mistake that can lead to crumbling layers, melted frosting, and a less-than-perfect final presentation. Proper cooling ensures your cake layers are firm, stable, and ready to be frosted flawlessly, maintaining their structure and preventing any mishaps.
Initial Pan Cool
Once your peanut butter cake layers are baked and pass the toothpick test, remove them from the oven. Allow them to cool in their pans on a wire rack for a crucial 10-15 minutes. This initial cooling period allows the delicate cake structure to set and firm up within the confines of the pan. Attempting to remove the cakes too soon can cause them to tear or break, as they are still very fragile and hot from the oven. This brief rest period significantly aids in their structural integrity.
Rack Cool Completely
After the initial cooling in the pans, carefully invert the cakes onto a wire rack. Gently remove the cake pans, and if you used parchment paper, peel it off at this point. Allow the cake layers to cool completely at room temperature. This can take anywhere from 1 to 2 hours, depending on your kitchen’s temperature and humidity. It is absolutely imperative that the cakes are cool to the touch before you even think about applying frosting. Frosting a warm cake will inevitably cause the frosting to melt, slide, and create a messy, unappealing finish. For any multi-layered dessert, ensuring full cooling is the key to successful assembly and a beautiful result.
Prepare Rich Peanut Butter Frosting
No homemade peanut butter cake would be truly complete without a generous slathering of rich, creamy peanut butter frosting. This decadent topping isn’t just an afterthought; it’s an integral part of the experience, complementing the moist cake layers with its smooth texture and intense flavor. Gathering the right ingredients and ensuring they are at the correct temperature will guarantee a silky, spreadable frosting that elevates your entire sweet treat.
Frosting Ingredients List
- 1 cup (2 sticks) unsalted butter, softened
- 1 cup creamy peanut butter
- 4 cups powdered sugar (confectioners’ sugar), sifted
- ¼ cup whole milk or heavy cream
- 2 teaspoons vanilla extract
- Pinch of salt
Just like with the cake batter, ensuring your butter is softened to room temperature is paramount for a smooth, lump-free frosting. The quality and creaminess of your peanut butter will define the frosting’s flavor, so choose your favorite brand. Sifting the powdered sugar is an extra step that prevents a grainy texture, contributing to the luxurious feel of this delicious frosting. This versatile frosting is perfect for this special occasion cake.
Make Your Creamy Frosting
Crafting the perfect creamy frosting is simpler than it seems, requiring just a few steps and the right technique. This process will transform simple ingredients into a luscious, spreadable topping that perfectly complements your homemade peanut butter cake, making it an irresistible, decadent dessert.
Beat Butter and Sugar
In a large mixing bowl, using an electric mixer, beat the softened unsalted butter and creamy peanut butter together on medium speed until the mixture is light, fluffy, and well combined. This usually takes about 2-3 minutes. Next, gradually add the sifted powdered sugar, one cup at a time, starting on low speed to prevent a sugar cloud, then increasing to medium-high once incorporated. Continue beating until the frosting is incredibly light and fluffy, incorporating plenty of air. This ensures a smooth, easy-to-spread consistency for your peanut butter cake.
Add Milk for Consistency
With the mixer still on low speed, slowly pour in the whole milk or heavy cream and the vanilla extract. Increase the speed to medium-high and beat until the frosting is smooth, creamy, and reaches your desired spreadable consistency. If the frosting appears too thick, add more milk, one teaspoon at a time, until it loosens up. Conversely, if it’s too thin, you can add a little more sifted powdered sugar to thicken it. The pinch of salt is a vital addition here, as it helps to balance the sweetness of the sugar and truly enhances the rich, nutty flavor of the peanut butter, making every bite of this frosting absolutely delicious.
Assemble Your Peanut Butter Cake
Assembling your cake is the rewarding culmination of all your careful baking and frosting preparation. This stage transforms your individual layers into a stunning, multi-tiered masterpiece. A well-assembled cake not only looks professional but also ensures each slice offers a balanced and delightful experience of cake and frosting.
First Layer Frosting
Begin by placing one completely cooled cake layer onto your chosen serving plate or cake stand. Dollop about a third of the prepared peanut butter frosting onto the center of this layer. Using an offset spatula, gently spread the frosting evenly across the top, extending it almost to the edges. This creates a generous and delicious filling between your cake layers, essential for the decadent feel of this homemade dessert. Ensure the layer is smooth and consistent before proceeding.
Stack and Frost Whole Cake
Carefully place the second cooled cake layer directly on top of the first, aligning it as precisely as possible. Once stacked, use the remaining frosting to cover the top and sides of the entire cake. For a professional, crumb-free finish, consider applying a thin “crumb coat” first: spread a very thin layer of frosting over the entire cake to trap any loose crumbs, then chill the cake in the refrigerator for about 15-20 minutes. After chilling, apply the final, thicker layer of frosting, smoothing it out with your offset spatula. This technique results in a clean and polished look for your delightful peanut butter cake, perfect for any special occasion.
Decorate with M&M’s Candy
The final touch for your M&M’s Peanut Butter Cake is the decoration. This step not only adds visual appeal but also delivers another exciting burst of chocolatey, colorful crunch that makes this sweet treat truly unforgettable. It’s an easy way to personalize your cake and make it even more festive.
Add Reserved M&M’s
Take the M&M’s candy you reserved earlier – about ½ cup should be sufficient – and generously sprinkle them over the top of the frosted cake. For an extra pop of color and texture, you can also gently press some of the M&M’s into the sides of the cake. The vibrant hues of the candy create a visually appealing contrast against the creamy peanut butter frosting, making your decadent cake even more inviting. This simple yet effective decoration transforms a delicious cake into an eye-catching centerpiece, adored by both children and adults. For more creative decorating ideas and inspiration, check out our boards on Pinterest.
Tips for Perfect Cake Success
Achieving a truly perfect peanut butter cake often comes down to mastering a few key techniques and thoughtful considerations during the baking process. These expert tips will help you elevate your homemade dessert from simply good to truly exceptional, ensuring every element, from texture to flavor, is spot-on.
Measuring Flour Correctly
Accurate measurement is paramount in baking, especially for flour. The most effective way to measure flour is the “spoon and level” method: lightly spoon the flour into your dry measuring cup until it overflows, then level off the excess with the straight edge of a knife or a flat spatula. Never scoop directly from the bag, as this can compact the flour, resulting in up to 25% more flour than intended. Too much flour leads to a dry, dense cake, robbing your creation of its moist and fluffy texture, vital for a truly decadent result.
Frosting Crunch Options
While the M&M’s candy provides a fantastic crunch, you have other delightful options to enhance the texture of your peanut butter frosting. Consider folding in finely chopped roasted peanuts for an intensified nutty flavor and a more subtle crunch. Alternatively, mini chocolate chips can be folded into the frosting for an extra layer of chocolatey goodness, complementing the peanut butter perfectly. These additions offer customizable textures to your frosting, catering to different preferences and making your sweet treat uniquely yours.
Darker Cocoa Flavor
If you’re a fan of the classic peanut butter and chocolate combination and desire a deeper chocolate note to your cake, a small adjustment to the cake batter can make a significant difference. Replace one to two tablespoons of the all-purpose flour with unsweetened cocoa powder. This subtle alteration will introduce a richer, darker cocoa flavor, creating a more complex and indulgent taste profile for your peanut butter cake. This makes it even more appealing to those who appreciate a strong chocolate presence in their homemade dessert. Share your beautiful creations with us on Instagram!
Storing Your M&M’s Peanut Butter Cake
Make Cake Ahead
This delightful M&M’s Peanut Butter Cake is wonderfully versatile and can be prepared ahead of time, making it an ideal choice for busy schedules or upcoming celebrations. If your cake is already frosted, store it loosely covered at room temperature for up to 2 days to maintain its optimal texture and flavor. For longer storage, you can keep the frosted cake in the refrigerator for up to 5 days. Remember to let refrigerated cake come to room temperature for about 30 minutes before serving; this allows the flavors to fully develop and ensures the frosting softens to its creamy best. Unfrosted cake layers offer even more flexibility: wrap them tightly in plastic wrap and freeze for up to 2 months. Thaw them overnight in the refrigerator before proceeding with frosting and assembly. This makes your easy baking efforts even more convenient.
Enjoy Your Homemade Cake Slice
The moment has finally arrived! After all your careful preparation, mixing, baking, and decorating, it’s time to truly savor the fruits of your labor: a generous slice of your incredible homemade M&M’s Peanut Butter Cake. This decadent creation, with its moist, fluffy layers, rich and creamy peanut butter frosting, and the delightful surprise of M&M’s candy in every bite, is a sweet treat to behold and enjoy. Perfect for birthday parties, family gatherings, or simply as a comforting indulgence on a quiet afternoon, your easy baking efforts have culminated in a masterpiece. Take pride in your culinary achievement, share it with loved ones, and watch their faces light up with pure joy as they experience this truly delicious dessert.