Gooey chocolate chip cookies are a timeless favorite, offering a comforting warmth and irresistible texture. This easy-to-follow cookie recipe provides all the baking tips you need to create perfectly soft, melt-in-your-mouth treats right in your own kitchen. Get ready to bake a batch of homemade dessert everyone will love.
Key Takeaways
- Achieve perfect gooeyness by avoiding overbaking and chilling your dough.
- Use quality ingredients, including softened butter and a mix of chocolate chips.
- Proper preparation, from preheating the oven to cooling, ensures a superior cookie.
- Customize your batch with different chip flavors or a sprinkle of sea salt.
- Homemade cookies are a delightful sweet treat for any occasion.
Baking delicious cookies is a joy. The aroma fills your home. Freshly baked treats are pure bliss. Share them with loved ones. Everyone loves a warm cookie.
Delicious Gooey Chocolate Chip Cookies
Why Try These Cookies Today?
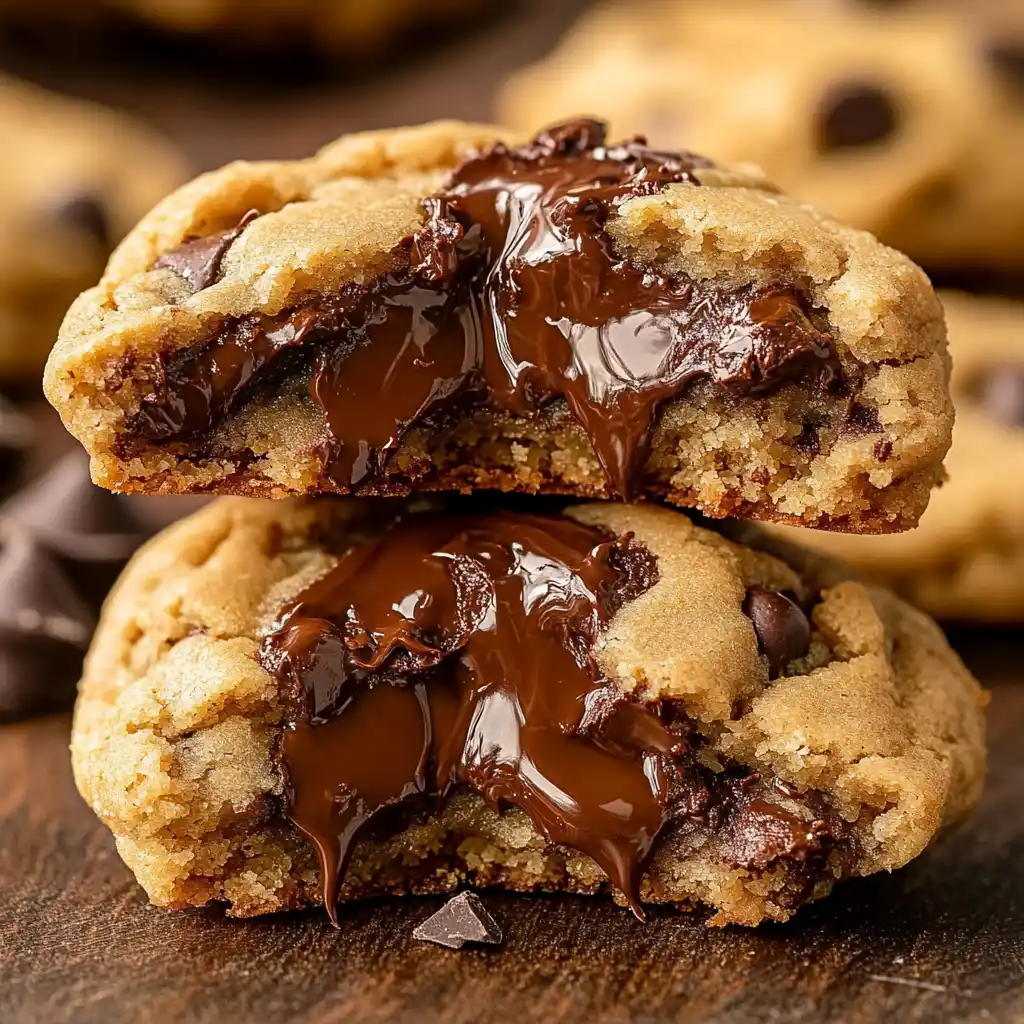
Today is the perfect day to bake a batch of delicious gooey chocolate chip cookies. There’s something truly magical about sinking your teeth into a cookie that’s crispy on the edges, yet wonderfully soft and melted in the center. Our cookie recipe focuses on achieving that coveted gooey texture, ensuring every bite is packed with rich, melted chocolate. These aren’t just any cookies; they are an experience, a simple pleasure that brings warmth and happiness. Whether you’re a seasoned baker or just starting, this guide provides all the necessary baking tips to create an irresistible homemade dessert. Imagine the delightful scent filling your kitchen, promising a sweet treat that’s perfect for sharing, gifting, or simply indulging yourself after a long day. With our easy steps, you’ll be enjoying these soft cookies in no time, making any ordinary moment extraordinary.
Ingredients for Gooey Chocolate Cookies
Softened Butter and Sugars
The foundation of truly gooey chocolate chip cookies begins with high-quality ingredients. For the wet cookie ingredients, softened unsalted butter is crucial; it creams better with sugars, creating a light, airy base for your dough. We combine both granulated sugar and brown sugar. Granulated sugar provides crispness and helps with spread, while brown sugar adds moisture, chewiness, and a subtle caramel note that deepens the cookie’s flavor profile. Ensuring your butter is properly softened (not melted!) allows for optimal aeration during the creaming process, which is a key baking tip for achieving that signature soft interior. This blend of sugars contributes significantly to the irresistible taste and texture of your finished homemade cookies, setting them apart from a regular batch.
Flour and Leavening Agents
For the dry ingredients, all-purpose flour provides the structure for these delightful sweet treats. Measuring your flour correctly is vital; too much can lead to dry, crumbly cookies, while too little might result in excessive spreading. We pair the flour with baking soda, our primary leavening agent, which reacts with the acidic brown sugar to give the cookies their lift and contributes to their soft, chewy texture. A small amount of salt is also included here, which isn’t just for taste; it balances the sweetness and enhances all the other flavors in the cookie, making them truly delicious. Sifting these dry components together ensures they are evenly distributed throughout the dough, preventing pockets of unmixed ingredients and ensuring consistent results in every cookie.
Double the Chocolate Chips
What’s a chocolate chip cookie without plenty of chocolate? Our recipe calls for double the chocolate chips to guarantee that luxurious, gooey chocolate experience in every bite. We recommend a blend of both semisweet and milk chocolate chips. The semisweet chips offer a classic, rich chocolate flavor, while the milk chocolate chips contribute a creamy sweetness that makes the cookies extra indulgent. You can even add some chopped chocolate bars for pockets of melty goodness. Using two types creates a more complex flavor profile and ensures maximum melty delight. Don’t skimp on this part—the generous amount of chocolate chips is what truly makes these cookies “gooey.” For more delicious desserts, visit our category page.
Prepare Oven and Baking Sheets
Preheat Oven Temperature
Proper oven preparation is a non-negotiable step for achieving perfectly baked gooey chocolate chip cookies. Always begin by preheating your oven to the specified temperature. For most cookie recipes, this usually falls around 375°F (190°C). Preheating ensures that when your cookie dough enters the oven, it immediately begins to bake at the correct temperature, leading to even baking and a consistent rise. Placing dough into a cold oven can cause the cookies to spread too much before they set, resulting in thin, crispy cookies rather than the desired soft and gooey texture. Give your oven ample time to reach and stabilize at the target temperature; a good rule of thumb is to preheat for at least 15-20 minutes, even after the oven indicates it’s ready.
Line with Parchment Paper
Lining your baking sheets is a simple yet effective baking tip that makes a big difference. We highly recommend using parchment paper, not only to prevent sticking but also to promote even baking. Parchment paper creates a barrier that helps insulate the bottom of the cookies, preventing them from browning too quickly and ensuring they remain soft and chewy throughout. It also makes cleanup incredibly easy; simply lift the parchment paper, and your baking sheet is ready for the next batch or quick wash. You can learn more about the benefits of parchment paper for baking. Avoid using aluminum foil directly on the baking sheet, as it can sometimes cause the bottoms of cookies to overcook. For consistently great results with your homemade dessert, parchment paper is your best friend.
Creaming Wet Cookie Ingredients
Butter and Sugar Mixture
The creaming method is foundational to light, airy, and gooey chocolate chip cookies. In a large bowl, combine your softened butter with both granulated and brown sugars. Using an electric mixer, beat these ingredients together on medium speed until the mixture becomes light, fluffy, and pale in color. This process, often called “creaming,” incorporates air into the butter and sugar, which creates tiny air pockets that expand during baking, contributing to the cookies’ tender texture. It’s a critical step that cannot be rushed; aim for about 2-3 minutes of mixing, scraping down the sides of the bowl occasionally to ensure everything is well combined. This aerated base is essential for a truly soft cookie. For another fantastic dessert, try our Vanilla Bean Creme Brulee Cheesecake Cupcakes.
Add Eggs and Vanilla
Once your butter and sugar mixture is light and fluffy, it’s time to incorporate the eggs and vanilla. Add the eggs one at a time, beating well after each addition until fully combined. Using room temperature eggs is a vital baking tip here; they emulsify more easily with the butter mixture, creating a smoother, more homogeneous dough. Cold eggs can cause the mixture to curdle or separate. After the eggs, stir in a good quality vanilla extract. Vanilla isn’t just for flavor; it enhances the overall sweetness and aroma of your homemade cookies. Mix until just combined, being careful not to overmix at this stage. The goal is a uniform, creamy consistency that promises a truly delicious sweet treat.
Whisking Dry Dough Ingredients
Combine Flour and Leaveners
Before combining your wet and dry ingredients, it’s crucial to properly prepare the dry components. In a separate medium bowl, whisk together your all-purpose flour and baking soda. Whisking serves two important purposes: it thoroughly combines the leavening agent with the flour, ensuring an even rise throughout your gooey chocolate chip cookies, and it aerates the flour, preventing lumps and making it easier to incorporate into the wet ingredients without overmixing. Some bakers also choose to sift these ingredients, but a good vigorous whisking usually suffices for most cookie recipes. This simple step contributes significantly to the consistency and texture of your finished homemade cookies, so don’t skip it!
Add a Pinch of Salt
Finally, add a pinch of salt to your whisked dry ingredients. While it might seem like a minor detail, salt plays a crucial role in balancing the sweetness of the cookies and enhancing the overall flavor profile. Without salt, cookies can sometimes taste one-dimensional and overly sweet. A good quality sea salt or kosher salt can make all the difference, bringing out the rich notes of the chocolate and butter. Ensure it’s thoroughly mixed with the flour and baking soda so that it’s evenly distributed throughout the dough. This small addition is a secret baking tip that elevates these delicious sweet treats from good to truly exceptional, making every bite a delightful experience.
Gradually Add Dry to Wet
Mix Until Just Combined
The next critical step in creating perfectly soft and gooey chocolate chip cookies is combining the dry and wet ingredients. Gradually add the dry mixture to the wet mixture, a third at a time, mixing on low speed until just combined after each addition. The key phrase here is “just combined.” Overmixing the dough once the flour has been added develops the gluten, which can lead to tough, dense cookies rather than the desired soft and chewy texture. Stop mixing as soon as you no longer see streaks of dry flour. A few small pockets of unmixed flour are better than an overmixed dough. This gentle incorporation ensures your homemade cookies remain tender and maintains that delicate crumb structure that makes them so delicious. For a savory alternative, consider making Creamy Baked Mac and Cheese for dinner.
Fold in Chocolate Chips
Semisweet and Milk Chips
Once your cookie dough is properly mixed, it’s time for the star of the show: the chocolate chips! As previously mentioned, using a combination of semisweet and milk chocolate chips provides the best flavor and texture. Gently fold these into the dough using a spatula. The goal is to distribute the chips evenly throughout the mixture without overworking the dough. The contrast between the slightly bitter semisweet and the creamy milk chocolate creates a more complex and satisfying taste experience. This step is where your gooey chocolate chip cookies truly come to life, transforming from simple dough into a promise of rich, melted deliciousness. Feel free to use your favorite brands for the best results.
Evenly Distribute Chocolates
Ensuring even distribution of the chocolate chips is important for a consistent cookie experience. You don’t want one cookie with all the chocolate and another with none! Continue to fold gently until you see chocolate chips throughout the dough. If you notice any stubborn clusters, break them up with your spatula. Some bakers like to reserve a small handful of chips to press into the tops of the cookie dough balls just before baking; this creates a beautiful, bakery-style appearance with visible melted chocolate on top. This attention to detail contributes to a visually appealing and satisfying homemade dessert, ensuring every bite of your soft cookie is a sweet treat.
Baking Your Gooey Chocolate Cookies
Scoop Dough onto Sheets
Now that your dough is ready, it’s time to scoop! Using a cookie scoop (about 1.5 to 2 tablespoons for medium-sized cookies) ensures consistent cookie size, which promotes even baking. Drop spoonfuls of dough onto your prepared baking sheets, leaving about 2 inches of space between each cookie. This spacing is crucial because the cookies will spread during baking. Overcrowding the baking sheet can lead to uneven baking and cookies that fuse together. For extra gooeyness, you can slightly underbake them, allowing the centers to remain incredibly soft. This precise preparation helps achieve the perfect results for your delicious gooey chocolate chip cookies.
Bake Until Edges Golden
Baking is where the magic truly happens for your homemade cookies. Place your prepared baking sheets into the preheated oven. Bake for approximately 9-12 minutes, depending on your oven and desired level of gooeyness. Keep a close eye on them; you’re looking for the edges to be set and lightly golden brown. This indicates that the cookie structure is firm enough to hold its shape. The timing can vary, so visual cues are your best friend here. This specific baking tip is crucial for achieving that signature soft and chewy texture that makes these cookies so popular. Trust your instincts and the visual cues more than just the clock.
Centers Still Look Soft
The most important baking tip for achieving genuinely gooey chocolate chip cookies is to pull them from the oven when their centers still look slightly underbaked and very soft. They might even appear a little glossy in the middle. Don’t wait until the entire cookie is golden brown and firm, as they will continue to cook on the hot baking sheet even after being removed from the oven. This residual heat, known as carryover cooking, will finish baking the centers to a perfect soft and gooey consistency without drying them out. It’s a delicate balance, but mastering this timing is the secret to producing the best homemade dessert with that irresistible gooey texture. Visit our Pinterest page for more baking inspiration.
Cooling for Perfect Gooey Cookies
Cool on Baking Sheets
Once your gooey chocolate chip cookies are out of the oven, resist the urge to immediately transfer them. This is a common mistake that can lead to broken cookies. Allow them to cool on the hot baking sheets for at least 5-10 minutes. During this crucial cooling period, the cookies will continue to set and firm up. The residual heat from the baking sheet helps to complete the baking process for the soft centers while allowing the edges to become slightly crispier. This patience ensures that your homemade cookies maintain their structure and don’t fall apart when moved. It’s a vital step for achieving that perfect balance of soft and chewy, a hallmark of a truly delicious sweet treat.
Transfer to Wire Racks
After their initial cooling period on the baking sheets, carefully transfer the cookies to a wire rack to cool completely. A wire rack allows air to circulate around all sides of the cookies, preventing the bottoms from becoming soggy and ensuring they cool evenly. If you leave them on the baking sheet for too long, condensation can build up, making the bottoms soft. Cooling completely on a wire rack also helps to achieve the desired texture: a slightly crisp edge with a wonderfully soft, gooey center. Once fully cooled, these delightful cookies are ready to be enjoyed. Make sure to keep them away from greedy hands until they’re just right!
Quick Glance at Cookie Times
Prep and Bake Duration
Understanding the time commitment for your gooey chocolate chip cookies can help in planning your baking session. The preparation time for these homemade cookies is typically around 15-20 minutes. This includes gathering ingredients, creaming the butter and sugars, mixing in the dry ingredients, and folding in the chocolate chips. The actual baking time is quite quick, usually ranging from 9-12 minutes per batch, depending on your oven and how gooey you prefer your centers. This relatively short active time makes it an accessible cookie recipe for a spontaneous craving or a last-minute sweet treat. For those who enjoy speedy recipes, consider our Quick Italian Cream Cake.
Total Time for Fresh Cookies
While the active prep and bake times are short, factor in the cooling periods for the total enjoyment time. After baking, the cookies need to cool on the baking sheet for 5-10 minutes, followed by an additional cooling period on a wire rack until they are ready to handle and consume. If you decide to chill your dough, which is highly recommended for enhanced flavor and texture, add at least 30 minutes (or up to 24-48 hours) to your overall timeline. So, from start to finish, including chilling and cooling, enjoying fresh gooey chocolate chip cookies could take anywhere from about an hour to a couple of days, depending on your choices. The wait is always worth it for such a delicious sweet treat.
Top Tips for Gooey Cookies
Don’t Overbake Them
This is arguably the most crucial baking tip for achieving truly gooey chocolate chip cookies: do not overbake them! As mentioned earlier, pull them from the oven when the edges are set and lightly golden, but the centers still look soft, slightly underbaked, and even a bit glossy. They will continue to cook on the hot baking sheet, and this carryover cooking will firm up the centers just enough without making them dry or cakey. Overbaking is the quickest way to turn a potentially gooey cookie into a hard, crispy one. Err on the side of underbaking, and you’ll be rewarded with a perfectly soft, melt-in-your-mouth homemade dessert every single time. It’s the secret to that coveted texture.
Chill Dough for Best Results
Chilling your cookie dough is a game-changer for enhancing both flavor and texture. While not strictly necessary if you’re in a rush, chilling the dough for at least 30 minutes (or ideally 24-48 hours) allows the flavors to meld and deepen. More importantly, it firms up the butter in the dough, which prevents the cookies from spreading too much during baking. This results in thicker, chewier cookies with more concentrated flavor and a perfectly gooey center. Simply wrap your scooped dough balls or the entire bowl of dough tightly in plastic wrap and refrigerate. This simple baking tip transforms a good cookie recipe into an outstanding one, yielding a truly spectacular sweet treat.
Use Room Temperature Ingredients
The temperature of your ingredients, especially butter and eggs, plays a significant role in the final texture of your gooey chocolate chip cookies. Using room temperature butter ensures it creams smoothly and efficiently with the sugars, incorporating more air for a lighter dough. Room temperature eggs emulsify better with the butter mixture, creating a more cohesive and evenly textured dough. Cold ingredients can cause the butter to seize up, leading to a lumpy mixture and an uneven bake. Plan ahead by taking your butter and eggs out of the refrigerator about 30-60 minutes before you start baking. This simple baking tip sets the stage for a consistently excellent homemade dessert.
Storing and Customizing Your Cookies
Keep Cookies Airtight
Once your gooey chocolate chip cookies have cooled completely, proper storage is key to maintaining their freshness and delicious texture. Store them in an airtight container at room temperature. This prevents them from drying out and keeps them soft and chewy for several days. If you prefer to keep them extra fresh, you can even place a slice of bread in the container with the cookies; the cookies will absorb moisture from the bread, helping them stay soft. Avoid refrigerating them unless you want to extend their shelf life significantly, as the cold can sometimes alter their texture. These homemade cookies are best enjoyed within 3-4 days for optimal flavor and gooeyness.
Try Different Chip Flavors
While classic chocolate chips are undeniable, don’t be afraid to customize your gooey chocolate chip cookies with different chip flavors! This cookie recipe is incredibly versatile. Experiment with white chocolate chips for a creamy, sweet contrast, or dark chocolate chips for a more intense, less sweet profile. Butterscotch chips add a rich, caramel-like sweetness, while peanut butter chips can bring a delightful nutty twist. You can even mix in other elements like chopped nuts (walnuts or pecans), dried cranberries, or a dash of cinnamon for an entirely new sweet treat experience. Personalizing your homemade dessert makes baking even more fun and allows you to cater to everyone’s preferences. Check out our Instagram account for more creative ideas.
Sprinkle Sea Salt Topping
For an elevated, gourmet touch to your gooey chocolate chip cookies, consider sprinkling a tiny bit of flaky sea salt on top of the dough balls just before baking. This addition might seem unusual, but the subtle crunch and briny notes of the sea salt beautifully cut through and enhance the sweetness of the chocolate and the butter in the cookie. It creates a sophisticated flavor contrast that highlights the best qualities of these delicious sweet treats. A little goes a long way, so use it sparingly. This baking tip transforms a simple cookie recipe into something truly special, making it feel like a high-end homemade dessert from a fancy bakery.