Sourdough donuts offer a delightful twist on a classic fried pastry, bringing a unique tang and incredible lightness. This recipe guides you through each step, from activating your starter to glazing your warm, golden treats. Prepare to enjoy homemade donuts that are truly special.
Key Takeaways
- Utilize active sourdough starter for optimal donut texture and flavor.
- Accurate ingredient measurement and proper kneading are key for light dough.
- Monitor oil temperature carefully for perfectly golden, evenly cooked fried donuts.
- A simple glaze adds the ideal sweetness to your warm, homemade donuts.
- Store leftovers correctly to maintain freshness or freeze for later enjoyment.
Sourdough adds depth. Its tang balances sweetness. The texture is wonderfully light. Homemade donuts become a true joy. Share this delicious sweet treat.
Start Your Glazed Sourdough Donuts
Beginning your journey to make sourdough donuts starts with understanding the unique role of an active starter. This foundational ingredient not only differentiates these fried treats from traditional yeast-leavened versions but also imbues them with a depth of flavor and a wonderfully airy texture that is hard to replicate. The natural fermentation process breaks down starches, creating a tender crumb and a subtle tang that perfectly complements the sweetness of the glaze.
Why Use Active Starter?
An active starter is crucial for several reasons when crafting the best sourdough donuts. Firstly, it acts as a natural leavening agent. The wild yeasts and bacteria in your starter produce carbon dioxide, which creates pockets of air in the dough, leading to a light and fluffy donut. Secondly, the acidity developed during fermentation contributes to the signature “sourdough” flavor profile—a slight tang that balances the richness of the fried dough and the sweetness of the glaze. This active starter ensures your donut dough rises beautifully and consistently, yielding a superior final product that stands out from standard dessert recipes. Using a robust, bubbly starter guarantees adequate lift and flavor development, making your Carina Recipes donuts truly special.
Gather Donut Ingredients and Tools
Success in making sourdough desserts like these glazed delights hinges on having all your ingredients and tools ready before you begin the baking process. A well-organized kitchen makes the entire experience smoother and more enjoyable. From measuring cups to a deep-fry thermometer, each item plays a role in achieving perfectly golden, delicious homemade donuts.
Full Ingredient List
For your delightful batch of homemade sourdough donuts, you will need:
- 1 cup active sourdough starter
- 1 cup whole milk, warmed
- 1/2 cup granulated sugar
- 2 large eggs, at room temperature
- 1/4 cup unsalted butter, melted
- 1 teaspoon vanilla extract
- 3 1/2 cups all-purpose flour, plus more for dusting
- 1 teaspoon salt
- Vegetable oil or canola oil, for frying
For the simple donut glaze:
- 2 cups powdered sugar
- 3-4 tablespoons milk or water
- 1/2 teaspoon vanilla extract
Essential Kitchen Items
Having the right tools simplifies the entire process, especially when working with sticky donut dough:
- Stand mixer with dough hook attachment (or a large mixing bowl and sturdy spoon for hand kneading)
- Large mixing bowls
- Measuring cups and spoons
- Rolling pin
- Donut cutter (or two round cutters of different sizes)
- Deep pot or Dutch oven for frying
- Deep-fry thermometer
- Slotted spoon or spider strainer
- Wire rack set over a baking sheet
- Parchment paper
These items ensure a smooth baking process, from mixing to frying your delectable homemade donuts.
Mix and Knead Sourdough Dough
The foundation of tender, light sourdough donuts lies in properly mixing and kneading the dough. This stage is crucial for developing gluten, which provides the structure and elasticity necessary for the dough to rise and hold its shape during frying. Take your time with each step to ensure your donut dough has the ideal consistency.
Combine Wet Ingredients First
In a large mixing bowl or the bowl of your stand mixer, combine the active sourdough starter, warm milk, granulated sugar, eggs, melted butter, and vanilla extract. Whisk these wet ingredients together thoroughly until well combined and smooth. Ensuring the milk isn’t too hot is important, as excessive heat can harm the beneficial microbes in your active starter. This initial step creates a homogeneous base for the rest of your ingredients, preparing the mixture for the flour and salt to be incorporated.
Add Flour and Salt
Gradually add the all-purpose flour and salt to the wet ingredients. Start with about half of the flour, mixing on low speed with the dough hook (or with a sturdy spoon if mixing by hand) until just combined. Then, add the remaining flour. The dough will appear shaggy and sticky at this point, but resist the urge to add too much extra flour. The salt is vital for flavor and also helps to control the yeast activity, contributing to the overall structure and taste of your homemade donuts.
Knead Dough Until Smooth
Once all the flour is added, increase the mixer speed to medium-low and knead the dough for 8-10 minutes. If kneading by hand, turn the dough out onto a lightly floured surface and knead vigorously for 12-15 minutes. The goal is to develop the gluten fully. The dough should transform from shaggy and sticky to smooth, elastic, and slightly tacky. It should pull away from the sides of the bowl. A well-kneaded donut dough will result in light, airy, and chewy sourdough donuts, showcasing the best of your baking process. This step is critical for a successful breakfast pastry.
Let Dough Rise and Shape Donuts
Patience is a virtue, especially in the baking process of sourdough donuts. Allowing adequate time for the dough to rise is essential for achieving that characteristic light and airy texture. After the initial rise, shaping the donuts with care ensures uniform size and perfect frying results. This stage requires a gentle touch and a bit of planning.
First Dough Rise
After kneading, transfer your donut dough to a lightly oiled bowl, turning it once to coat. Cover the bowl tightly with plastic wrap or a damp kitchen towel. Place it in a warm, draft-free spot (ideally around 75-80°F or 24-27°C) to undergo its first dough rise. This process will take approximately 4-6 hours, or until the dough has doubled in size. The exact time depends on the activity of your sourdough starter and the ambient temperature. A slow, steady rise builds flavor and helps create the open crumb structure desirable for delicious homemade donuts. Don’t rush this step; it’s fundamental for the final texture.
Roll and Cut Donuts
Once the dough has doubled, gently punch it down to release the air. Turn the dough out onto a lightly floured surface. Using a rolling pin, roll the dough to about 1/2 inch thickness. To cut the donuts, use a 3-inch round donut cutter for the outer ring and a 1-inch round cutter for the center hole. Alternatively, you can use two different sized cookie cutters. Carefully transfer the cut donuts and donut holes to parchment-lined baking sheets, leaving some space between each one. Cover them lightly with plastic wrap or a clean kitchen towel and let them rise again for another 30-60 minutes, or until visibly puffy. This second, shorter dough rise prepares them for frying, ensuring they are light and tender. Remember to save those donut holes; they fry up beautifully!
Frying Your Golden Sourdough Donuts
Frying is arguably the most exciting part of making sourdough donuts. Achieving that perfect golden-brown crust and a fluffy interior requires careful attention to oil temperature and frying technique. This step transforms your proofed donut dough into irresistible, fried delights.
Set Up Frying Oil
Choose a large, heavy-bottomed pot or Dutch oven for frying. Pour enough vegetable oil or canola oil into the pot to reach a depth of 3-4 inches. Attach a deep-fry thermometer to the side of the pot, ensuring the tip is submerged in the oil without touching the bottom. Heat the oil slowly over medium heat until it reaches a consistent temperature of 350-360°F (175-180°C). Maintaining this temperature is crucial; too cool, and your donuts will be greasy; too hot, and they will burn on the outside before cooking through on the inside. Prepare a wire rack set over a baking sheet lined with paper towels for draining the fried donuts.
Fry Until Golden Brown
Carefully lower 2-3 donuts into the hot oil using a slotted spoon or a spider strainer, being careful not to overcrowd the pot. Overcrowding will lower the oil temperature significantly, resulting in less-than-perfect fried donuts. Fry for about 1-2 minutes per side, or until they are beautifully golden brown and puffed up. Use the slotted spoon to gently flip them to ensure even cooking. The active starter contributes to their quick rise and lovely color in the hot oil. For more frying insights, you might enjoy our article on achieving perfect golden brown edges.
Drain Excess Oil
Once your sourdough donuts are perfectly golden brown on both sides, carefully remove them from the oil using a slotted spoon or spider strainer. Hold them over the pot for a moment to allow any excess oil to drip back into the pot. Then, transfer the fried donuts to the prepared wire rack lined with paper towels. This allows any remaining oil to drain away, preventing them from becoming soggy. Drain the donut holes as well. While they are still warm, they are ready for the next delicious step: glazing. This careful handling ensures your homemade donuts are crispy outside and soft inside.
Creating the Simple Donut Glaze
A simple yet delicious glaze is the perfect finishing touch for your warm sourdough donuts. It adds a layer of sweetness that beautifully complements the subtle tang from the active starter, turning a plain fried dough into a delightful sweet treat. This glaze recipe is straightforward and comes together in minutes, ensuring your homemade donuts are truly special.
Mix Glaze Ingredients
In a medium bowl, combine the powdered sugar, milk (or water), and vanilla extract. Whisk vigorously until the mixture is completely smooth and free of any lumps. The consistency should be thick enough to coat the donuts but thin enough to drip off easily. If the glaze is too thick, add more milk or water a teaspoon at a time until the desired consistency is reached. If it’s too thin, whisk in a little more powdered sugar. This simple donut glaze is versatile and can be customized with other flavorings, but for these sourdough donuts, classic vanilla provides the best balance. Prepare this while your donuts are frying so it’s ready for immediate dipping.
Glaze Your Warm Sourdough Donuts
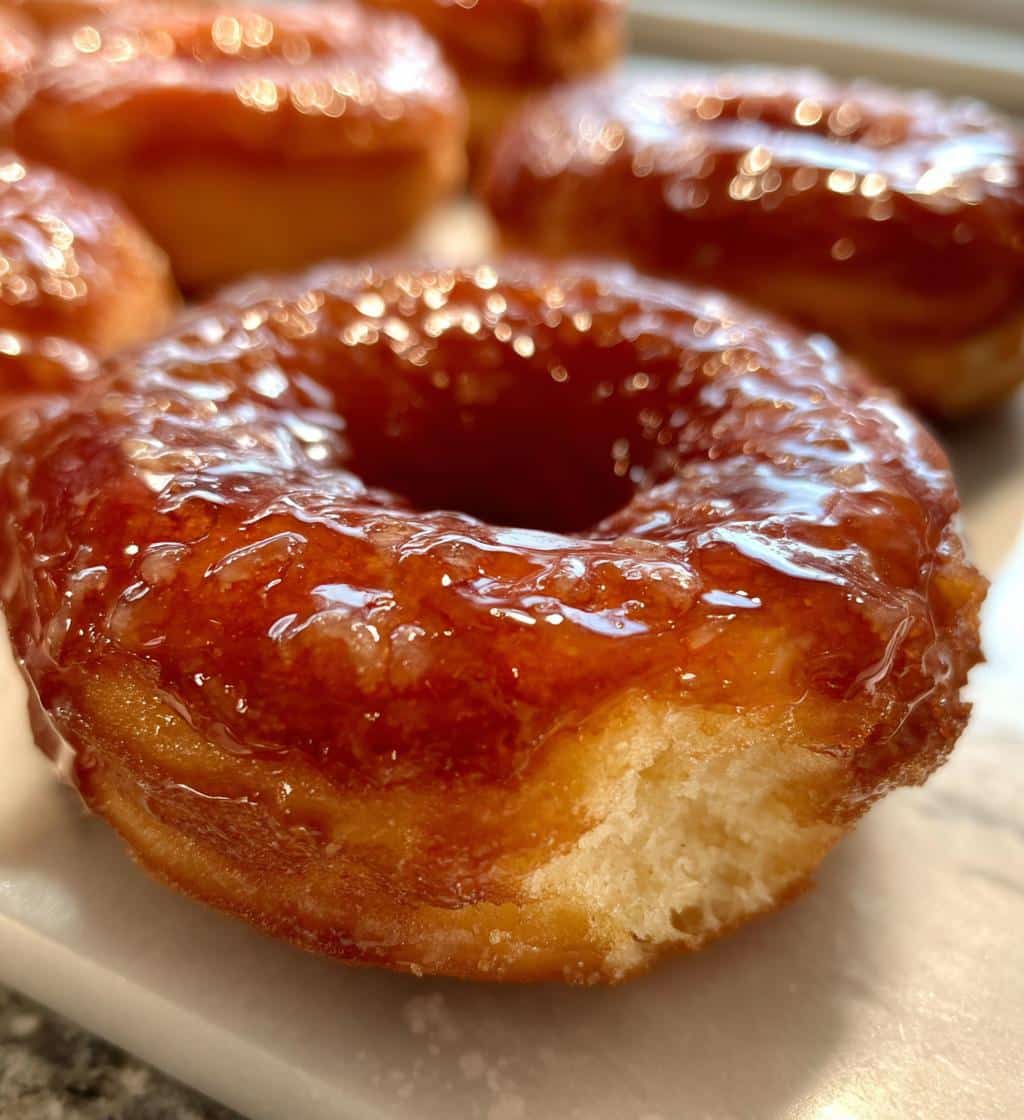
The moment your sourdough donuts emerge from the oil, they are ripe for glazing. Dipping them while still warm allows the glaze to adhere beautifully and slightly melt, creating a delicate, shiny coating that sets perfectly as they cool. This step transforms your fried donuts into irresistible glazed donuts.
Dip Each Donut
While the donuts are still warm, but not piping hot, gently dip each one into the prepared simple donut glaze. You can dip one side for a lighter coating or both sides for full coverage. Allow any excess glaze to drip off back into the bowl for a few seconds. Then, place the glazed donuts back onto the wire rack to allow the glaze to set. The warmth of the donut helps the glaze to spread smoothly and creates that signature sweet shell. As the glaze sets, it forms a slightly crispy, sweet layer that is pure bliss. Repeat with all your homemade donuts and donut holes. These sweet treats are best enjoyed fresh!
Key Tips for Best Donuts
Achieving bakery-quality sourdough donuts consistently involves paying attention to a few critical details throughout the baking process. These key tips will help you manage common challenges and ensure your homemade donuts turn out perfectly every time, from dough consistency to frying technique.
Manage Dough Consistency
Sourdough donut dough should be soft, supple, and slightly sticky, but not overly wet. The exact amount of flour needed can vary slightly depending on factors like the hydration of your sourdough starter and the humidity in your kitchen. Always add flour gradually during kneading. If your dough feels too sticky, add a tablespoon of flour at a time until it reaches the desired consistency. Conversely, if it seems too stiff, a teaspoon of milk can help. A well-managed dough consistency is fundamental for a light and airy finished product.
Control Oil Temperature
Maintaining a consistent oil temperature of 350-360°F (175-180°C) is perhaps the most critical factor for successful fried donuts. Use a reliable deep-fry thermometer and adjust the heat as needed. If the oil is too cool, the donuts will absorb too much oil, becoming greasy and heavy. If it’s too hot, the outsides will brown too quickly, leaving the insides raw. Fry only a few donuts at a time to prevent the oil temperature from dropping too drastically. Proper oil temperature control ensures your homemade donuts cook evenly and achieve that desired golden-brown exterior and fluffy interior. This attention to detail is similar to crafting a perfect dessert.
Handle Donuts Gently
After the final proof, your donut dough will be delicate and full of air. Handle the shaped donuts with extreme gentleness when transferring them to the hot oil. Use a wide spatula or your fingers to carefully lift and lower them into the fryer. Any rough handling can deflate the donuts, resulting in a dense texture rather than the light and airy crumb you’re aiming for. This gentle approach preserves the delicate structure created by the active starter and ensures your glazed donuts retain their beautiful shape and texture.
Storing Leftover Sourdough Donuts
While fresh, warm sourdough donuts are undeniably the best, sometimes you might have leftovers. Proper storage is key to maintaining their deliciousness for as long as possible. Whether you plan to enjoy them the next day or much later, there are effective ways to keep your homemade donuts fresh.
Keep at Room Temperature
For short-term storage, glazed sourdough donuts can be kept in an airtight container at room temperature for up to 1-2 days. Placing a piece of parchment paper between layers can prevent sticking. While they won’t have the exact same crisp exterior as when fresh, they will still be wonderfully soft and flavorful. Avoid refrigerating glazed donuts, as the cold air tends to dry them out and can cause the glaze to become tacky. Unglazed donuts can also be stored this way, and then glazed just before serving for a fresher taste.
Freeze for Longer Storage
If you wish to store your sourdough donuts for a longer period, freezing is an excellent option. For best results, freeze unglazed donuts. Arrange them in a single layer on a baking sheet and freeze until solid, about 2-3 hours. Once frozen, transfer them to a freezer-safe airtight container or heavy-duty freezer bag, separating layers with parchment paper. They can be stored in the freezer for up to 2-3 months. When ready to enjoy, thaw them at room temperature and then warm them gently in the oven or microwave before glazing. Glazed donuts can also be frozen, though the glaze might not look as pristine after thawing. This method is great for preparing donut dough ahead of time or enjoying your sweet treat weeks later.
Making Donut Dough Ahead
The beauty of working with an active starter for these homemade donuts is the flexibility it offers, including the option to prepare your donut dough ahead of time. This method can be a game-changer for busy mornings or when you want to spread the baking process over two days, allowing for a more relaxed experience.
Overnight Dough Prep
To prepare your donut dough ahead, follow all the mixing and kneading steps as described. After the dough has been thoroughly kneaded, instead of allowing it to undergo its first rise at room temperature for several hours, place the lightly oiled bowl of dough into the refrigerator. Cover it tightly with plastic wrap. The cold temperature will significantly slow down the fermentation process, allowing the dough to cold proof overnight, typically 8-12 hours, or even up to 24 hours. This extended, slow rise not only fits into your schedule but can also deepen the complex flavors of the sourdough, leading to even more delicious homemade donuts. The next morning, remove the dough from the refrigerator and let it come to room temperature for about 1-2 hours before proceeding with rolling, cutting, and the second rise, then frying. This method makes the entire baking process much more manageable.
Sourdough Donut Nutrition Breakdown
While homemade sourdough donuts are certainly a sweet treat to savor, understanding their general nutritional profile can be helpful for those monitoring their intake. As a rich, fried, and glazed dessert, they are an indulgence, but also a source of energy.
Per Serving Information
A single sourdough donut, particularly when homemade, typically contains calories primarily from carbohydrates (flour, sugar in dough and glaze) and fats (butter in the dough, oil from frying). They also contain some protein from the flour and eggs. Specific nutritional values like calories, fat, sugar, and protein per serving will vary significantly based on the exact size of your donuts, the type and amount of oil used for frying, and the thickness of your glaze. However, as a general estimate, expect a homemade glazed donut to be a calorie-dense treat, offering a satisfying energy boost. Enjoy these pure bliss donuts as part of a balanced diet.
Enjoy Your Pure Bliss Donuts
The journey from active starter to warm, glazed sourdough donuts is a rewarding one. You’ve put in the effort, and now it’s time to reap the delicious benefits. These homemade delights, with their unique sourdough tang and fluffy texture, are perfect for a special breakfast, a delightful dessert, or a comforting sweet treat any time of day. Share them with loved ones or savor them yourself. Each bite is a testament to the joy of baking and the magic of sourdough. Enjoy every moment of your pure bliss donuts!