Easy Christmas Cherry Bars Recipe brings joy to your holiday table with minimal effort. This delightful holiday treat features a buttery shortbread crust, sweet cherry pie filling, and a luscious vanilla glaze. Perfect for festive gatherings, these homemade bars are simple to prepare and truly delicious. Get ready to bake a crowd-pleasing dessert!
Key Takeaways
- Simple steps for baking delicious cherry bars from scratch.
- Utilizes readily available ingredients for convenience.
- Offers variations to personalize your holiday treat.
- Provides storage tips for enjoying bars longer.
- Includes a gluten-free option for dietary needs.
Baking these bars is pure joy. Simple ingredients create a festive delight. A sweet cherry layer, rich crust. The vanilla glaze finishes it perfectly. Share this delicious holiday treat.
Easy Christmas Cherry Bars Recipe
Quick Overview and Times
These *easy Christmas cherry bars* offer a delightful blend of a buttery crust, sweet cherry pie filling, and a smooth vanilla glaze, making them a perfect addition to any festive occasion. Their simplicity makes them an ideal choice for bakers of all skill levels, from beginners to seasoned pros. The total preparation time is remarkably short, often taking less than 20 minutes of active work, followed by approximately 30-40 minutes of baking. Cooling and glazing add a bit more time, but much of it is hands-off, allowing you to focus on other holiday preparations. Imagine the wonderful aroma filling your home as these golden-brown bars bake to perfection, promising a delectable *holiday treat* that truly embodies the spirit of *Christmas baking*. They are fantastic for holiday parties, family gatherings, or just a cozy evening. This recipe is designed to streamline your holiday baking, ensuring you spend less time in the kitchen and more time enjoying the festivities. With clear, simple steps, you’ll find that creating these festive bars is not only effortless but also incredibly rewarding. If you’re looking for another simple yet impressive dessert to complement your holiday spread, check out our Quick Italian Cream Cake. This recipe proves that exceptional flavor doesn’t require complex methods.
Gather Ingredients for Your Bars
Preparing these festive bars begins with gathering all your ingredients. Having everything measured and ready before you start, a practice known as *mise en place*, will make the baking process much smoother and more enjoyable. You’ll find most of these items are common pantry staples, ensuring that this truly is an *easy dessert* to whip up.
Wet Ingredients You Will Need
- Unsalted Butter: Softened to room temperature. This provides the rich, tender texture of the shortbread crust.
- Large Eggs: At room temperature, these help bind the batter and add moisture.
- Vanilla Extract: Pure vanilla extract enhances all the flavors in the bars, adding a comforting aroma.
- Cherry Pie Filling: One can (21 ounces) of your favorite brand. This forms the sweet, fruity layer.
Dry Ingredients for the Batter
These components form the structure and sweetness of your delicious bars:
- All-Purpose Flour: The foundation of the buttery crust.
- Granulated Sugar: Sweetens the base layer and balances the tartness of the cherries.
- Baking Powder: A leavening agent that gives the bars a slight lift and tenderness.
- Salt: Just a pinch to enhance the overall flavor and balance the sweetness.
Simple Glaze Components
The finishing touch for these holiday cherry bars is a quick and *simple vanilla glaze*:
- Powdered Sugar (Confectioners’ Sugar): The base for a smooth, sweet glaze.
- Milk (or Cream): A tablespoon or two, used to thin the glaze to the perfect drizzling consistency.
- Vanilla Extract: A small amount to infuse the glaze with aromatic vanilla flavor.
Gathering these items ensures a seamless baking experience, allowing you to create a truly wonderful *homemade* treat. Consider visiting Carina Recipes on Pinterest for more visual inspiration on ingredient prep and baking ideas.
Simple Steps for Cherry Bar Baking
Starting your *Christmas baking* adventure with these cherry bars involves a few essential preparatory steps that pave the way for a smooth process. These initial actions are crucial for ensuring your bars bake evenly and come out of the pan beautifully.
Preheat Oven and Prepare Pan
First, always begin by preheating your oven to 350°F (175°C). An accurately preheated oven is vital for consistent baking results, allowing the leavening agents in your batter to activate correctly from the start. While the oven warms up, prepare your baking pan. A 9×13-inch baking pan is ideal for this recipe. You’ll want to either grease it generously with butter or cooking spray, or, for even easier removal, line it with parchment paper. If using parchment paper, ensure the paper extends slightly over the edges of the pan, creating “handles” that will allow you to lift the cooled bars out effortlessly. This simple step prevents sticking and makes slicing your *festive* bars much simpler once they’re done. Preparing your pan properly sets the stage for a delightful *easy dessert* experience.
For more baking methodology and tips, consider checking out the baking category on our website, where you’ll find a wealth of information to refine your skills. Understanding the basics of oven temperatures and pan preparation, as described on Wikipedia’s baking page, can significantly improve your results.
Mixing the Perfect Bar Batter
Creating the perfect base for your *cherry bars* is a straightforward process when you follow these simple mixing steps. The texture and richness of your bars largely depend on how well these initial ingredients are incorporated.
Creaming Butter and Sugar
Begin by taking your softened unsalted butter and granulated sugar, placing them into a large mixing bowl. Using an electric mixer, beat these two ingredients together on medium speed until the mixture becomes light, fluffy, and pale yellow. This process, known as creaming, incorporates air into the butter and sugar, which contributes to the tender texture of the baked bars. Continue creaming for about 2-3 minutes, scraping down the sides of the bowl as needed to ensure everything is thoroughly combined. This foundational step is key to a light and airy base for your *holiday treat*.
Adding Eggs and Vanilla
Once the butter and sugar are perfectly creamed, it’s time to add the wet ingredients that provide moisture and richness. Add the eggs, one at a time, beating well after each addition until fully incorporated. Follow this with the vanilla extract, mixing until just combined. Be careful not to overmix once the eggs are in, as overworking the batter can lead to a tougher texture. The vanilla adds a fragrant depth that complements the sweetness of the cherries beautifully.
Combining Dry Ingredients
In a separate medium bowl, whisk together your all-purpose flour, baking powder, and salt. This ensures these *dry ingredients* are evenly distributed before being added to the wet mixture. Gradually add the dry ingredients to the wet ingredients, mixing on low speed until just combined. Mix only until no streaks of flour remain; overmixing at this stage can develop the gluten too much, resulting in dense, chewy bars rather than tender ones. The batter will be thick, which is exactly what you want for a sturdy base that can hold the *pie filling*. This method is essential for achieving the perfect texture for your homemade *cherry bars*.
Adding Cherry Pie Filling Layer
The magic of these *Christmas cherry bars* truly comes alive with the addition of the vibrant cherry pie filling. This section details how to properly layer the ingredients to ensure each bite offers a delightful balance of sweet crust and fruity goodness.
Pressing Batter into Pan
Once your batter is perfectly mixed, divide it approximately in half. Take one portion of the batter and gently press it evenly into the bottom of your prepared 9×13-inch baking pan. The batter will be somewhat thick and sticky, so using lightly floured hands or the back of a spoon can help you spread it smoothly. Ensure this bottom layer forms an even foundation from edge to edge. This creates the sturdy and flavorful crust that will support the generous layer of *cherry pie filling*.
Spreading the Cherry Filling
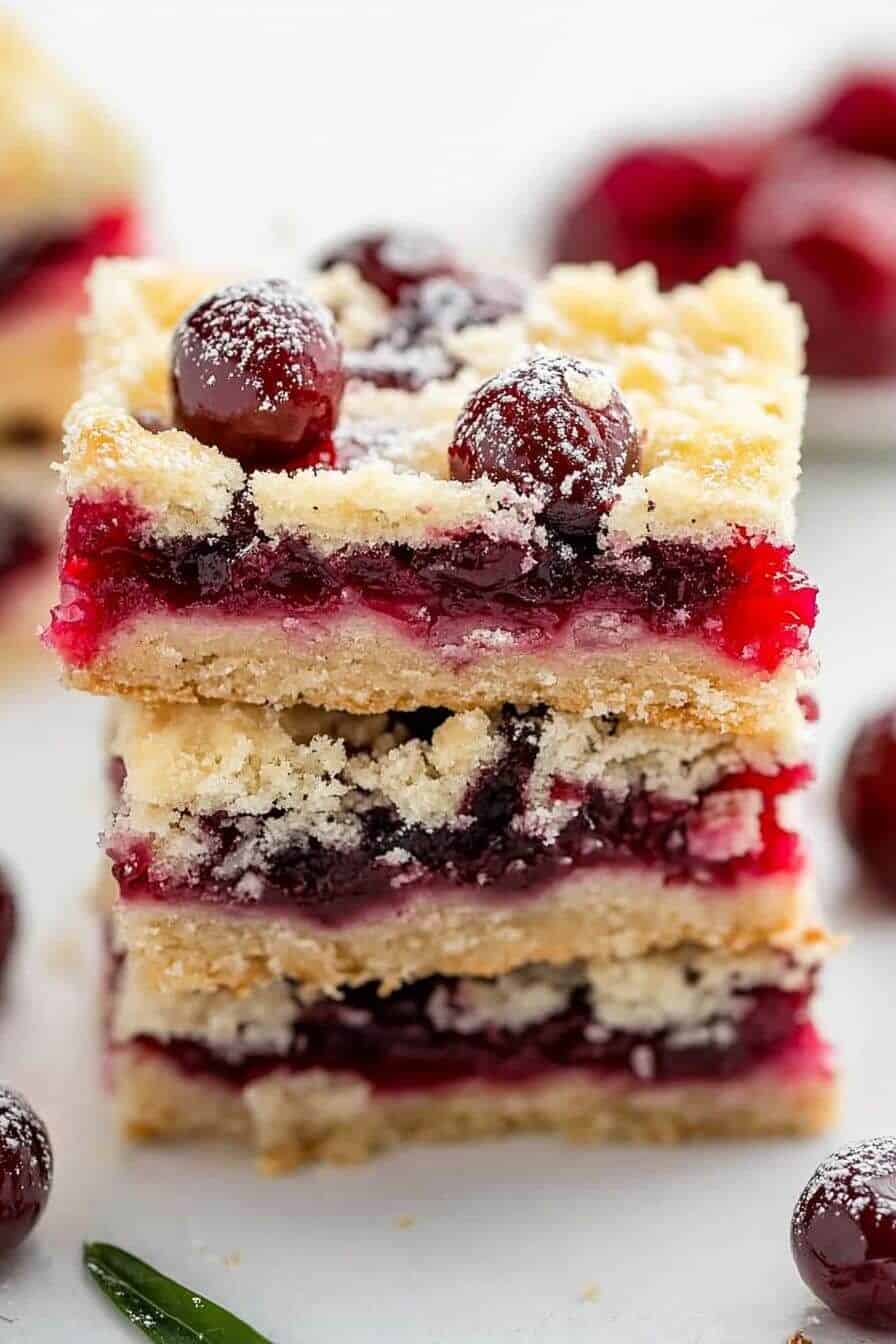
Next, carefully open your can of *cherry pie filling*. With an offset spatula or the back of a spoon, gently spread the entire can of filling evenly over the pressed batter layer. Be mindful not to disturb the bottom crust too much while spreading. The bright red cherries will create a visually appealing and delicious middle layer, offering a burst of fruity flavor in every bite of your *holiday treat*. This simple step is what gives these bars their distinctive taste and festive appearance.
Dolloping Remaining Batter
Finally, take the remaining half of your batter. Instead of trying to spread it evenly, which can be challenging over the sticky pie filling, simply dollop small spoonfuls of the batter randomly over the cherry layer. Don’t worry if it doesn’t cover the entire surface; the batter will spread as it bakes, creating a beautiful, slightly streaky top crust. This method ensures a perfect balance of fruit and crust, contributing to the rustic charm of these *homemade cherry bars*. It’s an easy technique that yields a wonderful texture. For more dessert inspirations that incorporate fruit fillings, you might enjoy our Blueberry Muffin Cookies with Streusel.
Baking Your Delicious Cherry Bars
Baking is where the magic happens, transforming your prepared ingredients into golden-brown, fragrant *cherry bars*. Careful attention to oven temperature and baking time will ensure your *easy dessert* achieves the perfect texture and doneness.
Oven Temperature and Time
Place your pan of layered *Christmas cherry bars* into the preheated 350°F (175°C) oven. The baking time typically ranges from 30 to 40 minutes. However, oven temperatures can vary, so it’s always best to keep a close eye on your bars, especially during the latter part of the baking process. The goal is to achieve a beautiful golden-brown color on the top crust. The edges of the bars should appear lightly browned and set, while the center might still have a slight jiggle, which is perfectly fine, as it will firm up as the bars cool. This balance ensures the bars remain moist and tender, not dry or overbaked.
Checking for Doneness
To confirm that your *holiday treat* is perfectly baked, you can gently touch the top of the crust. It should feel firm to the touch and spring back slightly. Another reliable indicator is a toothpick test; insert a toothpick into one of the batter sections (avoiding the cherry filling itself). If it comes out clean or with just a few moist crumbs attached, your bars are ready. If it comes out wet with raw batter, continue baking for another 5-10 minutes and retest. Overbaking can lead to dry bars, so it’s better to err on the side of slightly underbaked, as they will continue to cook slightly from residual heat once removed from the oven. Once baked, remove the pan from the oven and place it on a wire rack to begin cooling. This crucial cooling period before glazing ensures the bars set properly and the *vanilla glaze* adheres beautifully.
Making the Sweet Vanilla Glaze
The sweet *vanilla glaze* is the crowning glory of these *Christmas cherry bars*, adding a beautiful sheen and an extra layer of sweetness that perfectly complements the tartness of the cherries. This simple finishing touch takes mere minutes to prepare and apply.
Whisking Glaze Ingredients Smooth
In a medium-sized bowl, combine your powdered sugar (confectioners’ sugar), a small amount of milk (or cream), and a splash of vanilla extract. Start with about one tablespoon of milk and gradually add more, a teaspoon at a time, until you reach your desired consistency. You want a glaze that is smooth, thick enough to cling to the bars, but still thin enough to drizzle. Whisk vigorously until all lumps of powdered sugar are gone and the mixture is silky smooth. The key is to achieve a consistency that flows nicely but isn’t too runny, otherwise, it will simply soak into the bars rather than sitting on top. This *simple glaze* adds a professional touch to your *homemade* bars.
Drizzling Over Warm Bars
Once your cherry bars have cooled for about 15-20 minutes, while still slightly warm, it’s time to apply the glaze. Drizzling the glaze while the bars are warm allows it to spread slightly and set into a smooth, slightly translucent layer, bonding beautifully with the baked crust. You can use a spoon to drizzle the glaze back and forth over the bars, creating an attractive pattern, or spread it evenly with an offset spatula for full coverage. Let the glazed bars continue to cool completely on the wire rack. As they cool, the *vanilla glaze* will set, creating a lovely finish that is both appealing to the eye and the palate. This final step transforms a simple baked good into a truly festive and irresistible *holiday treat*. Consider posting your finished bars on Carina Recipes Instagram for others to see your baking success!
Cooling and Serving Your Bars
Patience is a virtue, especially when it comes to cooling and serving your *easy Christmas cherry bars*. Proper cooling ensures the glaze sets beautifully and the bars slice cleanly, presenting them as the perfect *festive* dessert.
Setting the Glaze Perfectly
After drizzling the *vanilla glaze* over your warm *cherry bars*, it is absolutely crucial to allow them to cool completely. This usually takes at least 1-2 hours at room temperature, or you can speed up the process by placing them in the refrigerator for about 30 minutes. Resist the temptation to slice them prematurely! If you cut into the bars while the glaze is still wet or the bars are warm, the glaze will smear, and the bars may crumble, losing their neat shape. A fully set glaze will be firm to the touch, creating a slight crust on top that provides a pleasing textural contrast to the soft bar beneath. This step is vital for both the aesthetic appeal and structural integrity of your delicious *holiday treat*.
How to Slice and Serve
Once your *Christmas cherry bars* are completely cooled and the glaze is perfectly set, it’s time to slice them. If you lined your pan with parchment paper, you can simply lift the entire slab of bars out onto a cutting board. Using a sharp knife, trim the edges for a clean presentation, then cut the bars into your desired size squares or rectangles. For clean cuts, wipe your knife with a damp cloth after every few slices, especially if the glaze or filling is sticky. These bars are wonderfully versatile and can be served at room temperature. They make a fantastic addition to a holiday dessert platter, a potluck, or simply enjoyed with a cup of coffee or tea. Each slice offers a taste of *homemade* holiday cheer, making them an instant crowd-pleaser.
More Christmas Cherry Bar Variations
While the classic *easy Christmas cherry bars* are undeniably delicious, one of the joys of *homemade* baking is the ability to customize and experiment. These variations allow you to tailor the recipe to your personal preferences or explore new flavor profiles, making your *holiday treat* truly unique.
Try Different Fruit Fillings
Don’t limit yourself to just *cherry pie filling*! This recipe is incredibly adaptable to other fruit fillings. Consider using apple, blueberry, peach, or even mixed berry pie filling for a completely different but equally delightful flavor. For a more autumnal feel, pumpkin pie filling could be a unique twist. Each fruit will bring its own distinct sweetness and tartness, offering a fresh take on the classic bar. Just ensure the consistency of the alternate *pie filling* is similar to cherry to maintain the structure of the bars. This simple swap is a fantastic way to enjoy this *easy dessert* year-round, not just during *Christmas baking* season.
Add Nuts or Chocolate
To add an extra layer of texture and flavor, consider incorporating nuts or chocolate chips into your batter or on top of the cherry filling. Chopped pecans, walnuts, or almonds would offer a lovely crunch and earthy note, complementing the cherries beautifully. Stir about a half cup of your chosen nuts into the dry ingredients before combining with the wet, or sprinkle them over the cherry layer before dolloping the top batter. Similarly, white chocolate chips, dark chocolate chunks, or even a swirl of melted chocolate on top of the *vanilla glaze* could create a decadent contrast. These additions can make your *festive* bars even more indulgent.
Coconut Twist Option
For those who love tropical flavors, a coconut twist can be a wonderful addition. Incorporate about half a cup of shredded unsweetened coconut into the dry ingredients for a subtle coconut flavor in the crust. Alternatively, you can sprinkle toasted shredded coconut over the *cherry pie filling* before dolloping the top batter, or even over the freshly applied *vanilla glaze* for both flavor and visual appeal. The slight chewiness and distinct aroma of coconut will add an exotic dimension to your traditional *holiday treat*. These simple modifications truly show the versatility of this basic *baking tips* recipe.
Storing Your Leftover Cherry Bars
Proper storage is key to maintaining the freshness and deliciousness of your *easy Christmas cherry bars*, ensuring you can enjoy this *holiday treat* for days to come. Whether you have just a few slices left or a whole batch you’ve prepared ahead, these *baking tips* will help preserve their quality.
Room Temperature Storage
If your *cherry bars* are to be consumed within 2-3 days, they can be stored at room temperature. Place them in an airtight container to prevent them from drying out. A glass container with a tight-fitting lid works wonderfully. Keep the container in a cool, dry place away from direct sunlight. While the *vanilla glaze* may soften slightly, the bars will remain deliciously moist and flavorful. This method is perfect for keeping your *festive* bars readily available for snacking or unexpected guests during the *Christmas baking* season.
Refrigeration and Freezing Tips
For longer storage, or if your kitchen runs warm, refrigerating your *homemade cherry bars* is a great option. Place the bars in a single layer in an airtight container or wrap individual bars tightly in plastic wrap before placing them in a container. They will stay fresh in the refrigerator for up to a week. When ready to serve, you can let them come to room temperature for about 15-20 minutes, or enjoy them chilled. For even longer preservation, these bars freeze exceptionally well. Cut the bars into individual portions, wrap each tightly in plastic wrap, and then place them in a freezer-safe bag or container. They can be frozen for up to 2-3 months. Thaw frozen bars at room temperature or in the refrigerator overnight. This *make ahead* option makes them perfect for holiday meal prep or unexpected cravings. For other make-ahead meal ideas, our Chicken Bacon Ranch Tater Tot Casserole offers great inspiration.
Common Questions About These Bars
Addressing common questions about *easy Christmas cherry bars* can help bakers customize this *simple recipe* and troubleshoot any potential concerns. Here are some frequently asked questions to ensure your *holiday treat* turns out perfectly.
Using Fresh Cherries Instead
While this *easy dessert* recipe calls for *cherry pie filling* for convenience and consistent results, you can certainly use fresh cherries with a few adjustments. You will need approximately 4-5 cups of pitted fresh cherries. Toss them with 1/2 cup of granulated sugar and 2 tablespoons of cornstarch or flour. This will help create a thick, jam-like consistency as they bake, preventing the bars from becoming too watery. You might also want to add a splash of lemon juice to enhance the cherry flavor and balance the sweetness. The cooking time might vary slightly, so keep an eye on the bars. Using fresh cherries can offer a vibrant, natural flavor, perfect for elevating your *homemade* bars when cherries are in season. The process, while slightly more involved, still adheres to the spirit of *Christmas baking*.
Adjusting Sweetness Levels
The sweetness of these *cherry bars* can be easily adjusted to suit your preference. If you find the *cherry pie filling* and glaze to be too sweet, you can reduce the amount of granulated sugar in the bar batter by a quarter cup. Alternatively, if you prefer a less sweet glaze, you can simply reduce the amount of powdered sugar or increase the amount of milk slightly to thin it out while keeping the sugar content lower. If you desire an even sweeter bar, you could consider adding a tablespoon or two more sugar to the batter. Remember that the *vanilla glaze* also contributes significantly to the overall sweetness. Taste your components as you go, especially the glaze, to fine-tune the flavor profile to your liking. This flexibility ensures your *festive* dessert is perfect for your palate.
Gluten-Free Christmas Cherry Bars
For those with dietary restrictions, enjoying a delicious *Christmas cherry bar* is still entirely possible! Making a *gluten-free option* for this *easy dessert* means everyone can partake in this *holiday treat*.
Flour Swap for Gluten-Free
Converting this *simple recipe* to a *gluten-free option* primarily involves a straightforward flour swap. Instead of using all-purpose flour, opt for a high-quality, all-purpose gluten-free flour blend that contains xanthan gum. Many brands offer such blends specifically designed for baking, and they usually work as a direct 1:1 substitute for traditional wheat flour. It’s crucial to use a blend that includes xanthan gum, as this ingredient helps to mimic the elasticity and structure that gluten provides, preventing your bars from becoming crumbly. If your chosen blend does not contain xanthan gum, you may need to add about 1/2 teaspoon per cup of flour. Follow the rest of the recipe instructions exactly as written. The baking time might be marginally different, so always perform the toothpick test to ensure doneness. With this simple adjustment, your *homemade* *gluten-free Christmas cherry bars* will be just as delightful and *festive* as the traditional version, making them inclusive for all your holiday guests. To learn more about gluten-free baking, Wikipedia’s page on gluten-free diets offers good background information.