Classic Easy Tiramisu is a beloved no-bake dessert, cherished for its rich coffee-soaked ladyfingers and smooth, creamy mascarpone filling. This authentic recipe makes creating this sweet indulgence accessible to anyone, whether you’re a seasoned baker or just starting. Prepare to enjoy a truly decadent sweet treat.
Key Takeaways
- Craft an authentic, creamy mascarpone filling for a delightful dessert.
- Master the art of briefly dipping ladyfingers in strong coffee for perfect moisture.
- Achieve beautiful, even layers for a visually appealing and delicious tiramisu.
- Chilling is crucial for the ideal texture and enhanced flavor of your creation.
- Finish with a delicate dusting of cocoa powder for a professional touch.
Tiramisu offers pure dessert joy. Layers of flavor satisfy sweet cravings. Simple steps yield delicious results. This no-bake treat impresses guests. A true sweet indulgence awaits.
Make Classic Easy Tiramisu Now
Craving a luxurious yet simple dessert that truly impresses? Our classic easy tiramisu recipe is your answer to creating an authentic Italian delight right in your own kitchen. This no-bake treat combines rich flavors and delicate textures into a harmonious whole, making it a favorite for any occasion. Forget complicated techniques; we break it down into manageable steps, ensuring a successful and delicious outcome every time. Whether you’re hosting a dinner party or simply looking for a sweet indulgence to brighten your day, this guide will walk you through the process, resulting in a dessert that tastes like it came from a high-end patisserie.
Six Steps to Pure Bliss
Creating this easy homemade tiramisu recipe involves just six primary steps, designed to simplify the process without compromising on taste or elegance. From gathering your fresh ingredients to the final delicate dusting of cocoa, each stage is crucial for building the layered flavors and iconic structure of this famous Italian dessert. Following these steps carefully will lead to a truly satisfying culinary experience, culminating in a dessert that’s both beautiful to behold and utterly irresistible. Prepare to receive compliments and delight your taste buds with this coffee-infused masterpiece.
Gather Classic Easy Tiramisu Ingredients
The foundation of any exceptional classic Italian dessert lies in the quality and freshness of its ingredients. For your tiramisu, selecting the right components is key to achieving that authentic flavor and creamy texture. We’ll be using a blend of pantry staples and special items that contribute to the dessert’s signature profile. Ensure all ingredients are at their proper temperature as specified, particularly the dairy, to guarantee smooth mixing and optimal consistency for your creamy mascarpone filling.
Strong Coffee and Liqueur
The heart of tiramisu’s distinct flavor comes from its coffee component. You’ll need about 1.5 cups of strong brewed coffee, ideally espresso, cooled to room temperature. This rich, dark liquid will be used to imbue the ladyfingers with a deep, aromatic essence. For an added layer of sophistication, a liqueur like Marsala wine, rum, or coffee liqueur is traditionally incorporated. About ¼ cup is sufficient to lend a subtle warmth and complex note without overpowering the coffee. If you prefer an alcohol-free version, simply increase the coffee amount or add a splash of vanilla extract.
Eggs, Sugar, and Mascarpone
These ingredients form the creamy, sweet core of your tiramisu. You’ll need 3 large egg yolks, which will be gently cooked with ½ cup of granulated sugar to create a rich, stable base for the cream. The star of the filling is 16 ounces (two 8-ounce containers) of mascarpone cheese. This Italian cream cheese is known for its incredibly smooth, velvety texture and mild, slightly sweet flavor, making it perfect for the creamy mascarpone filling. Ensure your mascarpone is cold to maintain its structure during mixing. For another delightful dessert experience, consider trying a quick Italian cream cake.
Cream, Ladyfingers, Cocoa Powder
To complete your tiramisu, you’ll also need 1 cup of heavy cream, chilled, which will be whipped to soft peaks and folded into the mascarpone mixture, adding lightness and volume. One 7-ounce package of ladyfingers (savoiardi biscuits) is essential for the characteristic layered structure and absorption of the coffee. Finally, about 2 tablespoons of unsweetened cocoa powder are required for the finishing touch, providing a slight bitterness that beautifully balances the sweetness of the dessert. For other sweet treats, explore our collection of dessert recipes, like this peanut butter brownie swirl cookie recipe.
Preparing Your Tiramisu Workspace
Before you dive into assembling your masterpiece, a little preparation goes a long way in ensuring a smooth and enjoyable cooking experience. Setting up your workspace efficiently helps streamline the process, allowing you to focus on the delicate steps of tiramisu creation. Having all your tools and ingredients ready at hand prevents interruptions and makes the entire procedure feel much more relaxed, aligning with the “easy” aspect of this easy homemade tiramisu recipe. A well-organized kitchen space is the first step toward pure bliss.
Combine Coffee and Liqueur
Your first preparatory step is to create the flavorful liquid that will soak the ladyfingers. In a shallow dish or a wide bowl, combine the cooled, strong brewed coffee with your chosen liqueur. Stir gently to ensure they are well mixed. This mixture is crucial for the coffee-soaked ladyfingers, providing the signature aromatic depth of the dessert. Make sure the dish is wide enough to comfortably dip the ladyfingers without breaking them. Having this prepared in advance allows you to seamlessly transition into the assembly phase once your creamy filling is ready.
Crafting the Creamy Tiramisu Filling
The heart and soul of any truly authentic tiramisu lies in its rich, velvety filling. This section details the steps to create a lusciously smooth and stable creamy mascarpone filling that will hold its shape and delight your palate. Precision in whipping and folding is crucial here to achieve the perfect airy yet decadent texture that characterizes this beloved classic Italian dessert. Take your time with each step, as the quality of your filling directly impacts the overall enjoyment of your homemade tiramisu.
Whip Egg Yolks and Sugar
In a heatproof bowl, whisk together the 3 egg yolks and ½ cup of granulated sugar until the mixture is pale yellow and slightly thickened. Place this bowl over a saucepan of simmering water (ensure the bottom of the bowl does not touch the water). Continuously whisk the egg mixture for about 5-7 minutes, until it becomes thick and forms a ribbon when the whisk is lifted. This gentle cooking process, known as a bain-marie, pasteurizes the eggs and creates a stable, frothy base. Remove from heat and let it cool completely, stirring occasionally.
Mix in Mascarpone Cheese
Once the egg yolk mixture is cool, gently fold in the 16 ounces of cold mascarpone cheese. Use a spatula to incorporate the mascarpone until the mixture is smooth and lump-free. Be careful not to overmix, as mascarpone can curdle if beaten too vigorously. The goal is a homogenous, creamy consistency that maintains its body. Mascarpone is a rich, creamy Italian cheese often used in desserts like tiramisu, learn more about it on Wikipedia.
Whip Heavy Cream Separately
In a separate, chilled bowl, whip the 1 cup of cold heavy cream until soft peaks form. It’s important that the cream is very cold, and preferably the bowl and beaters too, for the best whipping results. Soft peaks mean the cream holds its shape but the tip curls over when the whisk is removed. Do not over-whip, as it can turn grainy.
Fold Cream into Mascarpone
Finally, gently fold the whipped heavy cream into the mascarpone-egg yolk mixture. Use a large spatula and a light hand, folding from the bottom up to incorporate air and maintain the cream’s fluffiness. This step creates the characteristic light yet rich texture of the creamy mascarpone filling. Continue folding until just combined, ensuring no streaks of pure whipped cream remain. This careful folding ensures your filling is perfectly airy and ready for layering.
Dipping Ladyfingers for Tiramisu
The delicate balance of moisture and flavor in tiramisu heavily relies on how you prepare your ladyfingers. Too little liquid, and they’ll be dry; too much, and your dessert will be soggy. This crucial step is where the coffee-soaked ladyfingers truly come to life, absorbing the aromatic blend of coffee and liqueur to infuse every bite with irresistible taste. Mastering the dipping technique is key to achieving the perfect texture and flavor profile for your easy homemade tiramisu recipe, contributing significantly to its authentic charm.
Briefly Dip Ladyfingers
Take one ladyfinger at a time and quickly dip it into the prepared coffee and liqueur mixture. The key word here is “briefly”—a quick, one-second dip on each side is usually sufficient. Ladyfingers are highly porous and will absorb liquid very rapidly. You want them to be moist but not saturated or falling apart. Place the dipped ladyfingers in your chosen serving dish, creating an even layer. This method ensures that each cookie is infused with the rich coffee flavor without becoming mushy, forming a sturdy and flavorful base for your dessert layers.
Layering Your Classic Easy Tiramisu
Once your ingredients are prepped and your filling is creamy, the true artistry of creating a classic easy tiramisu comes into play: layering. This methodical process builds the dessert’s iconic structure and ensures that every spoonful delivers a harmonious blend of textures and flavors. Precision in layering is important not just for aesthetics but also for the even distribution of the creamy mascarpone and coffee-soaked ladyfingers, making each bite a delightful sweet indulgence. The careful stacking transforms simple ingredients into a sophisticated treat.
First Ladyfinger Layer
Arrange a single layer of the briefly dipped ladyfingers at the bottom of your chosen serving dish. A rectangular dish, typically 8×8 or 9×13 inches, works best. If necessary, break some ladyfingers to fit snugly and cover the entire base of the dish, minimizing gaps. This initial layer forms the sturdy foundation of your tiramisu, absorbing the rich coffee flavors and setting the stage for the creamy layers to follow. Ensure an even surface as much as possible to support the subsequent layers.
First Mascarpone Mixture Layer
Once your first ladyfinger layer is complete, gently spread about half of your prepared creamy mascarpone filling over the ladyfingers. Use an offset spatula or the back of a spoon to create an even, smooth layer, extending all the way to the edges of the dish. This layer provides the rich, sweet, and airy component that balances the coffee-infused biscuits. Distribute it carefully to avoid disturbing the ladyfingers underneath, aiming for a consistent thickness throughout.
Repeat Layers Smoothly
After the first mascarpone layer, create a second layer of dipped ladyfingers, arranging them in the same careful manner as the first. This repetition builds the height and complexity of your tiramisu. Finally, top this second layer of ladyfingers with the remaining half of the mascarpone mixture, spreading it out smoothly and evenly. The top layer of cream should look pristine and inviting, ready for its final garnish. This structured approach, a traditional method, ensures a beautifully composed and flavorful dessert. For more inspiring dessert ideas, check out our collection of recipes.
Chilling for Perfect Tiramisu Bliss
After all the careful preparation and meticulous layering, the most challenging part for many enthusiastic dessert makers is the waiting game. However, chilling your tiramisu is perhaps the most critical step in achieving that perfect texture and allowing the flavors to meld beautifully. This period is essential for the dessert to firm up, ensuring clean slices and a truly satisfying mouthfeel. Don’t rush this stage; patience will be rewarded with a decadent and well-set easy homemade tiramisu recipe that highlights its authentic flavor.
Chill for At Least Four Hours
Once your tiramisu is fully assembled, cover the dish tightly with plastic wrap and place it in the refrigerator. It needs to chill for a minimum of four hours. During this time, the mascarpone filling will firm up, and the coffee-soaked ladyfingers will continue to absorb the flavors, softening to an ideal consistency. For the absolute best results and a truly set dessert with enhanced flavor, chilling your tiramisu overnight is highly recommended. This longer chill allows the components to integrate fully, resulting in a richer, more cohesive, and utterly delicious classic Italian dessert.
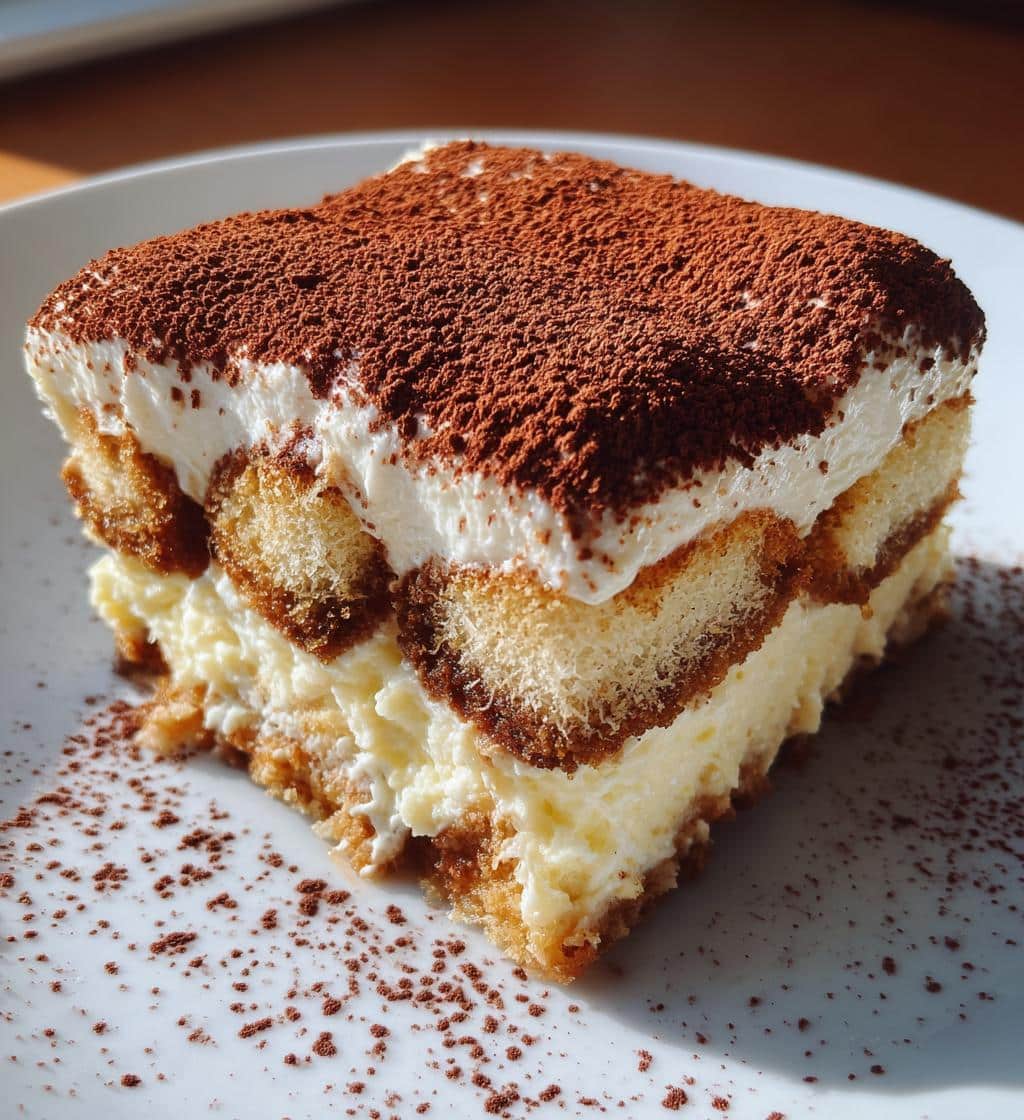
Dusting and Serving Tiramisu
The final touches to your classic easy tiramisu are what truly elevate it from a simple dessert to a show-stopping masterpiece. A little attention to detail at this stage enhances both its visual appeal and its complex flavor profile. The contrast between the rich, creamy layers and the slight bitterness of the cocoa powder is iconic, making the final dusting a signature element of this beloved sweet indulgence. This last step prepares your tiramisu for its grand reveal.
Dust with Cocoa Before Serving
Just before you are ready to serve your perfectly chilled tiramisu, retrieve it from the refrigerator. Using a fine-mesh sieve, generously dust the entire top surface with unsweetened cocoa powder. This creates a beautiful, even layer of cocoa powder finish that adds a subtle bitter note, perfectly balancing the sweetness of the mascarpone filling and the richness of the coffee. Do this right before serving to prevent the cocoa from absorbing moisture and clumping. Now, your homemade tiramisu is ready to be sliced and savored, showcasing your effort and the delicious outcome. You can learn more about this famous dessert on Wikipedia.
Enjoy Your Classic Easy Tiramisu Dessert
Congratulations! You’ve successfully created a truly magnificent classic easy tiramisu. This no-bake treat is a testament to the fact that sophisticated flavors can be achieved with straightforward steps. Each spoonful offers a delightful medley of soft, coffee-infused ladyfingers, creamy mascarpone, and a hint of cocoa, providing a perfect sweet indulgence. Whether shared with loved ones or enjoyed as a personal treat, this dessert is sure to bring smiles and satisfaction. Take pride in your creation and savor every moment of this delicious experience.
We love seeing your culinary successes! Share your homemade tiramisu photos with us on Pinterest and Instagram. Your feedback and creations inspire us to continue providing delightful recipes for all dessert lovers.
Tiramisu Recipe Time Breakdown
Understanding the time commitment for any recipe is helpful for planning, especially when preparing a dessert for a special occasion. While the chilling time for tiramisu is significant, the active preparation is surprisingly quick, making it a perfect choice for those seeking a quick preparation dessert. This breakdown provides a clear overview, allowing you to schedule your kitchen activities efficiently and enjoy the process without rush.
-
Preparation: 30 Minutes
This includes gathering ingredients, brewing coffee, preparing the egg yolk mixture, whipping cream, and assembling the layers. The active hands-on time is minimal, making it an accessible recipe even on busy days.
-
Total Time: 4 Hours 30 Minutes
This total accounts for the 30 minutes of active preparation plus a minimum of 4 hours for chilling. Remember, longer chilling (overnight) is always recommended for the best flavor and texture development.
Tiramisu Nutrition Information
While tiramisu is undeniably a sweet indulgence, understanding its general nutritional profile can help you enjoy it mindfully. As with many rich desserts, it’s a treat best savored in moderation. The following points provide a general idea of what a typical serving of tiramisu might contain, recognizing that exact values can vary based on specific ingredients and portion sizes in your easy homemade tiramisu recipe.
-
Per Serving: Calories and Fat
A single serving of tiramisu is typically rich in calories and fat, primarily due to the mascarpone cheese, heavy cream, and egg yolks. These ingredients contribute to its decadent flavor and creamy texture.
-
Carbs, Protein, Cholesterol
The ladyfingers and sugar contribute to the carbohydrate content, while eggs and mascarpone provide protein. Due to the dairy and eggs, tiramisu will also contain cholesterol. It’s an energy-dense dessert, perfect for a celebratory moment.
Important Tiramisu Recipe Tips
Achieving a truly exceptional classic easy tiramisu goes beyond just following the steps; a few key tips can elevate your dessert from good to absolutely unforgettable. These insights, gleaned from years of culinary practice, ensure your homemade tiramisu boasts the most authentic flavor and ideal texture. Paying attention to these details is what transforms a simple recipe into a consistently perfect one, guaranteeing a delicious outcome every time for all dessert lovers.
-
Use Strong Brewed Coffee
The coffee is a pivotal flavor component. Opt for a high-quality espresso or very strong brewed coffee. Avoid instant coffee if possible, as it lacks the depth of flavor needed. Ensure it’s cooled completely before dipping the ladyfingers to prevent them from becoming soggy too quickly. This strong foundation is key to the authentic flavor of your coffee-soaked ladyfingers.
-
Chill Overnight for Best Taste
While four hours of chilling is the minimum, allowing your tiramisu to chill overnight (12-24 hours) makes a significant difference. This extended period enables the flavors to fully meld and deepen, and the mascarpone filling to set perfectly, resulting in a firmer, more cohesive, and intensely flavorful dessert. This traditional method truly enhances the richness and complexity of the tiramisu.