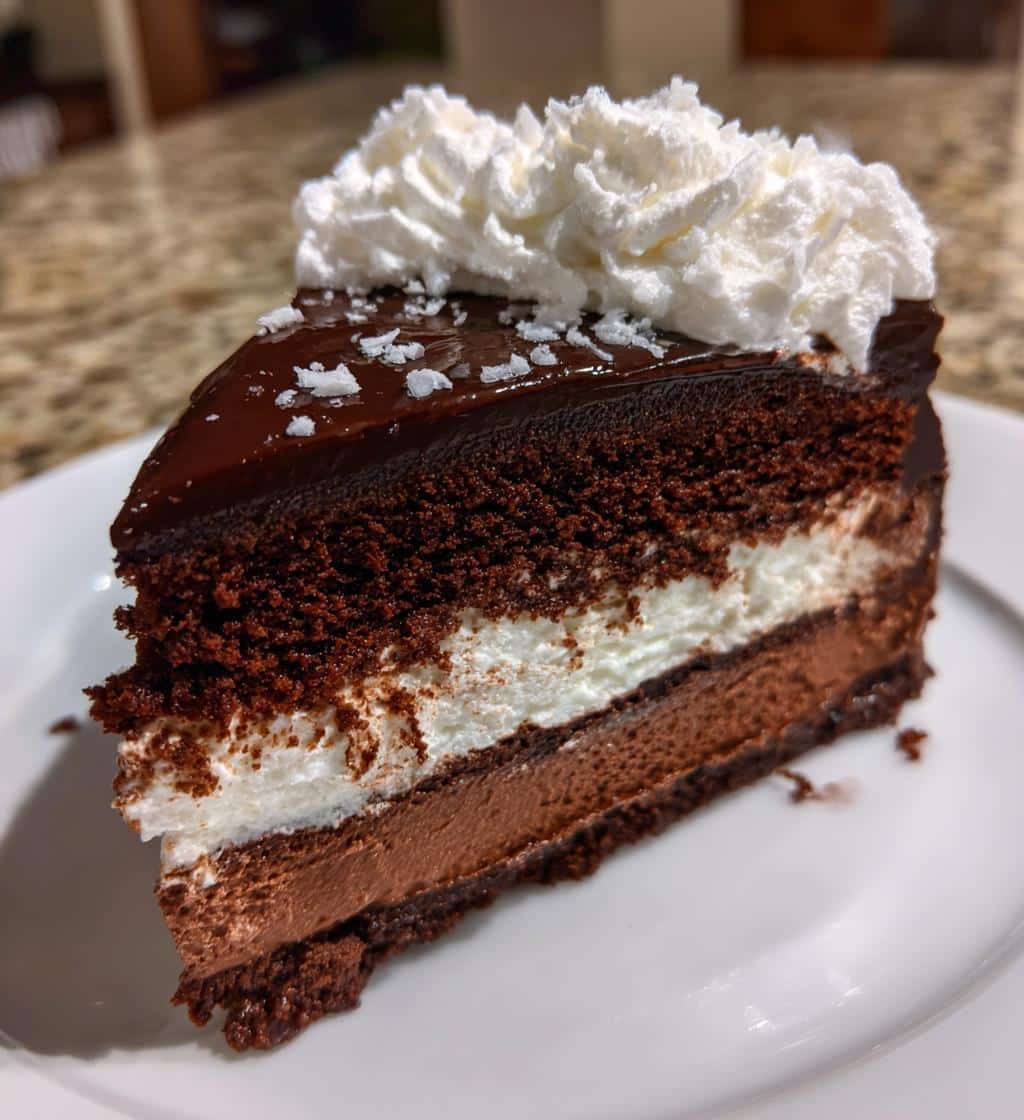
Chocolate Mousse Cake is a luxurious dessert, surprisingly simple to create at home. This recipe guides you through each step, ensuring a perfectly rich, smooth, and airy treat. Ideal for any occasion, it promises a truly decadent experience that will impress every guest with its delightful flavor.
Key Takeaways
- Gather high-quality ingredients, especially dark chocolate, for superior flavor.
- Master gentle techniques like the double boiler method and careful folding to achieve light textures.
- Allow ample chilling time (at least four hours, preferably overnight) for the mousse to set beautifully.
- Serve your homemade chocolate mousse cake chilled for the best taste and texture.
- Embrace precision and patience for a truly heavenly and decadent dessert experience.
Baking a chocolate mousse cake is rewarding. The steps are simple. Quality ingredients make a difference. Patience during chilling is key. Enjoy this decadent, homemade dessert.
Gather Ingredients for Chocolate Mousse Cake
Crafting a truly spectacular homemade chocolate mousse cake begins with selecting the right ingredients. The quality of your components directly impacts the final taste and texture of this decadent dessert. For an exceptionally rich chocolate flavor and a smooth texture, always opt for premium ingredients. You’ll need high-quality dark chocolate, preferably one with 60-70% cocoa solids, which will provide depth without excessive bitterness. Fresh, large eggs are crucial for creating the airy, fluffy mousse base. Unsalted butter will contribute to the richness, while granulated sugar balances the chocolate’s intensity.
List of All Needed Items
- Dark Chocolate: Around 8-10 ounces (225-280g) of good quality dark chocolate (60-70% cocoa), finely chopped. This is the star for that intense chocolate flavor.
- Unsalted Butter: About 6-8 tablespoons (85-115g), cut into cubes, which will melt beautifully with the chocolate.
- Large Eggs: 4-6 large eggs, separated into yolks and whites, essential for the mousse’s structure.
- Granulated Sugar: Approximately ½ to ¾ cup (100-150g), divided, to sweeten the eggs and cream.
- Heavy Cream: 1 ½ to 2 cups (360-480ml) of cold heavy whipping cream, for the light, airy component.
- Vanilla Extract: 1-2 teaspoons, to enhance all the flavors, particularly the rich chocolate.
- Salt: A pinch, to balance the sweetness and deepen the chocolate notes.
Having all your ingredients measured and ready before you start, a technique known as mise en place, will make the entire process smoother and more enjoyable, leading to a perfect quick Italian cream cake or any other dessert creation. For more fantastic sweet treat ideas, check out our desserts category.
Prep Time for Your Heavenly Delight
One of the most appealing aspects of a chocolate mousse cake is that much of its creation doesn’t involve traditional oven baking, making it a fantastic no-bake cake option. However, managing your prep time and understanding the crucial chill duration is key to success. While the active preparation steps are relatively fast, patience is truly a virtue when it comes to allowing the mousse to set properly.
Fast Preparation and Chill Duration
The active preparation for your homemade chocolate mousse cake typically takes between 30 to 45 minutes. This includes melting the chocolate, whisking the eggs, and whipping the cream. These steps are straightforward, making it an easy dessert recipe suitable for bakers of all levels. The beauty of this recipe lies in its simplicity and the minimal hands-on time required before the refrigeration process takes over.
However, the real “cooking” happens in the refrigerator. The chocolate mousse cake requires a significant chill duration to firm up and achieve its signature texture. You should plan for at least four hours of refrigeration, but for the absolute best results—a perfectly set, sliceable, and utterly smooth texture—chilling overnight is highly recommended. This allows all the flavors to meld beautifully and the structure to become completely stable. Don’t rush this step; it’s what transforms a liquid mixture into a luxurious, chilled cake. Factor this essential chilling into your total prep time to enjoy a perfectly decadent chocolate sweet treat.
Melting Dark Chocolate and Butter
The foundation of a truly rich chocolate mousse cake lies in perfectly melted dark chocolate and butter. This step is critical for achieving that smooth texture and ensuring your decadent chocolate shines through in every bite. Using a double boiler is the preferred method as it provides gentle, indirect heat, preventing the chocolate from seizing or burning, which can easily happen over direct heat.
Double Boiler Method for Smoothness
To set up a double boiler, you’ll need a heatproof bowl that fits snugly over a saucepan without touching the water at the bottom. Fill the saucepan with about an inch or two of water and bring it to a gentle simmer. Place your finely chopped dark chocolate and cubes of unsalted butter into the heatproof bowl. The steam from the simmering water will gently warm the bowl, slowly melting the chocolate and butter. Stir occasionally with a rubber spatula until the mixture is completely smooth and glossy, with no lumps remaining. This careful approach ensures an even melt, resulting in a luscious base for your homemade chocolate mousse cake.
Prevent Water from Touching Bowl
It is absolutely crucial to prevent any water or steam from directly contacting the chocolate mixture. Even a tiny drop of water can cause the chocolate to “seize,” turning it into a grainy, unworkable mess. Ensure the bottom of your bowl does not touch the simmering water; it should be heated only by the steam. Also, be mindful not to let condensation from the lid or sides drip into the chocolate. A perfectly melted mixture will be fluid and uniform, setting the stage for the exquisite rich chocolate flavor that makes this dessert so special. This technique is a fundamental baking tip for many chocolate-based sweet treats.
Whisking Eggs and Sugar Fluffy
Achieving the characteristic light and airy texture of a chocolate mousse cake relies heavily on the proper preparation of the egg and sugar mixture. This step involves incorporating a significant amount of air, which will contribute to the overall fluffiness and delicate structure of the final dessert. Rushing this process will result in a denser mousse, so patience and precision are key.
Achieve Pale and Airy Texture
In a clean, dry mixing bowl, combine your egg yolks with about half of the granulated sugar. Using an electric mixer, whisk this mixture on medium-high speed for several minutes. You’ll observe a significant transformation: the yolks will become noticeably pale in color, lighten in texture, and increase substantially in volume. The mixture should fall from the whisk in thick ribbons, indicating that enough air has been incorporated. This process not only aerates the yolks but also fully dissolves the sugar, preventing a gritty texture in your finished sweet treat. The goal is to create a voluminous, almost cloud-like consistency that will become the backbone of your fluffy mousse.
Separately, you will whisk the egg whites. In an impeccably clean bowl (any trace of fat can prevent whites from whipping), whisk the egg whites until soft peaks begin to form. Gradually add the remaining granulated sugar, continuing to whisk until stiff, glossy peaks are achieved. This meringue-like consistency is another vital component for the overall airy feel of your homemade chocolate mousse cake. Both the aerated yolks and the stiff egg whites work in tandem to provide the incredible lightness, making this an easy dessert recipe with truly rewarding results if these steps are followed diligently.
Folding Chocolate into Egg Mixture
Once your dark chocolate and butter are smoothly melted and your egg yolks are whisked to a pale, airy texture, the next crucial step is gently combining these two primary components. This stage demands a delicate touch to preserve the air you’ve worked so hard to incorporate into the eggs, which is essential for the light, fluffy mousse.
Combine Gently to Keep Air
Carefully pour the slightly cooled (but still warm and fluid) melted chocolate and butter mixture into the bowl with the whisked egg yolks and sugar. At this point, avoid aggressive stirring. Instead, use a rubber spatula to fold the chocolate into the egg mixture. The technique involves cutting down through the center of the mixture, across the bottom of the bowl, and then bringing the spatula up the side, turning the mixture over. Rotate the bowl as you go, continuing this gentle folding motion. The goal is to combine the ingredients thoroughly without deflating the aerated eggs. You want to maintain as much of that lightness as possible to ensure your homemade chocolate mousse cake has the desired smooth texture and decadent chocolate richness.
Continue folding until the mixture is uniform in color and texture, with no streaks of chocolate or egg yolk visible. It’s a delicate balance; you need to mix enough to combine but not so much that you lose the precious air bubbles. This creates a beautifully glossy, rich chocolate base that will contribute significantly to the overall volume and soft texture of your finished chilled cake. This step is a key baking tip for achieving the perfect light body in your sweet treat.
Whipping Heavy Cream and Vanilla
The final element that brings incredible lightness and creamy richness to your homemade chocolate mousse cake is perfectly whipped heavy cream. This ingredient transforms the denser chocolate-egg base into a truly ethereal, fluffy mousse. The addition of vanilla extract also plays a significant role, enhancing the overall flavor profile and complementing the deep notes of the dark chocolate.
Aim for Soft Peaks Forming
In a very clean, chilled mixing bowl (a metal bowl placed in the freezer for 10-15 minutes works wonders), pour your cold heavy cream and add the vanilla extract. Using an electric mixer fitted with a whisk attachment, begin whipping the cream on medium speed. As the cream starts to thicken, gradually increase the speed to medium-high. Watch closely as the cream transforms from a liquid into a soft, billowy cloud. The ideal consistency you’re aiming for is “soft peaks.” This means that when you lift the whisk, the cream should hold its shape but the tip of the peak will gently curl over.
It’s crucial not to over-whip the cream. If you continue whipping beyond soft peaks, the cream will become stiff and eventually turn buttery, losing its light, airy quality that is vital for the mousse texture. Over-whipped cream will result in a denser, greasier mousse rather than the delicate, melt-in-your-mouth sweet treat you desire. The soft peaks provide enough structure to hold the mousse together while still allowing for that delightful creaminess. This step, combined with the aerated eggs, contributes significantly to making this an easy dessert recipe that tastes incredibly sophisticated. For another delightful dessert, consider trying these peanut butter brownie swirl cookies.
Combining Cream into Chocolate Mix
This is the moment where the separate components truly come together to form the signature fluffy mousse texture of your homemade chocolate mousse cake. The key here, much like folding the chocolate into the eggs, is gentleness. You want to integrate the whipped cream without deflating the air you’ve carefully incorporated, ensuring a light and airy end product.
Lightly Fold for Mousse Texture
Take about one-third of your whipped heavy cream and add it to the chocolate and egg yolk mixture. Use a rubber spatula to gently fold this portion in. This initial addition helps to lighten the chocolate mixture, making it easier to incorporate the remaining cream without losing too much volume. Think of it as tempering the chocolate mixture to the lighter cream.
Once the first third is loosely combined, add the remaining whipped cream to the chocolate mixture. Again, using your rubber spatula, very lightly fold the cream into the chocolate. Continue the motion of cutting down the center, sweeping across the bottom, and bringing the mixture up and over. Do not stir vigorously. The goal is to just combine the two mixtures until no streaks of white cream are visible and the mixture is uniformly colored and smooth. The resulting consistency should be light, airy, and truly embody the rich chocolate flavor you’re striving for. This careful folding technique is paramount for achieving that perfect smooth texture and for a truly decadent chocolate sweet treat. Once combined, your mousse is ready for the crucial chilling phase.
Chilling Your Chocolate Mousse Cake
The chilling phase is arguably the most critical step in preparing a flawless homemade chocolate mousse cake. It’s during this time that the mousse truly sets, firming up to that delightful, sliceable consistency. Rushing this stage will result in a dessert that is too soft and unstructured, lacking the smooth texture and rich chocolate flavor you’ve worked to achieve.
Refrigerate for at Least Four Hours
After gently folding all your ingredients together to create the magnificent mousse, carefully spoon or pour the mixture into your prepared springform pan or individual serving dishes. Smooth the top with a spatula. Then, cover the pan loosely with plastic wrap to prevent any odors from the refrigerator from being absorbed by your dessert. Place the covered cake in the refrigerator. A minimum of four hours is required for the mousse to set adequately. During this time, the fats in the chocolate and butter will firm up, and the aerated structure of the mousse will stabilize, transforming it into a proper chilled cake. This patience ensures that your mousse holds its shape when sliced, offering a truly decadent chocolate experience.
For Best Results Chill Overnight
While four hours will yield a set cake, for the absolute best results and an impeccable smooth texture, chilling your chocolate mousse cake overnight (or for at least 8-12 hours) is highly recommended. An overnight chill allows the flavors to deepen and meld even further, creating a more intense and harmonious rich chocolate flavor. More importantly, it ensures the mousse is perfectly firm, making it much easier to unmold and serve cleanly. This extended chill time guarantees a stable, beautiful, and utterly delicious sweet treat that will impress any dessert lovers. Think of the chill duration as the final, essential cooking stage for this easy dessert recipe, ensuring every slice is heavenly.
Serving Your Delicious Mousse Cake
After patiently waiting for your homemade chocolate mousse cake to chill to perfection, the moment arrives to present and enjoy this heavenly dessert. Proper serving techniques ensure its beauty and taste are fully appreciated, making it a truly memorable sweet treat for any gathering or a simple indulgence.
Remove from Mold and Enjoy
Once your chocolate mousse cake has fully set (ideally overnight), it’s time to unmold it. If using a springform pan, simply release the latch and carefully lift the ring. You might need to gently run a thin, warm knife around the edges first to ensure a clean release. For cakes made in a mold without a removable bottom, you can often invert it onto a serving plate after a brief dip in warm water (being careful not to get water into the mousse), or serve directly from individual dishes. Garnish your beautiful chilled cake as desired; a dusting of cocoa powder, fresh berries, or chocolate shavings can elevate its visual appeal. This elegant dessert pairs wonderfully with a side of fresh fruit or a dollop of extra whipped cream. For more serving inspiration, you might enjoy exploring other recipes like our easy butter chicken recipe, showcasing the versatility of homemade dishes.
Always Serve This Cake Chilled
It is paramount to always serve this cake chilled. The integrity of the mousse texture relies on its cold temperature. Allowing the cake to sit at room temperature for too long will cause the mousse to soften and lose its delicate structure, detracting from the rich chocolate flavor and smooth texture. When ready to serve, take it directly from the refrigerator. If you anticipate a longer serving period, consider placing the cake on a platter over a bowl of ice to maintain its chilled state, especially on a warm day. This ensures every slice offers the perfect luxurious mouthfeel of a decadent chocolate sweet treat. Share your delightful creations with us on Pinterest and Instagram!
Expert Tips for Perfect Mousse Cake
Achieving a truly perfect homemade chocolate mousse cake involves more than just following the steps; it benefits greatly from a few expert baking tips that enhance both flavor and texture. These insights ensure your easy dessert recipe yields a consistently decadent chocolate experience, making you a master of this sweet treat.
Use High Quality Dark Chocolate
As emphasized earlier, the choice of dark chocolate is perhaps the most critical factor. Invest in a good quality dark chocolate with a cocoa content of 60-70%. Avoid chocolate chips, which often contain stabilizers that prevent smooth melting and can result in a grainy texture. Premium chocolate not only melts beautifully but also imparts a significantly richer chocolate flavor, elevating your mousse cake from good to extraordinary. The difference in taste and smooth texture will be immediately noticeable and appreciated by all dessert lovers.
- Temperature Control: Ensure all ingredients, especially the eggs and heavy cream, are cold before you begin whisking, then let the melted chocolate cool slightly before folding it into the egg mixture. Extreme temperature differences can shock the mixture.
- Gentle Folding: This cannot be overstated. When combining the aerated eggs, whipped cream, and chocolate mixture, use a light hand and a rubber spatula. Aggressive stirring will deflate the air bubbles, leading to a dense mousse rather than a light, fluffy mousse.
- Clean Bowls: Especially when whipping egg whites and heavy cream, ensure your bowls and whisk attachments are immaculately clean and grease-free. Any fat residue can prevent these ingredients from whipping up properly.
- Patience with Chilling: The chill duration is non-negotiable. Allow at least four hours, but preferably overnight, for the mousse to set completely. This ensures a stable, sliceable, and perfectly chilled cake.
By adhering to these baking tips, you’ll consistently create a homemade chocolate mousse cake that boasts an unparalleled smooth texture, rich chocolate flavor, and truly decadent quality, proving that even an easy dessert recipe can be elevated to gourmet status.
Nutrition Facts for Chocolate Mousse Cake
While a homemade chocolate mousse cake is undeniably a rich chocolate sweet treat, it’s helpful for dessert lovers to have an understanding of its nutritional content. As a decadent chocolate dessert, it’s typically enjoyed in moderation, often for special occasions. The exact nutrition facts can vary significantly based on the specific ingredients used, such as the percentage of cocoa in the dark chocolate, the amount of sugar, and any additional toppings or garnishes.
Check Calories Per Single Slice
Generally, a single slice of chocolate mousse cake can range anywhere from 300 to 500+ calories, depending on the portion size and the richness of the recipe. It typically contains a considerable amount of fat, primarily from the dark chocolate, butter, and heavy cream, along with carbohydrates from the sugar. Protein content will come from the eggs and dairy. While specific calorie information isn’t provided here, it’s wise to consider this when planning your treat. If you’re mindful of your intake, you can make slight adjustments, such as using a slightly less sugary chocolate or opting for smaller serving sizes.
This easy dessert recipe, while offering a rich chocolate flavor, is designed for indulgence. Enjoying a chilled cake like this in a balanced diet means savoring it mindfully. Knowing the general calorie information helps you make informed choices, ensuring you can still enjoy this delightful homemade chocolate mousse cake without guilt.
Enjoying Your Homemade Chocolate Mousse Cake
Finally, the moment arrives to savor the fruits of your labor: a magnificent homemade chocolate mousse cake. This easy dessert recipe, with its simple steps and rewarding outcome, proves that a heavenly dessert doesn’t have to be complicated. The satisfaction of creating such a decadent chocolate sweet treat from scratch is truly unparalleled, and sharing it with loved ones makes the experience even sweeter.
Simple Steps to Heavenly Dessert
From carefully gathering your ingredients and melting the rich dark chocolate to gently folding the airy mixtures and patiently chilling your creation, each step contributes to the ultimate success of this fluffy mousse. You’ve transformed basic ingredients into a luxurious, smooth-textured, and intensely flavored chilled cake that is sure to impress. Whether it’s for a special occasion, a dinner party, or simply a weekend indulgence, this chocolate mousse cake is a reliable choice for any dessert lovers.
Serve your chilled cake with a cup of coffee or tea, or pair it with fresh raspberries for a touch of tartness that beautifully complements the rich chocolate flavor. This dessert isn’t just a treat for the taste buds; it’s an experience, a testament to the joy of homemade baking. So, go ahead, slice into your masterpiece, and enjoy every decadent bite of your homemade chocolate mousse cake. It’s a truly heavenly dessert that embodies comfort, elegance, and pure deliciousness.