Chocolate Caramel Cream Pie is a truly decadent dessert, combining rich chocolate with luscious caramel in a perfect, creamy texture. This easy recipe offers step-by-step guidance to help you craft a homemade masterpiece. From baking the perfect crust to swirling caramel on top, get ready to impress everyone with this irresistible sweet treat.
Key Takeaways
- Master the art of a homemade pie crust for best results.
- Achieve a smooth, rich chocolate cream filling with ease.
- Learn ideal chill times for a perfectly set, creamy pie.
- Explore irresistible tips and elegant serving suggestions.
- Understand proper storage and delicious dessert variations.
Crafting this decadent pie is truly delightful. Layers of flavor combine beautifully. The reward is a truly amazing dessert. Guests will surely be impressed. Enjoy every single delicious bite.
Making Your Chocolate Caramel Cream Pie
Crafting a homemade chocolate caramel cream pie is a rewarding experience, leading to a truly decadent dessert that’s perfect for any special occasion or a comforting weeknight treat. This easy recipe breaks down the process into manageable steps, ensuring even novice bakers can achieve a show-stopping result. The combination of rich chocolate and smooth, buttery caramel creates a symphony of flavors that is hard to resist. We’ll cover everything from selecting the right ingredients to the final elegant presentation, making your pie a memorable sweet treat.
Before you begin your baking adventure, it’s helpful to understand the overall time commitment and how many servings your pie will yield. Planning ahead makes the entire process smoother and more enjoyable. Remember, a significant portion of the preparation time for a cream pie involves chilling, which is crucial for achieving that desired creamy texture and allowing the pie to set beautifully.
Total Time and Servings
Making a chocolate caramel cream pie generally requires about 45-60 minutes of active preparation time. However, the crucial part is the chill time. To ensure your pie sets perfectly and achieves its ideal creamy texture, it will need at least 4-6 hours in the refrigerator, with overnight chilling being the best option. This recipe typically serves 8-10 people, making it an excellent choice for family gatherings, dinner parties, or as a luxurious dessert to share. For more dessert masterpieces, browse our extensive collection.
Simple Ingredients List
The beauty of this chocolate caramel cream pie lies in its relatively simple ingredients, many of which you likely already have in your pantry. You’ll need components for the pie crust, the rich chocolate cream filling, and of course, the irresistible caramel drizzle. High-quality ingredients make a noticeable difference in the final flavor, so opt for good chocolate and fresh dairy. Gathering everything before you start ensures a seamless baking process. For more visual inspiration on delicious desserts, follow us on Pinterest.
Gather Ingredients for Your Cream Pie
Having all your ingredients prepped and ready before you start baking is a fundamental baking tip that ensures a smooth and stress-free process. This practice, often called “mise en place,” helps prevent last-minute rushes and ensures you don’t miss any crucial steps. For your chocolate caramel cream pie, this means measuring out flours, sugars, and cocoa, and having your dairy products and chocolate chips ready to go. Quality ingredients are key to a truly decadent dessert, so take a moment to select the best.
Pantry Staples You Will Need
For the homemade crust and the rich filling, you’ll need several common pantry items. These include all-purpose flour, granulated sugar, salt, and unsalted butter for the pie crust. For the filling, expect to use cornstarch (as a thickener), cocoa powder, and vanilla extract. Ensure your vanilla extract is pure for the best flavor. Having these items on hand means you’re well on your way to creating a fantastic sweet treat without extra trips to the store.
Fresh Cream and Chocolate Chips
The heart of your chocolate caramel cream pie lies in the fresh, creamy components and high-quality chocolate. You will need heavy cream (or whipping cream) for both the filling and potentially for a whipped topping. Whole milk is also often used in the filling to achieve the perfect consistency and richness. As for chocolate, opt for good quality semi-sweet or dark chocolate chips for melting into the filling. The better the chocolate, the more pronounced and luxurious the flavor of your rich filling will be. Good quality chocolate chips melt smoothly, contributing to that irresistible creamy texture. If you enjoy another delightful dessert featuring chocolate, you might like our Peanut Butter Brownie Swirl Cookies.
Bake the Perfect Pie Crust Base
The foundation of any great pie is its crust. For a chocolate caramel cream pie, a flaky, golden-brown homemade crust is ideal. While store-bought crusts can save time, making your own elevates the entire dessert, adding a layer of flavor and texture that truly sets it apart. Achieving a perfect pie crust involves careful temperature control, precise measurement of ingredients, and not overworking the dough. A well-baked crust provides a beautiful contrast to the smooth, creamy filling and is a hallmark of an expertly crafted pie.
Oven Temperature Setting
For a truly perfect pie crust, preheating your oven to the correct temperature is non-negotiable. Typically, a blind-baked pie crust (baking the crust before adding the filling) requires a high initial temperature to set the butter and create flakiness, usually around 400-425°F (200-220°C). After an initial bake, the temperature is often reduced slightly for the remainder of the baking time. Always ensure your oven is fully preheated before placing the pie crust inside for even baking. This crucial step is part of the essential baking tips for any pie.
Crust Baking Instructions
Begin by preparing your pie dough, chilling it for at least 30 minutes. Roll out the dough and carefully fit it into your pie plate. Trim the edges and crimp them decoratively. To prevent shrinkage and bubbling, line the crust with parchment paper and fill it with pie weights, dried beans, or rice. Blind bake for 15-20 minutes until the edges are lightly golden. Remove the weights and parchment, then continue baking for another 5-10 minutes until the bottom is lightly browned and dry. This creates a sturdy, flaky base that won’t become soggy when filled. For more details on crafting a perfect pie crust, Wikipedia has a comprehensive entry.
How to Make Chocolate Cream Filling
The chocolate cream filling is the star of this decadent dessert, providing a rich, smooth, and utterly irresistible center. Achieving the perfect creamy texture is paramount, and it largely depends on how you combine and heat your ingredients. This filling relies on a custard base, thickened with cornstarch and enriched with high-quality chocolate. Taking your time with each step, particularly the heating and melting phases, will ensure a lump-free, velvety smooth result that truly defines this sweet treat.
Heating the Heavy Cream
The foundation of a silky chocolate cream filling starts with carefully heating the heavy cream (and often some milk). In a saucepan, combine the heavy cream, milk, sugar, and cocoa powder. Whisk these ingredients together thoroughly to prevent lumps, especially from the cocoa. Heat this mixture over medium heat, stirring constantly, until it just begins to simmer and steam. Do not let it boil vigorously, as this can scorch the dairy. The goal is to create a warm, smooth base ready to melt the chocolate and thicken properly. This careful heating helps build the desired creamy texture.
Melting Chocolate Chips Smoothly
Once your cream mixture is hot and smooth, it’s time to incorporate the chocolate. Remove the saucepan from the heat and immediately add your chocolate chips. Let them sit for a minute or two to soften slightly from the residual heat, then whisk vigorously until the chocolate is completely melted and fully incorporated into the cream. The mixture should be glossy and homogenous, without any streaks or unmelted chocolate. If necessary, return the pan to very low heat for a few seconds to help melt any stubborn bits, but be cautious not to overheat. This step is crucial for a truly rich filling.
Add Sweetness and Vanilla
After the chocolate is perfectly melted, whisk in the remaining sugar (if any) and a generous amount of pure vanilla extract. Vanilla enhances the chocolate flavor and adds a beautiful aromatic depth to the filling. At this point, you’ll also typically whisk in a cornstarch slurry (cornstarch mixed with a small amount of cold water or milk) to thicken the custard further. Return the mixture to medium-low heat and continue stirring until it thickens to a pudding-like consistency. It should coat the back of a spoon. This thickening process is key to the pie’s stability and creamy texture. If you enjoy other creamy desserts, explore recipes like our Quick Italian Cream Cake.
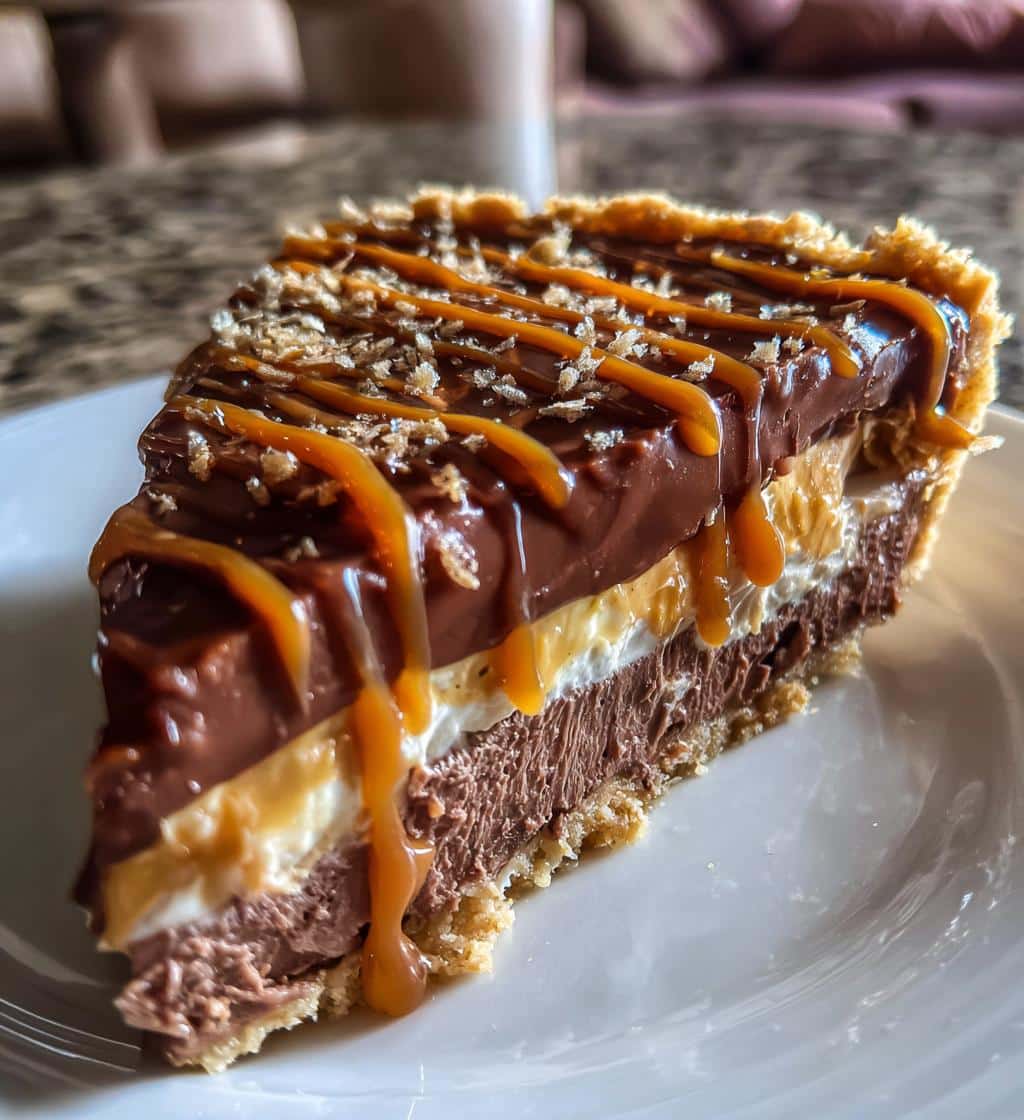
Drizzle Caramel for Irresistible Flavor
The caramel drizzle is what elevates this dessert from a simple chocolate cream pie to a truly unforgettable chocolate caramel cream pie. Its golden, buttery sweetness perfectly complements the rich, dark chocolate filling, adding another layer of complex flavor and a beautiful visual appeal. Whether you use a high-quality store-bought caramel sauce or make your own from scratch, the way you incorporate it can make all the difference in the final taste and presentation of this sweet treat. This step truly defines the “caramel” in our decadent dessert.
Pouring Filling into Crust
Once your chocolate cream filling has reached the desired thickness, immediately pour it into your pre-baked and cooled pie crust. Smooth the top with a spatula to ensure an even layer. The filling will be hot, so handle the pie plate with care. Distributing the filling evenly is important for a consistent bite in every slice. Allow the filling to sit for a few minutes to slightly cool on the surface before moving on to the caramel, creating a stable base for the swirl.
Swirling Caramel on Top
With the chocolate filling in the crust, it’s time for the caramel magic. Drizzle your caramel sauce generously over the top of the warm chocolate filling. You can do this in concentric circles, a zig-zag pattern, or freehand. For a beautiful marbled effect, take a skewer or a butter knife and gently swirl the caramel into the chocolate filling. Be careful not to press too deep into the crust. The warmth of the chocolate filling will help the caramel settle slightly, creating an inviting pattern. This swirling technique adds visual interest and ensures every bite gets a taste of both chocolate and caramel, enhancing the overall creamy texture.
Setting the Chocolate Caramel Cream Pie
After all the effort of baking the crust, creating the rich filling, and adding that luscious caramel drizzle, the most important step for a successful chocolate caramel cream pie is patience. Proper setting is absolutely crucial for this decadent dessert. It ensures that when you slice into your masterpiece, you get clean, firm slices rather than a gooey mess. The chill time allows all the components to firm up, creating that characteristic creamy texture and ensuring the pie holds its shape beautifully.
Importance of Chill Time
The chill time is not just a suggestion; it’s an essential part of the recipe for any cream pie. As the pie cools in the refrigerator, the starches in the chocolate filling fully hydrate and set, transforming the liquid mixture into a firm yet creamy custard. The butter in the crust also solidifies, making it crisp and sturdy. Moreover, chilling allows the flavors of the chocolate and caramel to meld together more deeply, resulting in a more harmonious and delicious sweet treat. Rushing this step will lead to a soft, runny pie that lacks structural integrity and the desired creamy texture.
Why Pie Needs to Set
Beyond texture, setting ensures the pie’s stability. A properly set pie can be sliced neatly without the filling oozing out, making for a much more appealing presentation. The cold temperature also slows bacterial growth, helping to keep your pie fresh longer. Think of it as the final, gentle baking process – cold baking, if you will – where the physical properties of the ingredients undergo a transformation necessary for the pie to become its best self. Aim for at least 4-6 hours of refrigeration, though overnight is truly best for optimal results. For more delicious creations, remember to check out CarinaRecipes on Instagram.
5 Irresistible Secrets for This Pie
While the basic recipe for chocolate caramel cream pie is fantastic, a few expert baking tips can elevate your creation from good to absolutely irresistible. These secrets focus on enhancing flavor, texture, and presentation, ensuring your decadent dessert stands out. From choosing the right type of chocolate to considering thoughtful garnishes and smart preparation, these small adjustments make a big difference, transforming a simple sweet treat into a truly memorable culinary experience. We’ll delve into some of the most impactful ones to perfect your rich filling and creamy texture.
Dark Chocolate for Richness
One of the easiest ways to deepen the flavor profile of your chocolate caramel cream pie is to use high-quality dark chocolate (60-70% cacao) for at least part of your chocolate component. While semi-sweet chocolate chips are common, a portion of dark chocolate will add a more sophisticated, less cloying sweetness and a profound chocolatey depth. This creates a richer, more complex flavor that balances the sweetness of the caramel beautifully, enhancing the overall creamy texture of the rich filling. It’s a key baking tip for a truly luxurious dessert.
Adding Nuts for Crunch
For an exciting contrast in texture, consider adding a layer of finely chopped toasted nuts, such as pecans or walnuts, between the pie crust and the chocolate filling, or sprinkle them generously on top before serving. The subtle crunch of the nuts provides a wonderful counterpoint to the silky smooth filling and flaky crust. Toasting the nuts beforehand brings out their natural oils and deepens their flavor, adding another dimension to this decadent dessert. Ensure they are fully cooled before adding to avoid softening the crust.
Proper Storage for Freshness
To keep your chocolate caramel cream pie at its best, proper storage is crucial. Always store cream pies in the refrigerator. Cover it loosely with plastic wrap or aluminum foil to prevent it from absorbing refrigerator odors and to maintain its moisture. An airtight pie carrier is even better. Storing it correctly helps preserve its fresh flavor and creamy texture for several days, allowing you to enjoy this sweet treat longer. This is an essential baking tip for maximizing enjoyment.
Serving Your Chocolate Caramel Cream Pie
The moment has arrived to share your beautifully crafted chocolate caramel cream pie! Serving this decadent dessert is about more than just cutting slices; it’s about presenting a delightful experience. Thoughtful presentation enhances the appeal of this sweet treat, making each serving feel special. Proper timing for garnishes and careful slicing techniques will ensure every piece looks as good as it tastes, highlighting the rich filling and creamy texture you worked so hard to achieve.
When to Add Whipped Cream
Whipped cream is the classic accompaniment to a chocolate cream pie, adding a light, airy contrast to the rich filling. However, it’s best added just before serving. If you add whipped cream too early, it can weep, become watery, and deflate, compromising the pie’s appearance and texture. Prepare fresh whipped cream (sweetened with a touch of sugar and vanilla) and dollop or pipe it onto individual slices just before they are presented to your guests. This ensures the freshest taste and most appealing look for your creamy dessert.
Best Way to Slice
To achieve clean, perfect slices of your chocolate caramel cream pie, ensure the pie is thoroughly chilled. Use a sharp, thin-bladed knife, preferably one that has been run under hot water and wiped dry between each slice. This warms the blade slightly, allowing it to cut through the cold, firm filling and crust more smoothly. Wipe the knife clean after each cut to prevent smudging and ensure crisp edges. Gently lift each slice with a pie server to maintain its integrity, showcasing the beautiful layers of crust, chocolate, and caramel. These serving suggestions will impress your guests.
Store Leftovers of Your Cream Pie
Even though this chocolate caramel cream pie is so delicious, sometimes there are leftovers! Knowing how to store them properly is crucial for maintaining the pie’s quality, safety, and delicious creamy texture. Proper storage ensures that your decadent dessert remains a delightful sweet treat for days to come, preventing spoilage and keeping the flavors fresh. Following a few simple guidelines will help you extend the life of your homemade masterpiece.
Keeping Pie Fresh in Fridge
Due to its dairy-heavy filling, your chocolate caramel cream pie must be stored in the refrigerator. Cover the pie loosely with plastic wrap or aluminum foil. Ideally, use a pie keeper or a container with a lid to prevent it from absorbing odors from other foods in the fridge and to protect the delicate crust and filling. Avoid placing anything directly on top of the pie to prevent smashing the whipped cream or damaging the surface. Proper refrigeration is key to preserving the creamy texture and rich filling.
How Long Pie Will Last
When stored correctly in the refrigerator, a homemade chocolate caramel cream pie typically lasts for 3-4 days. While it might still be safe to eat for a bit longer, the quality of the crust can start to soften, and the fresh flavors may diminish. It’s always best to enjoy this sweet treat within this timeframe for the optimal taste and texture experience. Freezing is generally not recommended for cream pies, as it can significantly alter the creamy texture of the filling upon thawing, making it watery or grainy.
Quick Nutrition for a Slice of Pie
While a chocolate caramel cream pie is undoubtedly a decadent dessert, it’s helpful to have a general idea of its nutritional content. Understanding the calories, sugar, fat, and protein can help you enjoy this sweet treat mindfully. Nutritional values can vary based on specific ingredients used, portion size, and whether you opt for a homemade crust or store-bought. This quick overview provides an approximation to inform your enjoyment of this rich filling.
Calories and Sugar Content
A typical slice of chocolate caramel cream pie can range from approximately 400 to 600 calories, depending on the size of the slice and the richness of the ingredients (e.g., amount of butter in the crust, fat content of cream, and sugar in the caramel and filling). Sugar content is also generally high, often ranging from 30 to 50 grams per slice, primarily from the granulated sugar, chocolate, and caramel. These figures are approximations, and precise values would require a detailed calculation based on your specific recipe. For more on general nutritional values, Wikipedia offers a good resource.
Fat and Protein Information
Given the heavy cream, butter in the crust, and chocolate, a slice of chocolate caramel cream pie will be relatively high in fat. Expect anywhere from 25 to 40 grams of fat per slice, with a significant portion being saturated fat. Protein content is comparatively lower, usually falling between 5 to 10 grams per slice, primarily from the dairy products. While it’s certainly not a health food, this nutritional breakdown helps illustrate why this dessert is considered such a rich and satisfying sweet treat. Enjoying it in moderation is key.
Delicious Variations for Chocolate Cream Pie
The classic chocolate caramel cream pie is a masterpiece, but its versatility means you can easily adapt it to suit different tastes and occasions. Exploring delicious variations allows you to customize this decadent dessert, making it uniquely yours. From altering the toppings to experimenting with different crust options, there are numerous baking tips and creative ways to put a fresh spin on this beloved sweet treat, ensuring it remains exciting and new with every iteration. Get ready to explore new dimensions of flavor and texture.
Different Topping Ideas
While whipped cream is traditional, consider these alternative toppings to enhance your chocolate caramel cream pie:
- Chocolate Shavings: Grate dark or milk chocolate over the top for an elegant finish.
- Toasted Coconut: Sprinkle toasted coconut flakes for a tropical twist and added texture.
- Mini Chocolate Chips: A simple yet effective garnish, especially if you love extra chocolate.
- Chopped Candy Bars: Crush your favorite chocolate or caramel candy bar for a fun, playful topping.
- Sea Salt Flakes: A light sprinkle of flaky sea salt can beautifully cut through the sweetness of the caramel and chocolate, enhancing their flavors.
These topping ideas can transform the presentation and add exciting flavor combinations to your rich filling.
Crust Options for Your Pie
Beyond the classic flaky pie crust, several alternatives can change the character of your chocolate caramel cream pie:
- Oreo Cookie Crust: A crushed Oreo cookie crust provides an intense chocolate flavor and a delightful crunch, perfect for a no-bake option.
- Graham Cracker Crust: A simple graham cracker crust offers a subtly sweet and crunchy base that complements the creamy filling.
- Pretzel Crust: For a sweet and salty twist, a crushed pretzel crust can add an unexpected depth of flavor and a fantastic textural contrast.
- Nut Crust: A crust made from finely ground nuts (like pecans or almonds) can offer a gluten-free option with rich, earthy notes.
Each crust option brings its unique flavor and texture profile, allowing for endless dessert variations. To explore more sweet treats, check out our Snickerdoodle Cobbler recipe.
Common Questions About Cream Pie
As popular as cream pies are, a few common questions often arise, especially for those new to baking this particular decadent dessert. Addressing these queries can help clarify techniques, offer valuable baking tips, and ensure you achieve the best possible results with your chocolate caramel cream pie. From homemade caramel to tips for faster setting, these answers aim to make your baking experience smoother and more successful, leading to a perfectly creamy texture and a delightful sweet treat.
Can I Make Caramel from Scratch?
Absolutely! Making caramel from scratch for your chocolate caramel cream pie is a fantastic way to add an extra layer of homemade goodness and impress your guests. While it requires a bit more attention than using store-bought sauce, the rich, buttery flavor of homemade caramel is unparalleled. You’ll typically need sugar, water, butter, and heavy cream. The key is to cook the sugar mixture to a beautiful amber color without burning it, then carefully whisk in the cream and butter. Be cautious, as hot caramel is very hot! Once cooled, it provides a superior, rich flavor for your sweet treat.
Tips for Faster Setting
While patience is key for a perfectly set cream pie, there are a few baking tips if you’re in a pinch:
- Chill in the Freezer (Short Term): For a quicker set, you can place the pie in the freezer for 1-2 hours. However, do not leave it longer, as it can freeze the filling and affect the creamy texture when thawed.
- Increase Thickener Slightly: A very slight increase in cornstarch (e.g., an extra half teaspoon) might help, but be careful not to add too much, or the filling can become too firm or gummy.
- Ensure Filling is Thoroughly Cooked: Make sure the filling is cooked until it’s visibly thickened and coats the back of a spoon. An undercooked filling will never set properly.
- Use a Cold Pie Plate: Starting with a chilled pie plate can help cool the filling faster.
Remember, slow chilling in the refrigerator overnight still yields the best results for a truly decadent dessert with a perfect creamy texture.