Red velvet muffins offer a delightful treat, combining rich cocoa flavor with a signature vibrant red hue. This recipe walks you through creating perfectly moist muffins topped with sweet cream cheese frosting. Learn expert baking tips for an easy, delicious outcome, making every bite a joy. Enjoy homemade delicious treats.
Key Takeaways
- Prepare ingredients and tools carefully before you start.
- Combine dry and wet batter components separately for ideal texture.
- Bake muffins until a toothpick comes out clean, then cool completely.
- Use gel food coloring for the most vibrant and appealing red velvet color.
- Store finished muffins properly to maintain their freshness and flavor.
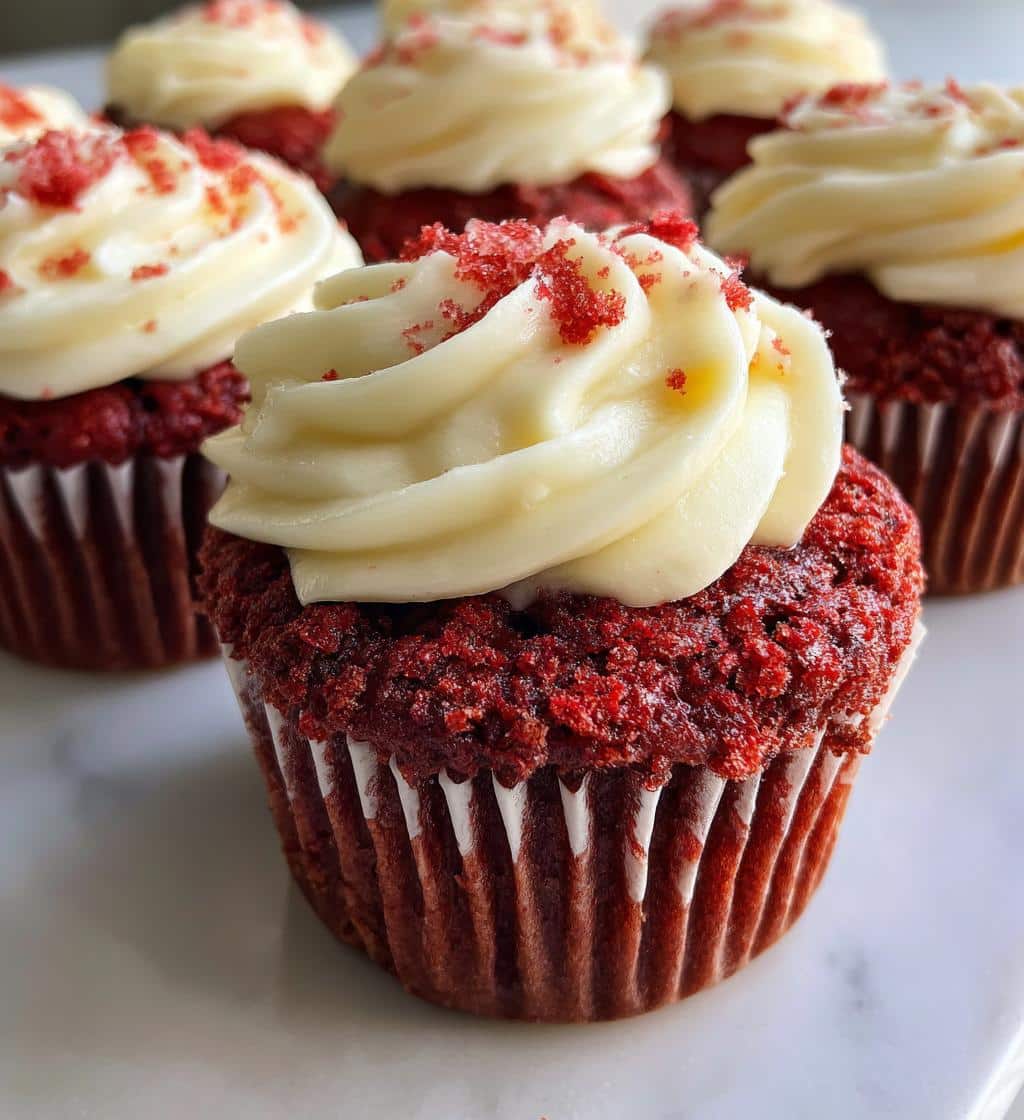
Making red velvet muffins is rewarding. The vibrant color delights. Soft texture pleases every palate. Cream cheese frosting adds sweetness. These treats are simply wonderful.
Starting Your Red Velvet Muffin Journey
Embarking on the creation of homemade red velvet muffins is a delightful culinary adventure. Proper preparation sets the foundation for delicious treats that are both visually stunning and incredibly tasty. Before you even think about mixing ingredients, taking a few moments to organize your workspace and preheat your oven will ensure a smooth baking process and optimal results. This initial stage is crucial for any successful red velvet muffin recipe, guaranteeing that every step flows seamlessly towards those perfectly baked, moist muffins.
Prepare oven and muffin tin
Begin by preheating your oven to the specified temperature, usually around 375°F (190°C), to ensure even baking from the moment your muffins enter. While the oven warms, prepare your muffin tin. For a standard 12-cup muffin pan, line each cup with paper liners. This prevents sticking and makes cleanup much easier. If you prefer not to use liners, lightly grease and flour each cup to ensure the muffins release effortlessly after baking. A well-prepared tin is a small but mighty baking tip that saves frustration later.
Gather all your tools
Having all your necessary tools and ingredients within reach is key to an enjoyable baking experience. Collect your mixing bowls (at least two: one for dry, one for wet ingredients), a whisk, a rubber spatula, measuring cups and spoons, and a cooling rack. Ensure all your ingredients, from flour to buttermilk, are measured out and ready to go. This organized approach minimizes stress and helps you focus on the art of mixing, leading to consistently good results every time you make these scrumptious homemade muffins. Consider checking out other dessert recipes on our site, like this quick Italian cream cake, which also benefits from careful preparation.
Ingredients for Red Velvet Muffins
Crafting the perfect red velvet muffin relies on a precise balance of dry and wet ingredients, culminating in a tender crumb and that signature vibrant hue. The combination of cocoa and buttermilk creates the classic red velvet flavor profile, while the addition of cream cheese frosting elevates these simple muffins into truly delicious treats. Understanding the role of each component is vital for achieving the desired taste and texture in your red velvet muffin recipe.
Dry items for muffin base
For the dry base of your red velvet muffins, you’ll need all-purpose flour, granulated sugar, unsweetened cocoa powder, baking soda, and a pinch of salt. The flour provides the structure, while sugar adds sweetness and aids in moisture retention. Cocoa powder is what gives red velvet its subtle chocolatey undertone; opt for natural unsweetened cocoa for the best flavor. Baking soda, when combined with acidic ingredients, helps the muffins rise and develop a tender texture, a crucial element for moist muffins. The salt balances the sweetness, enhancing all the other flavors.
Wet items for red color
The wet ingredients bring both moisture and the iconic red color to your muffins. These typically include buttermilk, vegetable oil, eggs, vanilla extract, and, most importantly, red food coloring. Buttermilk reacts with baking soda to create a light, fluffy crumb and adds a slight tang that is characteristic of red velvet. Vegetable oil contributes to the muffin’s tenderness and moisture. Eggs bind the ingredients and add richness, while vanilla extract enhances the overall flavor. For that unmistakable deep red, use high-quality gel food coloring, as it provides a more vibrant and concentrated color without thinning the batter, a critical baking tip for achieving true red velvet.
Frosting’s sweet creaminess
No red velvet muffin is complete without a luscious cream cheese frosting. This sweet, tangy topping requires softened cream cheese, unsalted butter (also softened), powdered sugar, and a touch of vanilla extract. The cream cheese provides a delightful tang that perfectly complements the subtle cocoa of the muffin, while the butter contributes to its smooth, rich consistency. Powdered sugar sweetens the frosting and gives it structure, and vanilla extract rounds out the flavors. Making sure your cream cheese is at room temperature is crucial for a lump-free, wonderfully smooth frosting. This element truly transforms simple muffins into indulgent dessert masterpieces, similar to the delightful frosting on vanilla bean creme brulee cheesecake cupcakes. For more information on this essential ingredient, visit Cream cheese on Wikipedia.
Mixing Up Your Red Velvet Batter
The process of mixing your red velvet batter is where all your carefully selected ingredients come together to form the foundation of your delicious muffins. The key to achieving light, fluffy, and moist muffins lies in how you combine the dry and wet components. Overmixing can lead to tough muffins, so a gentle hand is essential here. Following these steps precisely will help you create a perfectly balanced batter for your homemade muffins, setting you up for baking success.
Combine dry ingredients well
In a large mixing bowl, whisk together all your dry ingredients: the all-purpose flour, granulated sugar, unsweetened cocoa powder, baking soda, and salt. It’s important to whisk these thoroughly to ensure they are evenly distributed. This step prevents pockets of unmixed baking soda or flour in your final muffins and helps activate the leavening agents properly once they meet the wet ingredients. A well-combined dry mixture ensures a uniform texture throughout your red velvet muffin recipe.
Blend wet ingredients smoothly
In a separate medium-sized bowl, combine your wet ingredients. Whisk together the buttermilk, vegetable oil, eggs, and vanilla extract until they are smooth and fully incorporated. This mixture should be consistently blended before adding the crucial red food coloring. Once the base wet ingredients are uniform, add your gel food coloring. Stir until the color is fully dispersed and achieves the vibrant red you desire. This method ensures that the color is evenly distributed throughout the batter, creating those iconic vibrant red muffins.
Gently mix both together
Now it’s time to bring the two mixtures together. Pour the wet ingredients into the dry ingredients. Using a rubber spatula, gently fold the mixture until just combined. It’s perfectly normal, and even desirable, for a few lumps to remain. Overmixing develops the gluten in the flour, which can result in tough, dense muffins rather than the desired light and moist muffins. Stop mixing as soon as no streaks of dry flour are visible. This gentle approach is a top baking tip for achieving the perfect texture in your red velvet muffin recipe.
Baking Irresistible Red Velvet Muffins
Baking is where the magic truly happens, transforming your carefully prepared batter into irresistible red velvet muffins. Paying close attention to how you fill your muffin cups, the baking time, and the cooling process are all critical for achieving perfectly risen, tender, and delicious treats. These steps ensure your muffins not only look appealing but also have that desirable moist texture that makes homemade muffins so special.
Fill muffin cups properly
Once your batter is ready, it’s time to fill the muffin cups. For best results and uniform muffins, fill each cup about two-thirds full. You can use an ice cream scoop for easy, mess-free portioning. This allows enough room for the muffins to rise beautifully without overflowing the tin, creating a lovely domed top. Avoid overfilling, as this can cause the muffins to bake unevenly or stick to the pan. Proper filling ensures that each of your vibrant red muffins is perfectly shaped and ready for frosting.
Bake until toothpick clean
Place your filled muffin tin into the preheated oven. Bake for approximately 18-22 minutes, though baking times can vary slightly depending on your oven. To check for doneness, insert a toothpick into the center of a muffin. If it comes out clean or with a few moist crumbs, your muffins are ready. If there’s wet batter, bake for a few more minutes and check again. Avoid opening the oven door too frequently during the baking process, especially in the first 15 minutes, as this can cause the muffins to sink. These baking tips are applicable to many recipes, including savory ones like crispy Parmesan chicken with a rich garlic sauce.
Cool muffins completely first
Once baked, remove the muffin tin from the oven and let the muffins cool in the tin for about 5 minutes. This allows them to firm up slightly. Then, carefully transfer the muffins to a wire cooling rack to cool completely. This step is incredibly important, especially if you plan to frost them. Frosting warm muffins will cause the cream cheese frosting to melt, creating a messy and unappealing result. Patience here ensures that your delicious treats are perfect for frosting and enjoying, offering a full, rich flavor experience.
Crafting Delicious Cream Cheese Frosting
The velvety smooth, tangy-sweet cream cheese frosting is the crowning glory of any red velvet muffin. It’s the perfect counterpoint to the subtle cocoa flavor of the muffin, adding a layer of indulgence that makes these delicious treats truly irresistible. Mastering this frosting is simple, but requires attention to a few key details to achieve that perfect, spreadable consistency.
Soften cream cheese first
The most crucial step in making flawless cream cheese frosting is ensuring your cream cheese and butter are properly softened to room temperature. This means taking them out of the refrigerator at least an hour before you plan to mix. Softened ingredients combine much more smoothly, preventing lumps in your frosting. Cold cream cheese or butter will result in a clumpy, uneven frosting texture that is difficult to spread and lacks that signature creamy mouthfeel. This simple baking tip makes a significant difference in the final quality of your cream cheese frosting.
Whip frosting until smooth
Once your ingredients are softened, combine the cream cheese and butter in a large mixing bowl. Using an electric mixer, beat them together on medium speed until they are light, fluffy, and completely smooth. This usually takes 2-3 minutes. Next, gradually add the powdered sugar, one cup at a time, mixing on low speed until combined, then increasing to medium until smooth. Finally, beat in a splash of vanilla extract. Continue whipping until the frosting is light, airy, and wonderfully smooth. Avoid over-whipping once the powdered sugar is incorporated, as this can sometimes thin out the frosting. The result should be a dreamy, sweet creaminess that is perfect for topping your vibrant red muffins.
Perfecting Your Red Velvet Muffins Display
Once your red velvet muffins are baked and your cream cheese frosting is prepared, the final step is to bring them together in a presentation that’s as appealing as their taste. Perfecting the display involves not only neat frosting techniques but also considering how you’ll present these delightful treats to maximize their visual and edible appeal. This stage truly completes your red velvet muffin recipe, turning simple baked goods into culinary works of art.
Frost cooled muffins neatly
With your muffins completely cooled, it’s time to add the glorious cream cheese frosting. You can use an offset spatula to spread the frosting generously over each muffin, creating a rustic, homemade look. For a more polished presentation, transfer the frosting to a piping bag fitted with your favorite decorative tip (a star or round tip works well). Pipe swirls or dollops onto the center of each muffin. The key is to frost them neatly, ensuring an even coating that covers the top of the muffin without spilling down the sides. This ensures a clean, professional finish for your vibrant red muffins.
Serve these delightful treats
Once frosted, your red velvet muffins are ready to be served! Arrange them attractively on a platter or cake stand for an impressive display. These muffins are perfect for any occasion, from a casual brunch to an elegant dessert table. Their rich color and enticing frosting make them a standout. Pair them with a cup of coffee or tea for a truly indulgent experience. Sharing these homemade muffins with friends and family is one of the greatest joys of baking, ensuring every bite is savored. They make truly delicious treats that everyone will adore, making your efforts worth every moment.
Smart Tips for Amazing Muffins
While the basic red velvet muffin recipe yields fantastic results, incorporating a few smart baking tips can elevate your homemade muffins from good to truly extraordinary. These small adjustments can enhance flavor, texture, and visual appeal, ensuring your red velvet muffins are always moist, vibrant, and utterly irresistible. Pay attention to these details for that extra touch of perfection in your quick baking endeavors.
Let muffins sit for flavor
A surprising tip for enhancing the flavor of your red velvet muffins is to let them “sit” for a few hours, or even overnight, before serving. As the muffins rest, the flavors meld and deepen, especially the subtle cocoa notes and the tang from the buttermilk. The moisture also has a chance to redistribute evenly throughout the crumb, often resulting in an even more moist muffin. While they are certainly delicious fresh out of the oven, a little patience can significantly improve the overall taste experience of these delicious treats.
Use gel food coloring for vibrancy
To achieve that iconic, deep, vibrant red velvet color, always opt for gel food coloring instead of liquid. Liquid food coloring can thin out your batter, requiring you to add more to achieve a strong color, which can affect the muffin’s texture. Gel food coloring, on the other hand, is highly concentrated and delivers intense color with just a small amount, without impacting the consistency of your batter. This is a crucial baking tip for making vibrant red muffins that truly live up to their name and visual expectation.
Storing Your Fresh Baked Muffins
Proper storage is essential to maintain the freshness, moisture, and delicious flavor of your homemade red velvet muffins. Because they are topped with cream cheese frosting, special care must be taken to ensure they remain safe to eat and enjoyable for as long as possible. Following these simple guidelines will help you keep your vibrant red muffins in prime condition.
Keep muffins airtight
To prevent your red velvet muffins from drying out, it is crucial to store them in an airtight container. Place a layer of parchment paper between stacked muffins if you have more than one layer to prevent the frosting from sticking. Due to the cream cheese in the frosting, these muffins should ideally be stored in the refrigerator. The cool temperature helps preserve the frosting and prevent spoilage, making them last longer as delicious treats. If you need to keep them at room temperature for a short period (a few hours), ensure they are still covered to maintain moisture.
Enjoy within three days
While properly stored in the refrigerator, your red velvet muffins are best enjoyed within three to five days of baking. Beyond this period, the texture and freshness will start to diminish, and the frosting may begin to break down. For optimal taste and quality, try to consume them within the first three days. If you’ve baked a large batch and want to extend their life, unfrosted muffins can be frozen in an airtight container for up to a month. Thaw, then frost and serve. This allows you to enjoy homemade muffins over a longer period.
Understanding Muffin Nutrition Information
When indulging in delicious red velvet muffins, it’s helpful to have a general idea of their nutritional content. While homemade muffins allow for some control over ingredients, they remain a delightful treat best enjoyed in moderation. The following provides a general sense of what you might find in a typical serving, keeping in mind that exact values can vary based on specific ingredients and portion sizes in your red velvet muffin recipe.
Calories per serving
A single red velvet muffin with cream cheese frosting typically contains between 300 to 450 calories. This figure can fluctuate significantly based on the size of the muffin, the amount of sugar and oil used in the batter, and the richness and quantity of the cream cheese frosting. For those mindful of calorie intake, adjustments can be made, such as using less oil or sugar, or a lighter frosting, though this may alter the classic taste and texture of these delightful treats.
Key nutritional values
Beyond calories, red velvet muffins will contain varying amounts of fats (both saturated and unsaturated from butter, cream cheese, and oil), carbohydrates (primarily from sugar and flour), and some protein (from eggs, buttermilk, and cream cheese). They also provide small amounts of vitamins and minerals. Fiber content is generally low unless whole wheat flour is incorporated. It’s important to remember that these are dessert items, and while they bring joy, they are not typically a significant source of daily essential nutrients. Enjoy them as a sweet indulgence, part of a balanced diet.
The Secret to Rich Muffin Color
The visual appeal of red velvet muffins is almost as important as their taste. That signature, deep red hue is what makes them instantly recognizable and incredibly tempting. While the traditional red velvet cake sometimes achieves its color through a chemical reaction between cocoa, buttermilk, and vinegar, modern red velvet muffin recipes primarily rely on food coloring. Understanding how to get the best color is a crucial baking tip for truly vibrant red muffins.
Why gel works best
As mentioned previously, gel food coloring is unequivocally the best choice for achieving a rich, deep red color in your muffins. Unlike liquid food coloring, which is water-based and dilutes the batter, gel coloring is highly concentrated. This means you need significantly less product to achieve a vivid shade. A small amount of gel provides intense pigmentation without affecting the consistency of your batter, ensuring your moist muffins retain their perfect texture. This method guarantees that your muffins will look as delicious as they taste.
Achieving deep red velvet
To achieve the deepest red velvet, start with a good quality gel food coloring. Brands like AmeriColor or Wilton offer excellent, concentrated options. Begin by adding a teaspoon or two to your wet ingredients, mixing until fully incorporated. You can gradually add more in small increments until you reach your desired shade. Don’t be shy; sometimes a good amount of coloring is needed to cut through the pale color of the flour and other ingredients. The goal is a striking, deep red, not a faint pink. This attention to detail will ensure your homemade muffins boast the authentic, captivating color associated with classic Red velvet cake.
Quick Guide to Muffin Perfection
For those eager to whip up a batch of red velvet muffins but are short on time, this quick guide offers an overview of the time commitments involved. Knowing the estimated preparation and baking durations can help you plan your baking session efficiently, ensuring you can enjoy these delicious treats without a lengthy wait. This quick baking breakdown simplifies your red velvet muffin recipe.
Total preparation time
The total preparation time for red velvet muffins, including gathering ingredients, measuring, and mixing the batter, typically ranges from 15 to 25 minutes. This assumes you have all your tools ready and ingredients at room temperature. Efficient prep work, such as pre-measuring ingredients, can bring this time closer to the lower end. This makes the red velvet muffin recipe a fantastic option for quick baking when you crave homemade muffins without a prolonged process.
Fast baking duration
Once your muffins are in the oven, the fast baking duration is usually between 18 to 22 minutes. This relatively short time allows for quick turnaround from batter to baked goods. Remember to preheat your oven properly to ensure consistent baking within this timeframe. The cooling period after baking will add extra time before frosting, but the actual oven time is swift, making these vibrant red muffins a great choice for a spontaneous baking session.
Enjoying Your Homemade Muffins Fresh
The culmination of your baking efforts is the moment you get to enjoy your perfectly crafted red velvet muffins. Serving them fresh truly highlights their moist texture and rich flavor, especially when paired with the sweet creaminess of the frosting. These delightful treats are meant to be savored, making every bite a pleasure. Here’s how to make the most of your homemade muffins.
Best way to serve
Red velvet muffins are best served at room temperature, allowing the frosting to be perfectly soft and the muffin’s flavors to fully develop. While delicious on their own, they pair wonderfully with a warm cup of coffee, tea, or a glass of cold milk. For a special touch, consider a light dusting of cocoa powder or a few red sprinkles on top of the frosting just before serving. Their vibrant color makes them a festive addition to any dessert spread or a charming gift for friends. Find more inspiration for serving your delicious dessert recipes on our desserts category page.
Savor every delightful bite
Finally, take a moment to savor every delightful bite of your homemade red velvet muffins. Appreciate the tender crumb, the subtle cocoa, the tang of the cream cheese, and the beautiful vibrant red color. These delicious treats are a testament to the joy of home baking and the simple pleasure of creating something wonderful from scratch. Don’t forget to share your creations! You can find more visual inspiration and connect with us on Carina Recipes Pinterest and Carina Recipes Instagram.