Jammy eggs are a delightful and simple way to enjoy eggs, featuring a perfectly set white and a rich, runny yolk. Paired with spicy chili butter and cool garlic yogurt, this dish becomes an unforgettable culinary experience. It’s an easy recipe, ideal for a quick breakfast or a light snack any time of day.
Key Takeaways
- Create perfect jammy eggs with a runny yolk and firm white.
- Enhance flavor with homemade spicy chili butter and creamy garlic yogurt.
- Enjoy a quick and easy meal, ready in under 20 minutes.
- Versatile dish suitable for breakfast, brunch, or a light snack.
Soft-boiled eggs are a true delicacy. Their golden yolks add rich flavor. Paired with spicy chili butter, they become exciting. Cooling garlic yogurt provides balance. This simple dish truly delights.
Meet Your Jammy Eggs Delight Dish
The culinary world is always seeking dishes that are both comforting and exciting, and this Jammy Eggs Delight Dish fits that description perfectly. It’s a celebration of simple ingredients transformed into something extraordinary. This dish centers around perfectly cooked eggs, showcasing a beautiful balance between a tender white and a luscious, runny yolk that creates a sauce-like consistency. It’s truly a delight for the senses, offering a visually appealing presentation alongside a burst of flavors that awaken the palate.
What makes this egg dish special?
What sets these jammy eggs apart is the exquisite combination of textures and tastes. The star, of course, is the soft-boiled egg, carefully cooked to achieve that signature “jammy” yolk — neither fully liquid nor completely firm. This rich egg is then elevated with two incredible companions: a vibrant chili butter that delivers a warm, gentle heat and a creamy, cooling garlic yogurt that provides a refreshing contrast. Each element plays a crucial role, building layers of flavor that are both harmonious and distinct. It’s an approachable yet sophisticated way to enjoy an everyday ingredient, turning a simple egg into a memorable meal.
Quick and easy meal idea
In today’s fast-paced world, finding a quick meal that doesn’t compromise on taste or quality can be a challenge. Fortunately, this jammy egg recipe offers a fantastic solution. From prep to plate, you’re looking at minimal time commitment, making it an ideal choice for busy mornings, a speedy lunch, or even a light dinner when you’re short on time. The steps are straightforward, requiring no complex techniques or specialized equipment. It’s a testament to how simple ingredients, thoughtfully combined, can yield an incredibly satisfying and remarkably flavorful quick meal that will become a regular in your recipe rotation.
Why You’ll Love Jammy Eggs
Once you try these Jammy Eggs with Chili Butter and Garlic Yogurt, you’ll quickly understand why they become a favorite. This dish isn’t just about delicious flavors; it’s about the sheer versatility and ease it brings to your kitchen. The concept of jammy eggs themselves is a culinary marvel, offering a texture that’s both creamy and substantial, making them infinitely more interesting than a standard hard-boiled egg. The rich yolk provides a natural richness that coats your palate, enhanced by the thoughtful additions of spice and tang. It’s a dish that genuinely caters to various cravings and occasions, making it a truly adaptable staple.
Perfect for breakfast or snack
The beauty of jammy eggs lies in their adaptability across meal times. They are undeniably perfect for breakfast, providing a protein-packed start to your day without heavy preparation. Imagine a serene morning, a plate of these colorful eggs, and a cup of coffee – pure bliss. But their appeal doesn’t stop there. They also make an excellent, satisfying snack. Whether you need a midday pick-me-up or something light before dinner, these flavorful soft-boiled eggs fit the bill. Their rich texture and bold flavors ensure that even a small serving leaves you feeling content, making them a fantastic alternative to less healthy options. For more delicious breakfast ideas, check out our breakfast category.
Simple ingredients, bold flavors
Perhaps one of the most compelling reasons to love this dish is its reliance on simple ingredients that together create truly bold flavors. You don’t need a pantry full of exotic items to make these jammy eggs; just fresh eggs, common dairy products, and a few key spices. Yet, the outcome is far from ordinary. The chili butter provides a fantastic kick, infusing warmth and depth, while the fresh garlic in the yogurt adds a pungent, savory note that perfectly complements the rich egg. This clever combination proves that culinary excellence doesn’t require complexity, making it an approachable recipe for cooks of all skill levels. For another recipe that proves simple ingredients lead to bold flavors, try our Easy Butter Chicken Recipe.
Ingredients for Jammy Eggs with Chili Butter
Crafting this delightful Jammy Eggs with Chili Butter dish starts with selecting the right components. While the recipe celebrates simplicity, choosing fresh and quality ingredients will significantly impact the final taste and texture. There are no exotic items needed, just everyday staples that, when combined, create a symphony of flavors. Focusing on freshness ensures that each element contributes its best to the overall experience, from the creamy yolk to the aromatic butter and tangy yogurt. This mindful selection is key to achieving a truly exceptional dish.
Fresh eggs and dairy essentials
- Large Eggs: The fresher, the better! Fresh eggs tend to peel more easily after an ice bath. You’ll want 4-6 large eggs, depending on how many servings you need.
- Unsalted Butter: About 2 tablespoons. Using unsalted butter allows you to control the saltiness of the chili butter. High-quality butter makes a difference in flavor.
- Plain Greek Yogurt: ½ cup. Opt for full-fat plain Greek yogurt for the creamiest texture and richest flavor. It provides a fantastic tangy counterpoint to the spicy butter.
Spices and seasonings needed
- Chili Flakes (Red Pepper Flakes): 1-2 teaspoons, or to your heat preference. These provide the signature gentle warmth and vibrant color to the chili butter.
- Fresh Garlic: 1-2 cloves, minced. Fresh garlic is crucial for the yogurt’s pungent, refreshing kick.
- Salt and Black Pepper: To taste. Essential for seasoning both the eggs and the garlic yogurt, bringing out their natural flavors.
These straightforward ingredients lay the foundation for a deeply satisfying and quick meal. Remember, the quality of your fresh eggs and the richness of your Greek yogurt are particularly important for the best results.
Kitchen Tools for Jammy Egg Recipe
One of the many appealing aspects of making this Jammy Egg recipe is that it requires only the most basic kitchen tools. You won’t need any specialized gadgets or complicated machinery, making it accessible even for those with minimal kitchen setups. This simplicity means less clean-up and a smoother cooking process, allowing you to focus on the enjoyment of preparing and eating this delicious dish. Having the right, even if basic, tools at hand ensures efficiency and success in achieving those perfectly jammy eggs and flavorful accompaniments.
Basic pots and mixing bowls
To start, you’ll need a medium-sized saucepan with a lid, essential for boiling the eggs. Choose one large enough to comfortably hold your eggs in a single layer without overcrowding, ensuring even cooking. For preparing the chili butter and garlic yogurt, a couple of small mixing bowls will be invaluable. One bowl can be used to melt the butter and infuse it with chili flakes, while another is perfect for combining the yogurt, minced garlic, and seasonings. A small whisk or a fork will also be helpful for smoothly blending the yogurt mixture.
Measuring spoons and cups
While this recipe is quite forgiving, having a standard set of measuring spoons and cups will help you achieve consistent results, especially when it comes to the spices and dairy. You’ll need measuring spoons for the chili flakes, salt, and pepper, and a measuring cup for the Greek yogurt. A slotted spoon is also highly recommended for carefully transferring the eggs into and out of the boiling water and the ice bath, preventing breakage. With these simple items, you’ll be well-equipped to create a delicious and satisfying dish without any fuss.
How to Boil Perfect Jammy Eggs
Achieving that coveted jammy yolk is all about precise timing and proper technique. Boiling perfect jammy eggs isn’t difficult, but it requires attention to detail. The goal is a firm, yet tender white, and a rich, runny yolk that flows beautifully when sliced. Mastering this technique will not only make your Jammy Eggs with Chili Butter exceptional but also open up a world of possibilities for other egg-based dishes. This section will guide you through each critical step to ensure your eggs turn out just right every time, giving you confidence in your egg-boiling abilities.
Bring water to a rolling boil
The first crucial step is to prepare your cooking environment. Fill your medium saucepan with enough water to fully submerge your eggs. Place the saucepan on high heat and bring the water to a vigorous, rolling boil. It’s important that the water is actively boiling before you add the eggs, as this helps set the timing accurately. Adding a splash of vinegar or a pinch of salt to the water is optional but can sometimes help prevent cracks from spreading if an egg shell is compromised. Once the water is at a rolling boil, you are ready for the next precise step.
Cook eggs for 6-7 minutes
Gently lower the eggs into the boiling water using a slotted spoon to avoid cracking them. Immediately set a timer. For perfect jammy eggs, cook them for precisely 6 to 7 minutes. A 6-minute cook time will yield a very runny, saucy yolk, while 7 minutes will give you a slightly thicker, still very soft yolk. Anything beyond 7 minutes starts moving towards a firmer, more traditional hard-boiled texture, so stick within this range for that desired jammy consistency. The exact timing can vary slightly based on egg size and altitude, so experimentation may be needed initially. Learn more about the science of boiled eggs on Wikipedia’s Boiled Egg page.
Cool eggs in an ice bath
As soon as the timer goes off, carefully remove the eggs from the boiling water with your slotted spoon and immediately transfer them into a prepared ice bath. An ice bath is simply a bowl filled with cold water and plenty of ice cubes. This sudden temperature change halts the cooking process, preventing the eggs from overcooking and ensuring that jammy yolk remains intact. Furthermore, plunging the eggs into an ice bath makes them significantly easier to peel. Allow the eggs to cool in the ice bath for at least 5 minutes before peeling. This step is as crucial as the cooking time for achieving the ideal texture and ease of peeling.
Making Flavorful Chili Butter at Home
The chili butter is a star component of this dish, offering a wonderful layer of warmth and a gentle kick that elevates the simple jammy eggs. Crafting it at home is incredibly easy and far more flavorful than any store-bought alternative. The process involves infusing melted butter with fragrant chili flakes, creating an aromatic oil that drizzles beautifully over the eggs. This homemade chili butter isn’t just for eggs; it can be used to add a vibrant touch to vegetables, toast, or even other main course dishes. It’s a versatile condiment that introduces a delightful complexity to any meal.
Melt butter with chili flakes
Start by melting 2 tablespoons of unsalted butter in a small saucepan or microwave-safe bowl. Once the butter is fully melted, add 1 to 2 teaspoons of chili flakes (also known as red pepper flakes). The amount can be adjusted based on your preference for heat; use less for a milder flavor or more for a bolder kick. Stir the chili flakes into the melted butter, ensuring they are well dispersed. This initial step combines the richness of the butter with the nascent spice of the chili, setting the stage for the infusion process.
Cook gently for aroma
After mixing the chili flakes into the melted butter, return the saucepan to low heat (if using a stove) or gently microwave for another 30 seconds to a minute. The goal here is not to fry the chili flakes but to gently warm the mixture, allowing the butter to absorb the aromatic oils and heat from the chili. You should notice a fragrant aroma developing. Be careful not to burn the butter or the chili flakes, as this can lead to a bitter taste. Once fragrant, remove the chili butter from the heat and let it sit for a few minutes. This resting period allows the flavors to deepen even further, resulting in a perfectly infused and incredibly flavorful chili butter, ready to drizzle.
Whip Up Creamy Garlic Yogurt
Complementing the spicy chili butter and rich jammy eggs is a refreshing and creamy garlic yogurt. This element provides a cool, tangy, and savory balance to the dish, preventing it from being overly rich or spicy. The creaminess of the yogurt, combined with the pungent kick of fresh garlic, creates a wonderfully light yet flavorful component that ties the entire dish together. It’s an incredibly simple addition that makes a significant impact on the overall taste profile, proving that often, the simplest combinations yield the most delightful results. A perfect example of dairy versatility, explored further on Wikipedia’s Yogurt page.
Mix yogurt with fresh garlic
To prepare the creamy garlic yogurt, start with ½ cup of plain Greek yogurt. Opt for full-fat Greek yogurt if possible, as its thickness and richness contribute greatly to the desired creamy texture. In a small mixing bowl, combine the Greek yogurt with 1 to 2 cloves of fresh garlic, minced very finely. The fresh garlic is crucial here; avoid using garlic powder, as it won’t provide the same vibrant, pungent flavor. Stir these two ingredients together thoroughly, ensuring the garlic is evenly distributed throughout the yogurt. The aroma of the fresh garlic will immediately begin to permeate the yogurt, setting the stage for its refreshing taste.
Add salt and pepper to taste
Once the yogurt and garlic are well combined, it’s time to season the mixture. Add a pinch of salt and a grind of fresh black pepper to taste. Start with small amounts, mix, and then taste before adding more. The salt will enhance the flavors of both the yogurt and the garlic, while the pepper adds a subtle warmth and depth. The goal is to achieve a balance that is tangy, savory, and slightly piquant, without overpowering the delicate flavors of the jammy eggs. Once seasoned to your liking, the creamy garlic yogurt is ready to be generously spooned alongside your beautifully cooked eggs.
Assembling Your Jammy Eggs with Chili Butter
With your perfectly jammy eggs cooled, your aromatic chili butter infused, and your creamy garlic yogurt prepared, the final step is to bring all these delightful components together. Assembling this dish is as much about presentation as it is about combining flavors. A visually appealing plate enhances the dining experience, making each bite even more enjoyable. This section focuses on the simple yet effective ways to arrange your ingredients, ensuring every serving looks as good as it tastes. The care taken in assembly showcases the appreciation for this quick and flavorful meal.
Peel and halve the cooked eggs
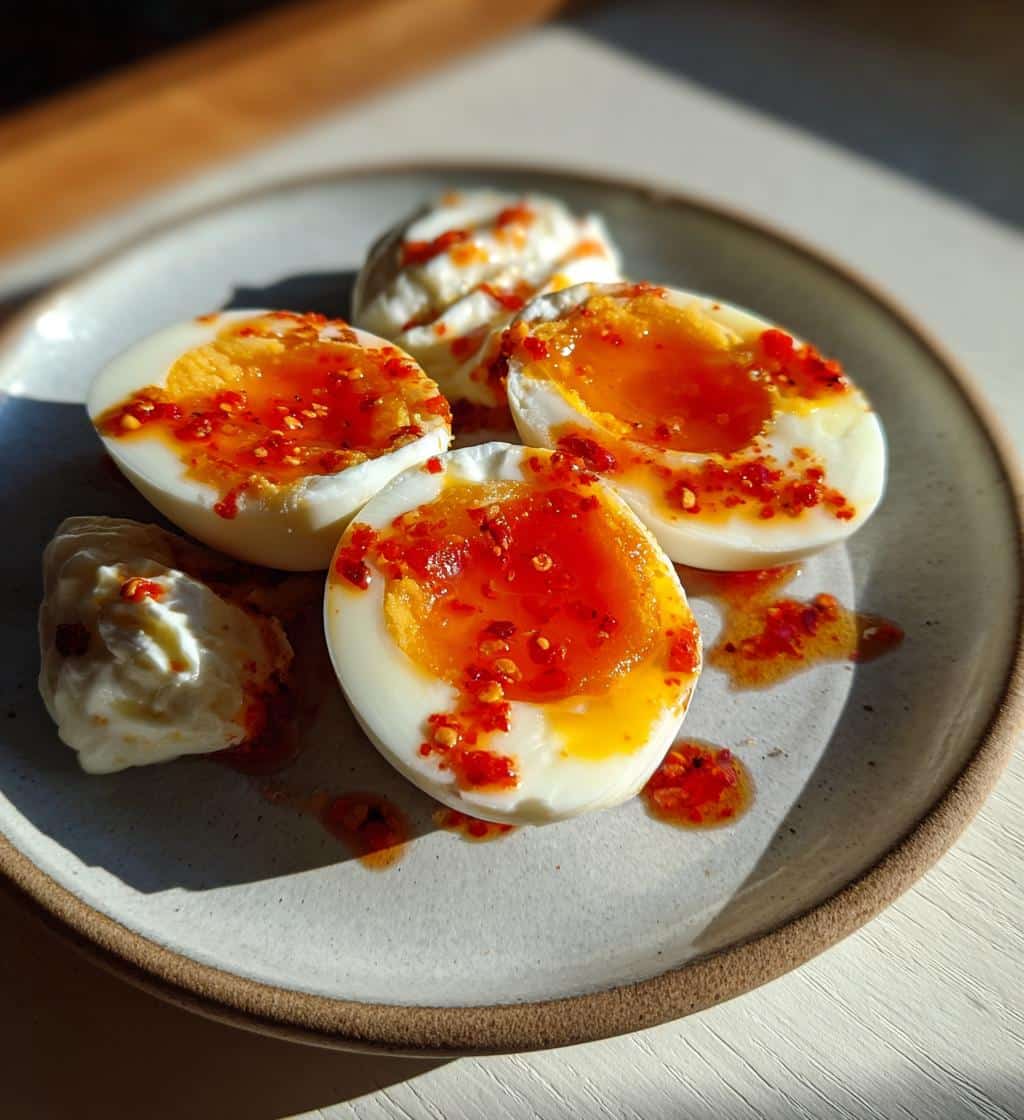
Carefully retrieve your eggs from the ice bath. The cold temperature should make them relatively easy to peel. Gently crack the shell all around by tapping the egg on a hard surface, then peel under a trickle of cold water; this helps to wash away any small shell fragments. Once peeled, use a sharp knife to carefully halve each egg lengthwise. This cut reveals the beautiful, golden, runny yolk—the signature “jammy” center that makes this dish so special. Place the halved eggs, yolk-side up, on your chosen serving plates. The vibrant color of the yolk will instantly make the plate more appealing and appetizing.
Arrange on serving plates
Now, arrange the halved jammy eggs artfully on your individual serving plates. You might place two or three halves per plate, depending on how many eggs you cooked and how generous you want the serving to be. Consider using small, shallow bowls or plates with a slight rim to contain the chili butter and garlic yogurt without them running off. A rustic wooden board or a modern white plate can both serve as excellent backdrops for this colorful dish. The key is to create an inviting presentation that highlights the vibrant yolks and sets the stage for the delicious flavors to come.
Serving Jammy Eggs for Best Enjoyment
Serving your Jammy Eggs with Chili Butter and Garlic Yogurt isn’t just about putting food on a plate; it’s about creating an experience. The way you present and serve this dish can significantly impact its enjoyment. The interplay of warm chili butter, cool garlic yogurt, and the rich jammy egg is meant to be savored in each bite. This section provides guidance on how to serve your creation to maximize flavor, texture, and visual appeal, ensuring every meal feels like a special occasion, whether it’s a quick breakfast or a leisurely brunch. This mindful approach ensures optimum satisfaction.
Drizzle with chili butter
Once your peeled and halved jammy eggs are arranged on the serving plates, it’s time for the first layer of flavor: the chili butter. Take your infused chili butter and generously drizzle it over the exposed yolks and whites of the eggs. The warm, slightly spicy oil will beautifully coat the eggs, adding a glossy sheen and a tempting aroma. The chili flakes themselves will also adhere to the eggs, providing both texture and an extra burst of heat. This drizzle is not just for taste; it enhances the visual appeal, making the eggs look even more appetizing. Don’t be shy with the butter; it’s a key component for the dish’s signature flavor.
Spoon garlic yogurt generously
After the chili butter, add the creamy garlic yogurt. Spoon a generous dollop of the yogurt alongside the eggs, or even directly over a portion of them, allowing some of its coolness to mingle with the warmth of the butter. The bright white of the yogurt provides a stunning visual contrast to the orange yolks and red chili, making the plate pop with color. Encourage diners to mix and match bites of egg with both the chili butter and the garlic yogurt, experiencing the full spectrum of flavors – spicy, savory, tangy, and creamy – in every mouthful. This combination is what truly makes the Jammy Eggs with Chili Butter and Garlic Yogurt a standout dish.
Expert Tips for Jammy Egg Success
While the Jammy Eggs with Chili Butter and Garlic Yogurt recipe is straightforward, a few expert tips can help you achieve even better results and tailor the dish to your personal preferences. These insights come from experience and aim to elevate your cooking, ensuring your jammy eggs are consistently perfect and bursting with flavor. Paying attention to these small details can make a big difference, transforming a good dish into an outstanding one. By incorporating these suggestions, you’ll feel more confident in your culinary skills and enjoy a more refined eating experience.
Adjust chili to your liking
The beauty of homemade chili butter is its customizability. The recipe suggests 1-2 teaspoons of chili flakes, but this is merely a starting point. If you prefer a milder flavor, begin with ½ teaspoon and taste before adding more. For those who love heat, feel free to increase the amount to 3 teaspoons or even incorporate a tiny pinch of cayenne pepper for an extra fiery kick. You can also experiment with different types of chili flakes, such as Aleppo pepper for a fruitier, less intense heat, or smoked paprika for a deeper, earthier flavor. Don’t be afraid to adjust the chili to perfectly suit your palate.
Use Greek yogurt for thickness
For the creamy garlic yogurt component, using plain Greek yogurt is highly recommended over regular plain yogurt. Greek yogurt is strained, resulting in a much thicker, richer, and tangier consistency. This density means it holds up better on the plate and provides a more satisfying textural contrast to the runny yolks. Its higher protein content also adds to the dish’s nutritional value. If you only have regular yogurt, you can try straining it through a coffee filter or cheesecloth for a few hours to achieve a similar thickness, though the flavor profile might be slightly different. For another simple and delicious dish using yogurt, consider making Beet Salad with Feta.
Nutrition Details: Jammy Eggs with Yogurt
Understanding the nutritional profile of the Jammy Eggs with Chili Butter and Garlic Yogurt can help you appreciate it not just as a delicious meal but also as a healthy choice. This dish is rich in protein and offers a good balance of fats, making it a satisfying option that keeps you feeling full and energized. While specific values can vary based on portion sizes and exact ingredients used, the fundamental components—eggs, yogurt, and butter—contribute positively to a balanced diet. It’s a fantastic example of a flavorful meal that doesn’t compromise on wellness, fitting well into various dietary plans.
Calories and protein per serving
A typical serving of two jammy eggs with a drizzle of chili butter and a generous spoonful of garlic yogurt is surprisingly nutrient-dense. Each serving can provide approximately 200-250 calories, making it a light yet fulfilling meal. More impressively, it delivers a substantial amount of protein, usually around 12-15 grams per serving. The eggs are a complete protein source, offering all essential amino acids, while Greek yogurt further boosts the protein content. This makes the dish an excellent choice for muscle repair, satiety, and sustained energy throughout your morning or afternoon. It’s an ideal way to incorporate high-quality protein into your diet effectively.
Fat and carbohydrate breakdown
The fat content in this dish primarily comes from the egg yolks and the butter, contributing healthy fats essential for bodily functions and nutrient absorption. A serving generally contains about 15-20 grams of fat, with a good mix of monounsaturated and saturated fats. The carbohydrates are relatively low, typically ranging from 5-8 grams per serving, mainly from the Greek yogurt. This low-carb, high-protein, and moderate-fat profile makes the jammy eggs an excellent option for those following ketogenic, low-carb, or general healthy eating plans. It’s a dish that truly offers a well-rounded nutritional package without feeling heavy, supporting both your taste buds and your health goals. For more healthy and delicious recipes, visit CarinaRecipes on Pinterest or follow us on Instagram.
Quick Jammy Egg Prep and Cook Time
One of the most compelling features of this Jammy Eggs with Chili Butter and Garlic Yogurt recipe is its incredible efficiency. In a world where time is a precious commodity, having a delicious and satisfying meal ready in minutes is a huge advantage. This dish is perfect for those busy mornings or when you need a quick, healthy snack without much fuss. The simplicity of the steps, combined with the minimal cooking time, means you can enjoy a gourmet-quality meal without spending hours in the kitchen. It truly embodies the concept of a quick meal solution.
Only 10 minutes to prepare
From gathering your ingredients to preparing your butter and yogurt mixtures, the preparation for this jammy egg recipe takes a mere 10 minutes. This includes mincing garlic, melting butter, and setting up your ice bath. The beauty lies in its streamlined process: while the water heats up, you can simultaneously prepare the chili butter and garlic yogurt. This multitasking approach ensures that every minute is used efficiently, allowing you to move seamlessly from prep to cooking without unnecessary delays. It’s the ideal choice for a speedy, no-stress culinary endeavor.
Cooking takes just 7 minutes
The actual cooking of the eggs is the quickest part of this entire process, requiring precisely 6 to 7 minutes in boiling water. This short cooking window is key to achieving that desirable jammy yolk texture. Once the timer dings, a quick plunge into an ice bath stops the cooking and makes peeling a breeze. This extremely short cooking duration, combined with the minimal prep time, culminates in a complete, flavorful, and visually appealing dish that can be on your table in under 20 minutes. It’s truly a testament to how quick and easy delicious, homemade food can be.