Soft Cheesy Onion Bread brings unparalleled warmth and flavor to any table. This delightful homemade bread offers a comforting savory bread experience that is surprisingly simple to achieve. Imagine soft texture, rich cheese, and sweet onion in every bite. It’s an easy recipe for a truly delicious cheesy loaf.
Key Takeaways
- This recipe for soft cheesy onion bread is straightforward, even for beginner bakers.
- Utilize readily available simple ingredients to create a highly flavorful savory bread.
- Proper yeast activation and dough rising are crucial steps for a light, airy loaf.
- Incorporating shredded cheese and chopped onion enhances the bread’s texture and taste.
- Enjoy this versatile cheesy loaf as a side dish or a comforting snack any time.
Homemade bread offers unique satisfaction. The aroma fills your kitchen. It provides warmth and comfort. Freshly baked goods are truly special. This recipe simplifies the process.
Discover Soft Cheesy Onion Bread
Soft Cheesy Onion Bread is more than just a recipe; it’s an invitation to create a truly memorable baking experience. This savory bread combines the comforting familiarity of homemade bread with the irresistible flavors of rich cheese and sweet, aromatic onion. Perfect for a cozy evening, a family gathering, or simply to enjoy a delicious snack, this cheesy loaf promises a delightful treat. Whether you’re an experienced baker or just starting your journey into the world of yeast bread, this easy recipe will guide you to a golden-brown masterpiece.
Why Make This Comfort Loaf?
Making your own bread from scratch offers a profound sense of accomplishment, and this cheesy onion bread takes that feeling to a new level. Unlike store-bought options, homemade bread allows you to control the quality of ingredients, ensuring a wholesome and flavorful product. This comfort food loaf, with its soft interior and cheesy crust, serves as an excellent accompaniment to a hearty soup, a crisp salad, or as a standalone snack. It fills your home with an inviting aroma that simply cannot be replicated. Furthermore, the process of making bread can be incredibly therapeutic, a wonderful way to unwind and engage your senses.
The Joy of Homemade Bread
There’s a special joy in pulling a warm, golden-brown loaf of homemade bread from the oven. The crackle of the crust, the soft texture of the interior, and the robust aroma all contribute to a sensory experience that pre-packaged bread simply can’t match. This particular recipe for savory cheesy onion bread elevates that joy with its delightful inclusions. Each slice offers a perfect balance of fluffy bread, melted cheese, and tender onion, making it a creamy baked mac and cheese and a truly satisfying snack or side dish. Sharing a freshly baked loaf with loved ones creates lasting memories, making the effort entirely worthwhile. For more bread recipes, check out our bread category.
Ingredients for Cheesy Onion Bread
Creating this delicious, soft cheesy onion bread begins with gathering the right ingredients. The beauty of this recipe lies in its simplicity; you won’t need a lengthy shopping list for this flavorful cheesy loaf. High-quality basic ingredients are the secret to a superior homemade bread. Ensuring your yeast is fresh and your cheese is flavorful will make all the difference in the final product. Always read through the ingredient list before you start to make sure you have everything on hand, which makes the process flow smoothly for this easy recipe.
Simple Items You Will Need
The core components for this savory bread are pantry staples. You’ll need all-purpose flour, warm water, active dry yeast (essential for that signature rise), a touch of sugar (to feed the yeast), salt (for flavor and dough structure), and olive oil (to enrich the dough and prevent sticking). These fundamental items form the base of your soft cheesy onion bread, providing the canvas for the added flavors. Make sure your water is the correct temperature to properly activate the yeast; too hot will kill it, too cold won’t activate it effectively. For more details on yeast, you can read about it on Wikipedia’s yeast page.
Your Favorite Shredded Cheese
The choice of cheese is where you can truly personalize your cheesy loaf. While cheddar is a popular and delicious choice for its sharpness and melt, don’t hesitate to experiment with other varieties. Monterey Jack offers a mild, creamy melt, while Gruyère or Swiss can add a nutty depth. A blend of cheeses, such as cheddar and mozzarella, can also create a wonderful texture and flavor profile. Aim for about 1 to 1.5 cups of shredded cheese. Freshly shredded cheese melts better and often has a more vibrant flavor than pre-shredded options, which sometimes contain anti-caking agents. Consider using a good quality cheese to truly elevate your homemade bread.
Easy Steps to Make Dough
Making the dough for soft cheesy onion bread is a straightforward process that lays the foundation for your delicious loaf. Don’t be intimidated by working with yeast; with a few simple steps, you’ll have a pliable, smooth dough ready to rise. This section will walk you through each critical stage, ensuring your homemade bread turns out perfectly light and airy. Precision in these initial steps is key to achieving that desirable texture in your savory bread. Follow these easy steps carefully for a successful cheesy loaf.
Activating Yeast with Warm Water
Yeast activation is the first crucial step in making this flavorful bread. In a large bowl, combine your warm water (around 105-115°F or 40-46°C) with a pinch of sugar and the active dry yeast. The sugar provides food for the yeast, helping it to bloom. Let this mixture sit for 5-10 minutes. You’ll know the yeast is active when it becomes foamy and bubbly on the surface. If it doesn’t foam, your yeast might be old or the water temperature was off, and you’ll need to start again. This step is vital for the bread’s rise and overall soft texture, ensuring your soft cheesy onion bread will be light and fluffy.
Mixing Flour, Salt, and Oil
Once your yeast is active, it’s time to bring the rest of the main ingredients together. To the yeast mixture, add the all-purpose flour, salt, and olive oil. Using a wooden spoon or a stand mixer with a dough hook, mix these ingredients until a shaggy dough forms. Initially, it might seem a bit dry or sticky, but as you continue to mix, the ingredients will combine. The salt provides flavor and strengthens the gluten structure, while the olive oil adds richness and tenderness to the dough. This initial mixing stage is crucial for distributing all components evenly before kneading.
Kneading Dough Until Smooth
Kneading is where the magic happens, developing the gluten in the flour that gives bread its characteristic chewiness and structure. Turn the dough out onto a lightly floured surface and knead for 7-10 minutes, or until the dough is smooth, elastic, and no longer sticky. If using a stand mixer, knead on medium speed for 5-7 minutes. You should be able to stretch a small piece of dough thin enough to see light through it without tearing (the “windowpane test”). This vigorous working of the dough is what creates the perfect soft texture for your homemade bread. It’s a satisfying part of creating this delicious savory bread.
Adding Flavorful Onion and Cheese
This is where your soft cheesy onion bread truly comes alive, receiving its signature flavors. Once the dough has been properly kneaded and developed, it’s time to incorporate the aromatic onions and the rich, shredded cheese. These additions not only infuse the bread with incredible taste but also add delightful pockets of texture. Distributing them evenly is key to ensuring every slice of your homemade bread is packed with flavor. This step transforms a simple yeast bread into a truly savory bread that will be a family favorite.
Fold in Chopped Onion
For the onion, aim for a finely chopped consistency so that it distributes well throughout the dough and cooks down gently during baking. Sweet onions or yellow onions work wonderfully, offering a balanced flavor that complements the cheese without overpowering it. You might even lightly sauté the onion before adding it to soften its bite and enhance its sweetness, though it’s not strictly necessary. Turn the kneaded dough onto a clean surface and gently flatten it slightly. Sprinkle the chopped onion over the dough, then fold the dough over itself multiple times, pressing and kneading lightly to incorporate the onion evenly. This ensures that every bite of your cheesy loaf will have a hint of that wonderful onion flavor. Learn more about onions and their varieties on Wikipedia’s onion page.
Mix in Shredded Cheese
After the onion is folded in, it’s time for the cheese. Sprinkle your chosen shredded cheese over the dough, just as you did with the onions. Again, gently fold and knead the dough a few times to distribute the cheese throughout. Be careful not to over-knead at this stage, as too much handling can cause the cheese to break down or the dough to become tough. The goal is to integrate the cheese so that it creates flavorful pockets throughout the bread, melting beautifully as it bakes to create a gooey, delicious texture. This combination of sweet onion and savory cheese makes this homemade bread an exceptionally flavorful experience. This is what truly makes this a delicious cheesy loaf, perfect as a side dish with something like an easy butter chicken recipe.
First Rise for Light Bread
The first rise, often called bulk fermentation, is a crucial stage in making soft cheesy onion bread. This period allows the yeast to work its magic, producing carbon dioxide gas that inflates the dough and creates that desirable light, airy texture. Proper conditions during this rise are essential for the overall structure and flavor development of your homemade bread. Rushing this step can result in a dense or less flavorful cheesy loaf. Take your time here; patience is key to a truly successful and delicious savory bread. This step is foundational for the softness of the bread.
Greasing the Bowl Properly
To ensure your dough doesn’t stick and can be easily removed after its first rise, it’s important to grease the bowl properly. Use a light coating of olive oil or a neutral cooking oil to coat the inside of a large mixing bowl. Place the dough into the greased bowl, then turn it once to coat the entire surface of the dough with a thin layer of oil. This not only prevents sticking but also keeps the surface of the dough from drying out and forming a crust during the rising period. Covering the dough with oil also helps to maintain its elasticity, allowing for a better rise. This simple step makes a big difference in handling the dough later.
Letting Dough Double in Size
Once the dough is in the greased bowl, cover it tightly with plastic wrap or a clean kitchen towel. Place the bowl in a warm, draft-free spot in your kitchen. Ideal temperatures for rising dough are typically between 75-80°F (24-27°C). The dough should be allowed to rise until it has roughly doubled in size. This usually takes anywhere from 1 to 2 hours, depending on the warmth of your kitchen and the activity of your yeast. You can test if it’s ready by gently poking it with two fingers; if the indent remains, it’s done. This patient waiting ensures your soft cheesy onion bread will be wonderfully light and airy. It’s a rewarding part of baking this homemade bread.
Get Ready to Bake Bread
As your soft cheesy onion bread dough completes its first rise, it’s time to prepare for the baking stage. Proper oven preheating and pan preparation are critical steps to ensure your cheesy loaf bakes evenly and achieves a beautiful golden-brown crust. Rushing these preparations can lead to uneven baking or a loaf that doesn’t reach its full potential. A perfectly preheated oven provides the initial burst of heat needed for a good oven spring, which contributes to the bread’s volume and texture. This part of the process is about setting the stage for a delicious, savory bread.
Preheat Oven to 375°F
Preheating your oven thoroughly is a non-negotiable step for any successful bread baking, and this soft cheesy onion bread is no exception. Set your oven to 375°F (190°C) and allow it to preheat for at least 15-20 minutes after it signals it’s reached temperature. This extra time ensures that the oven walls and racks are fully heated, providing a consistent and stable baking environment. A properly preheated oven will help the bread rise quickly and evenly, creating a beautiful crust and a well-cooked interior. Don’t underestimate the importance of this step for your homemade bread.
Preparing Your Loaf Pan
While the oven is preheating, prepare your loaf pan. A standard 9×5-inch (23×13 cm) loaf pan is ideal for this recipe. To prevent sticking and ensure easy removal of your savory bread, generously grease the inside of the pan with butter, shortening, or cooking spray. For an extra layer of non-stick security and easier cleanup, you can also line the bottom and two long sides of the pan with parchment paper, leaving an overhang to act as “handles.” This meticulous preparation guarantees that your delicious cheesy loaf will come out perfectly, preserving its shape and presentation. Consider this step as crucial as preparing other side dishes like crispy cauliflower.
Shaping Soft Cheesy Onion Bread
After the first rise, your dough for soft cheesy onion bread will be light and airy, ready to be transformed into its final loaf shape. This step requires a gentle touch to maintain the delicate structure created by the yeast. Proper shaping ensures an evenly baked loaf with a pleasing appearance. Don’t be afraid to handle the dough; it’s quite forgiving. The goal is to create a compact, uniform shape that will fit well into your prepared loaf pan, setting it up for its second rise and ultimately, a delicious, golden-brown cheesy loaf. This is a satisfying stage of making homemade bread.
Gently Punch Down Dough
Once your dough has doubled in size during the first rise, it’s time to “punch it down.” This doesn’t mean hitting it forcefully! Rather, gently deflate the dough by pressing it down with your fist. This action releases the large pockets of carbon dioxide gas that have formed, redistributes the yeast and its nutrients, and ensures a finer, more even crumb texture in your finished savory bread. Turn the dough out onto a lightly floured surface. You’ll notice it’s much easier to handle now. This step prepares the dough for shaping and prevents large, irregular holes in the final soft cheesy onion bread.
Form Into a Loaf Shape
Now, shape the deflated dough into a rectangle, roughly the length of your loaf pan. Fold the shorter sides of the rectangle towards the center, overlapping slightly, then gently press to seal. Next, starting from one of the longer sides, roll the dough up tightly into a log, pinching the seam closed at the bottom. Taper the ends slightly to fit your pan. This technique creates tension on the surface of the dough, which helps it hold its shape during the second rise and baking, resulting in a beautifully structured homemade bread. Place the shaped dough, seam-side down, into your prepared loaf pan. This precise shaping contributes significantly to the final look and texture of your delicious cheesy loaf.
Second Rise and Final Prep
With your soft cheesy onion bread dough beautifully shaped and nestled in its pan, the second rise is the final fermentation stage before baking. This critical step allows the dough to relax, expand further, and develop a lighter crumb. It’s often shorter than the first rise but equally important for achieving a lofty, tender loaf. Patience here ensures your homemade bread reaches its full potential. While the dough is rising, you can finalize any last-minute preparations, ensuring a smooth transition to the oven. This stage solidifies the structure of your delicious savory bread.
Loaf Rises in Greased Pan
Once your dough is shaped and placed in the greased loaf pan, cover the pan loosely with plastic wrap or a clean kitchen towel. Return it to a warm, draft-free spot for its second rise. This rise, often called proofing, allows the dough to puff up again, becoming lighter and more aerated. It typically takes about 30-45 minutes, or until the loaf has nearly doubled in size and looks visibly puffy. You can perform the “poke test” again; if a gentle indent springs back slowly, it’s ready. If it springs back too quickly, it needs more time; if it collapses, it’s over-proofed. This second rise is crucial for the final soft texture and open crumb of your cheesy loaf. It’s the last step before your soft cheesy onion bread hits the heat.
Baking Golden Onion Cheese Bread
The moment of truth arrives as your perfectly proofed soft cheesy onion bread enters the oven. Baking is where the magic truly unfolds, transforming the raw dough into a golden-brown, aromatic, and irresistible cheesy loaf. Precise baking time and temperature are key to achieving a crust that is crisp and golden, while the interior remains soft, tender, and fully cooked. The delightful aroma filling your kitchen will be a testament to your efforts, signaling that a truly delicious homemade bread is just moments away. This is the rewarding climax of making savory bread.
Bake Until Golden Brown
Carefully place your loaf pan into the preheated 375°F (190°C) oven. The baking time for soft cheesy onion bread typically ranges from 30 to 40 minutes. Keep an eye on the crust; it should develop a beautiful deep golden-brown color. About halfway through baking, you might want to rotate the pan 180 degrees to ensure even browning on all sides. If the top starts to brown too quickly, you can loosely tent it with aluminum foil to prevent burning while the interior finishes cooking. The rich color indicates the Maillard reaction is taking place, contributing to the bread’s appealing flavor and texture. This creates the perfect appearance for your delicious cheesy loaf.
Check for Doneness Carefully
To confirm your homemade bread is fully baked, there are a couple of reliable methods. The most accurate way is to use an instant-read thermometer. Insert it into the center of the loaf; it should register an internal temperature of 200-210°F (93-99°C). Another common test is to tap the bottom of the loaf. If it sounds hollow, it’s generally done. If it sounds dense or doughy, it likely needs more time in the oven. Once done, remove the loaf from the pan immediately and place it on a wire rack to cool. This critical step ensures that no condensation builds up, which could make the bottom of your savory bread soggy. A properly baked loaf means perfect soft cheesy onion bread.
Serving Your Delicious Bread Slices
After all your efforts in creating this wonderful soft cheesy onion bread, the final step is to serve and enjoy it! While the aroma might be tempting you to slice into it immediately, a little patience goes a long way. Proper cooling ensures the bread’s texture is perfect and that the flavors have time to fully develop. This delicious cheesy loaf is incredibly versatile and can elevate a variety of meals, making it a true family favorite. Whether you’re enjoying it as a simple snack or part of a grander meal, this homemade bread is sure to impress.
Cool Before Slicing and Enjoy
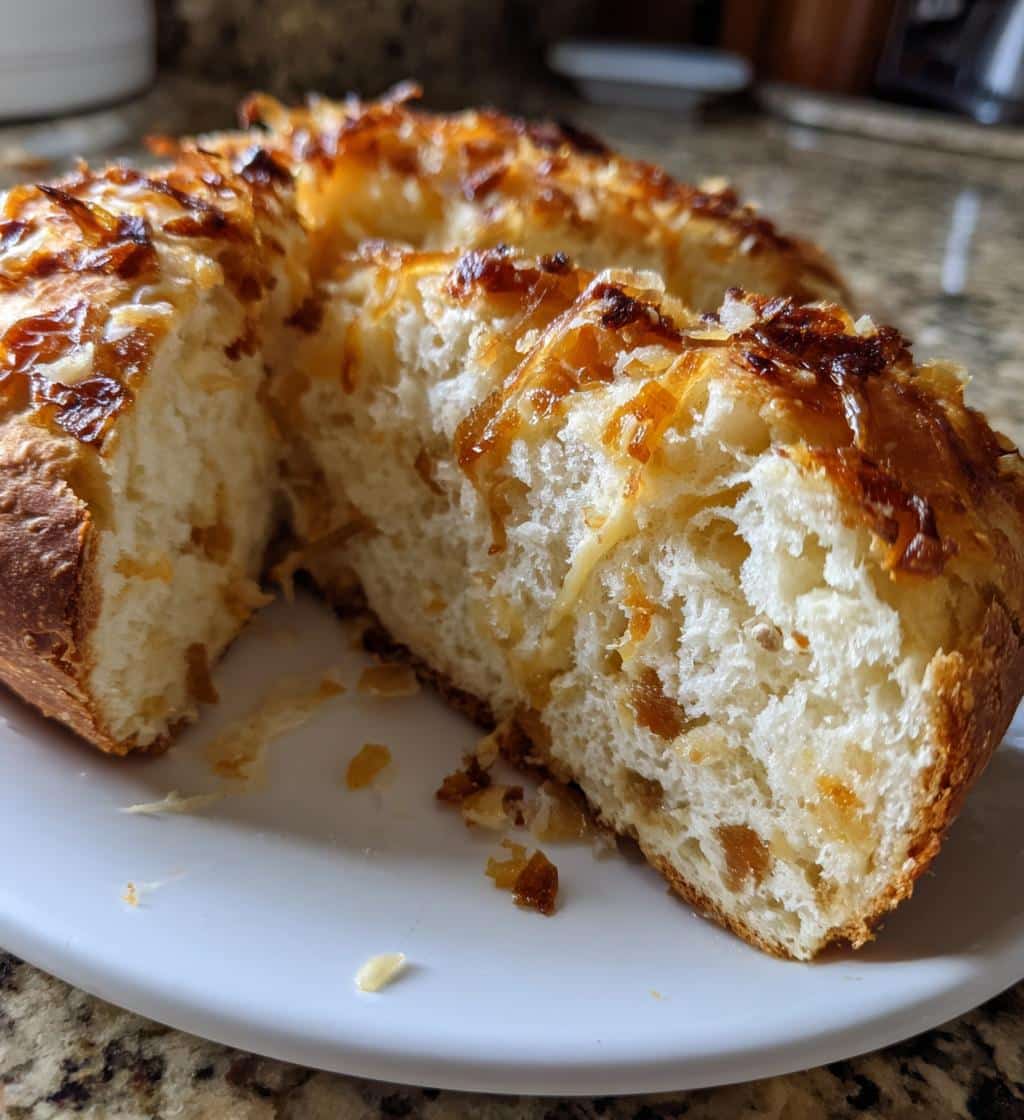
It’s crucial to allow your golden-brown onion cheese bread to cool completely on a wire rack before slicing. While the scent is intoxicating, slicing into hot bread can compromise its texture, making it gummy or causing it to crumble. Cooling allows the internal structure of the bread to set and the starches to firm up. Ideally, let it cool for at least 30-60 minutes, or even longer if you can resist! Once cooled, use a serrated knife to cut beautiful, even slices. Enjoy the soft, flavorful interior with its pockets of melted cheese and sweet onion. This patient waiting ensures the best possible eating experience for your savory bread.
What to Serve With It
This versatile soft cheesy onion bread pairs wonderfully with a wide array of dishes. It makes an excellent accompaniment to hearty soups, stews, or chili, soaking up the flavorful broths beautifully. It’s also fantastic served alongside roasted meats or grilled chicken, adding a comforting element to your dinner spread. For a lighter option, enjoy it with a fresh salad or simply toasted with a little extra butter. It can even be a standalone snack, perhaps with a smear of cream cheese or a sprinkle of herbs. Its robust flavor profile makes it a delicious and satisfying addition to almost any meal. You can find more dinner ideas on our Carina Recipes dinner pages or check out our Instagram for inspiration.
Storing Leftover Cheesy Bread
While freshly baked soft cheesy onion bread is undoubtedly the best, you might find yourself with delicious leftovers. Proper storage is key to maintaining its freshness and flavor for as long as possible. With a little care, your homemade bread can remain soft and enjoyable for a few days, allowing you to savor its savory goodness over multiple meals. This easy recipe makes enough to share, but any extra can be stored and brought back to life with simple reheating. Don’t let any of this delicious cheesy loaf go to waste!
Airtight Storage for Freshness
To keep your soft cheesy onion bread fresh, the most important thing is to prevent it from drying out. Once completely cooled, store the loaf in an airtight container or a large, resealable plastic bag at room temperature. Avoid refrigerating bread, as it tends to dry out more quickly in the fridge. Properly stored, your homemade bread should remain fresh and soft for 2-3 days. For longer storage, you can slice the bread and freeze individual slices in a freezer-safe bag for up to 2-3 months. Thaw frozen slices at room temperature or toast directly from frozen for a quick treat. This ensures your savory bread remains delicious.
Try Adding Herbs for Flavor
While the basic soft cheesy onion bread is incredibly flavorful on its own, you can easily customize it with additional herbs to suit your taste. Before the second rise or even when folding in the onion and cheese, consider adding a tablespoon of dried herbs like chives, parsley, oregano, or a blend of Italian herbs. Fresh herbs, finely chopped, also work wonderfully. Rosemary or thyme can add a rustic, earthy note that complements both the onion and cheese beautifully. This simple addition can subtly change the character of your cheesy loaf, offering new dimensions of flavor and making each batch a unique experience. Experimentation is part of the fun of making homemade bread!
Soft Cheesy Onion Bread Nutrition
Understanding the nutritional aspects of your soft cheesy onion bread can be helpful, especially if you’re mindful of your dietary intake. While specific values can vary based on ingredients and portion sizes, this section provides general information about what you can expect from this delicious homemade bread. Knowing these details helps you appreciate this savory bread as part of a balanced diet. Remember that these are estimates for a typical slice of a cheesy loaf, and actual values may differ slightly based on the exact cheese and oil used in your easy recipe.
Calories and Fat Per Slice
A typical slice of soft cheesy onion bread, depending on its thickness and the specific ingredients used, might contain approximately 150-250 calories. The fat content will primarily come from the cheese and the olive oil used in the dough. Generally, a slice could have around 5-10 grams of fat, with a portion of that being saturated fat from the cheese. If you use a lower-fat cheese or reduce the amount of oil, these numbers will adjust accordingly. This delicious homemade bread offers a satisfying and flavorful option, making it a hearty choice for a snack or side dish.
Protein and Fiber Details
This cheesy loaf also offers valuable protein and fiber. A single slice can provide approximately 5-8 grams of protein, mainly from the flour and, significantly, from the cheese. Protein is essential for muscle repair and satiety. Fiber content will be modest, typically around 1-2 grams per slice, primarily coming from the flour. If you opt for whole wheat flour or a blend, the fiber content would naturally increase. This soft cheesy onion bread offers a comforting and nutritious addition to your meal plan, contributing to your daily intake of key macronutrients. It truly is a versatile and enriching savory bread.