Swirled Garlic Herb and Cheese Bread is a delightful treat, perfect for any occasion. This recipe guides you through creating a tender, flavorful loaf with layers of aromatic garlic, fresh herbs, and gooey cheese. Enjoy baking this savory bread from scratch, transforming simple ingredients into something truly special for your table.
Key Takeaways
- Master the art of yeast dough for soft, flavorful bread.
- Create a vibrant garlic, herb, and cheese filling.
- Learn precise rolling and shaping techniques for the signature swirl.
- Achieve a perfect golden crust and tender interior.
- Discover optimal serving and storage methods to enjoy your homemade loaf.
Making this bread is very rewarding. The aroma fills your kitchen beautifully. Layers of flavor await every bite. It pairs wonderfully with many dishes. Share this delicious creation with loved ones.
Bake Irresistibly Delicious Swirled Garlic Herb and Cheese Bread
What makes this bread special?
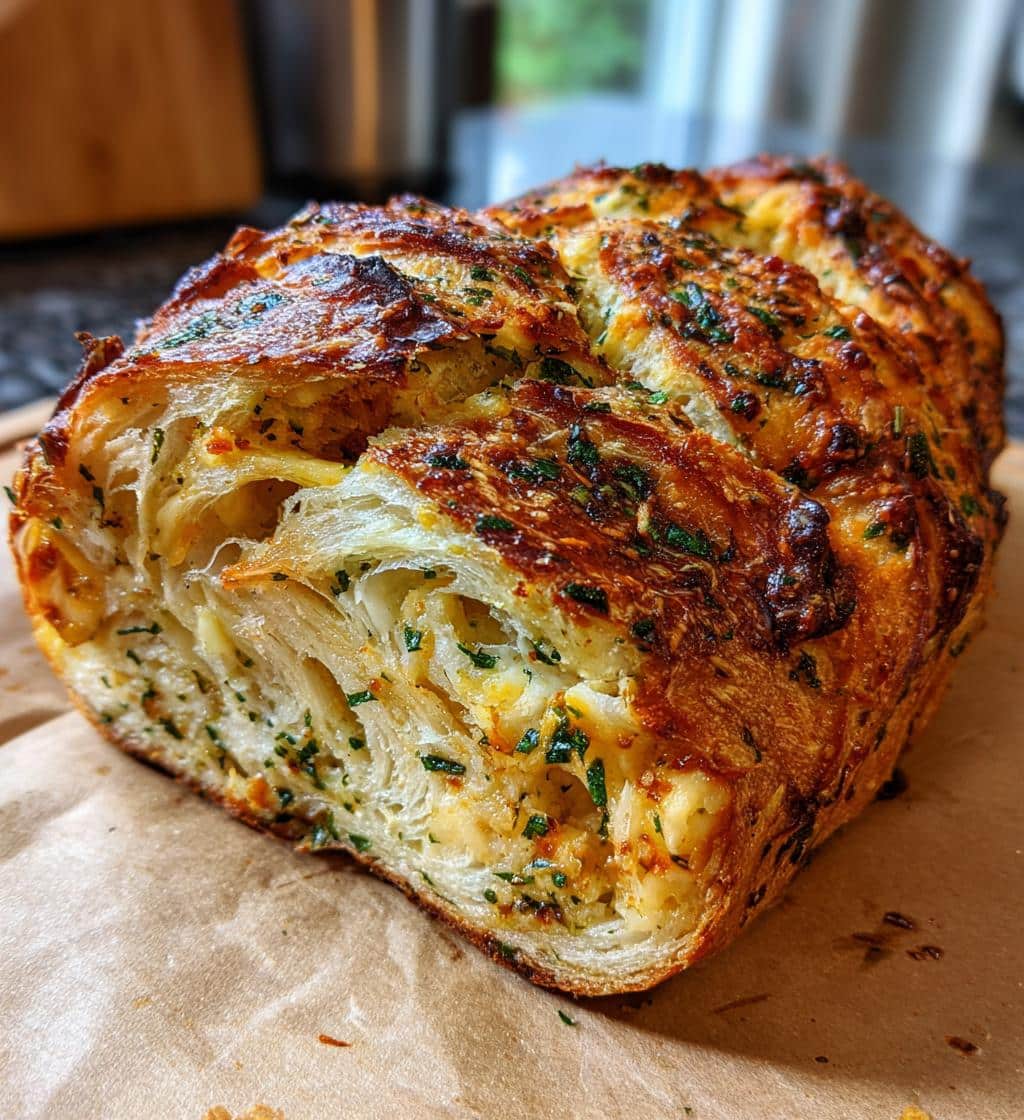
This swirled garlic herb and cheese bread stands out not just for its incredible taste, but also for its beautiful presentation. Unlike a simple garlic bread, this recipe involves layering a rich, aromatic garlic, herb, and cheese mixture within a tender, yeasted dough, which is then rolled and sliced to create a mesmerizing swirl pattern. Each slice offers a perfect balance of soft bread, savory garlic, fragrant herbs, and melted, bubbly cheese. It’s a delightful centerpiece for any meal, offering both visual appeal and a burst of flavor that will impress everyone at your table. The combination of textures—a slightly crisp crust giving way to a fluffy interior, punctuated by pockets of melted cheese—makes this bread an unforgettable culinary experience. It’s more than just a side; it’s a star in its own right, perfect for dipping into soups or serving alongside your favorite Italian dishes.
Why make this recipe?
There are numerous reasons to bake this irresistible bread. Firstly, the satisfaction of creating homemade bread is immense, filling your kitchen with an aroma that signals warmth and comfort. This particular recipe offers a wonderful opportunity to practice your bread-making skills, from kneading to proofing, resulting in a show-stopping loaf. It’s far superior to store-bought alternatives, providing fresh, preservative-free goodness. Moreover, it’s incredibly versatile; while amazing on its own, it also complements a wide array of meals, from hearty pasta dishes like a creamy chicken alfredo lasagna rolls to light salads. It’s a crowd-pleaser, perfect for family dinners, potlucks, or holiday gatherings. The process is a rewarding journey, culminating in a delicious, savory bread that tastes as good as it looks. Plus, knowing exactly what ingredients go into your food provides peace of mind and allows for customization to suit dietary needs or flavor preferences.
Key Ingredients for Swirled Garlic Bread
Flour, yeast, and water basics
The foundation of any great bread is the quality of its basic ingredients. For this swirled garlic bread recipe, you’ll need all-purpose flour, active dry yeast, warm water, a touch of sugar, and salt. All-purpose flour provides the structure for your loaf; ensure it’s fresh for the best results. Active dry yeast is the leavening agent that makes your bread light and fluffy. Always check its expiry date and “proof” it in warm water with a pinch of sugar before adding it to the flour. The sugar helps to activate the yeast, indicating that it’s alive and ready to work. Warm water, ideally between 105-115°F (40-46°C), is crucial for activating the yeast without killing it; too hot, and it dies, too cold, and it won’t activate properly. Salt is not just for flavor; it also controls the yeast’s activity and strengthens the dough’s gluten structure. Together, these simple ingredients create a robust dough that forms the canvas for your flavorful swirl.
Cheeses and herbs for flavor
The heart of our garlic herb cheese bread lies in its vibrant, savory filling. You’ll want a combination of cheeses that melt beautifully and offer distinct flavors. Mozzarella cheese is a must for its incredible melt and mild, creamy taste, creating those irresistible gooey pockets. For a sharper, more complex flavor, finely grated Parmesan cheese adds a salty, umami depth. You could also experiment with Gruyere or Provolone for variations. Fresh herbs are non-negotiable for their aromatic qualities. Fresh parsley and fresh chives are classic choices, bringing bright, herbaceous notes that complement the garlic perfectly. Minced fresh garlic, of course, is the star, providing that pungent, irresistible aroma and taste. A good quality butter, softened, will bind these ingredients together, making the filling spreadable and rich. Don’t be shy with the garlic; it’s what makes this bread truly spectacular. Consider adding a pinch of red pepper flakes for a subtle heat, or dried oregano for an Italian twist, though fresh herbs offer the most vibrant taste.
Mixing and Kneading Dough Perfectly
Combining dry and wet ingredients
The first step to a perfect loaf of homemade garlic bread is correctly combining your dry and wet ingredients. In a large mixing bowl, whisk together your flour and salt. In a separate, smaller bowl or measuring cup, gently stir the warm water, active dry yeast, and a pinch of sugar. Let this mixture sit for 5-10 minutes until it becomes foamy, indicating that the yeast is active. Once foamy, pour the wet mixture into the dry ingredients. Using a sturdy spoon or a dough whisk, begin to mix until a shaggy dough forms. It’s crucial not to overmix at this stage; just combine until there are no dry pockets of flour left. The dough might seem a bit sticky, but that’s normal. This initial combining process sets the stage for gluten development and a tender crumb. Ensure all ingredients are at room temperature, except for the warm water, for optimal integration.
How to knead dough correctly
Kneading is a fundamental step in bread making, developing the gluten that gives bread its structure and elasticity. Once your shaggy dough is formed, turn it out onto a lightly floured surface. Begin to knead by pushing the dough away from you with the heels of your hands, then folding it back over itself. Rotate the dough slightly and repeat the process. This takes about 8-10 minutes by hand, or 5-7 minutes with a stand mixer fitted with a dough hook. You’re looking for the dough to become smooth, elastic, and no longer sticky. A good test for readiness is the “windowpane test”: tear off a small piece of dough and gently stretch it. If you can stretch it thin enough to see light through it without tearing, your gluten is well-developed. This stage is vital for creating a light and airy loaf, making your swirled garlic herb and cheese bread truly irresistible.
First Rise: A Key Step
Letting dough double in size
The first rise, often called bulk fermentation, is a critical stage in the bread-making process. After kneading, lightly oil a large bowl, place your dough inside, and turn it once to coat. Cover the bowl tightly with plastic wrap or a clean kitchen towel. Place it in a warm, draft-free spot. An oven with just the light on can create an ideal environment. During this period, the yeast will feast on the sugars in the dough, producing carbon dioxide gas, which causes the dough to expand and rise. The goal is for the dough to approximately double in size. This usually takes 1 to 1.5 hours, but timing can vary depending on your kitchen temperature and the vitality of your yeast. A good indicator that it’s ready is the “poke test”: gently press two fingers into the dough; if the indentations remain, it’s ready for the next step. This rise develops much of the bread’s flavor and contributes significantly to its final texture. Patience here is rewarded with a more flavorful and tender crumb.
Prepare Flavorful Garlic Herb Cheese Swirl
Mincing garlic and mixing herbs
While your dough is on its first rise, it’s the perfect time to prepare the star of this recipe: the garlic herb cheese swirl. Begin by mincing a generous amount of fresh garlic. For the best flavor, aim for a fine mince rather than a rough chop. Next, gather your fresh herbs—parsley and chives are excellent choices for their vibrant color and fresh taste. Finely chop these herbs, ensuring they are evenly distributed. In a small bowl, combine the minced garlic, chopped herbs, and softened unsalted butter. A pinch of salt and freshly ground black pepper will enhance the flavors. Mix everything together thoroughly until you have a fragrant, spreadable paste. This paste will infuse your bread with incredible aroma and taste. For an added layer of flavor, consider mixing in a tablespoon of finely grated Parmesan cheese directly into this herb butter mixture before spreading. This combination is what truly elevates this delicious swirled garlic bread.
Spreading cheeses on the dough
Once the dough has completed its first rise and you’ve prepared your garlic herb butter, it’s time to bring them together. After gently deflating the dough, roll it out into a large rectangle on a lightly floured surface. Make sure the dough is thin enough to roll easily but not so thin that it tears. Now, evenly spread the prepared garlic herb butter mixture across the entire surface of the dough, leaving a small border along one long edge. This border will help seal the dough later. Over this flavorful butter base, sprinkle your shredded cheeses—primarily mozzarella for its melt factor and Parmesan for its salty depth. Distribute the cheeses as evenly as possible to ensure every bite of your cheesy bread recipe gets a delicious burst of flavor. This careful spreading is key to achieving that beautiful, consistent swirl of garlic, herbs, and cheese throughout the baked loaf. You can even try adding some grated provolone for another dimension.
Rolling and Filling Your Dough
Creating the perfect rectangle
After the first rise, gently punch down the dough to release the air. Turn the dough out onto a lightly floured surface. Using a rolling pin, gradually roll the dough into a large rectangle. The precise dimensions aren’t as critical as achieving an even thickness and shape. Aim for a rectangle that is roughly 18×12 inches (45×30 cm), or proportional to the size of your loaf pan. Consistency in thickness is important to ensure the bread bakes evenly and the swirl layers are uniform. If the dough springs back too much, let it rest for 5-10 minutes to allow the gluten to relax, then continue rolling. A perfectly shaped rectangle provides a clean canvas for spreading your filling and ensures a beautifully shaped loaf. This step is a key component to achieving the signature swirled bread recipe look and feel.
Evenly spreading the filling
With your dough rolled out, it’s time to apply the savory filling. As previously prepared, take your garlic herb butter and carefully spread it over the entire surface of the dough rectangle, leaving about a 1/2-inch border along one of the long edges. This border will act as a seal when you roll the dough. Next, generously sprinkle your shredded cheeses—mozzarella and Parmesan—over the butter layer. Ensure the cheeses are distributed as evenly as possible so every slice of bread gets a delightful cheesy bite. Don’t be shy; a good amount of cheese contributes significantly to the irresistible flavor and texture of the bread. For an extra kick, a dash of red pepper flakes can be added here. The goal is a uniform layer of flavor from edge to edge, setting up your loaf for perfectly distributed swirls. You want to make sure your ingredients are spread right to the edges, except for that one crucial border, for maximum flavor in every part of your garlic herb and cheese bread.
Shaping and Second Dough Rise
Rolling dough tightly
Once your dough is evenly covered with the garlic herb cheese filling, it’s time to carefully roll it up. Starting from the long edge opposite the reserved border, begin to roll the dough tightly and evenly. This tightness is crucial for creating well-defined swirls in your baked bread. As you roll, try to keep the log uniform in thickness from one end to the other. If the dough starts to stick or seems difficult to roll, a very light dusting of flour on your hands or the surface can help, but avoid adding too much. Continue rolling until you reach the opposite long edge where you left the border. Gently pinch the seam closed along this edge to seal the roll. This careful sealing prevents the filling from escaping during the rise and bake. Once sealed, gently tuck in the ends to create a neat, compact log. This meticulous rolling technique is essential for the aesthetic appeal of your swirled bread recipe.
Final rise in loaf pan
After rolling and sealing your dough, prepare your loaf pan. Lightly grease a standard 9×5 inch (23×13 cm) loaf pan. Carefully transfer the rolled dough log into the prepared pan, seam-side down. Cover the loaf pan with plastic wrap or a clean kitchen towel and place it in a warm, draft-free spot for its second rise, also known as proofing. This final rise allows the dough to relax and expand further, becoming light and airy. The bread should rise until it nearly doubles in size and just crests the top of the loaf pan, typically taking 45-60 minutes, again depending on your kitchen environment. This rise is vital for a soft crumb and prevents dense bread. While it proofs, you might check out other tasty main course recipes on CarinaRecipes.com, perhaps something that would pair perfectly with your freshly baked bread. You can tell it’s ready when it looks puffy and passes the “poke test” where an indentation slowly springs back. Avoid over-proofing, as this can lead to a collapse in the oven. This careful shaping and rising process ensures your garlic herb and cheese bread bakes beautifully.
Baking Your Golden Swirled Garlic Bread
Oven temperature and timing
Proper oven temperature and accurate timing are paramount for baking a perfect loaf of golden swirled garlic bread. Preheat your oven to 375°F (190°C) with a rack in the center. Allow sufficient time for the oven to fully preheat—at least 15-20 minutes after it signals it’s ready—to ensure a consistent temperature throughout the baking process. Place the loaf pan into the preheated oven. Bake for approximately 30-35 minutes. Around the 20-minute mark, if the top is browning too quickly, you can loosely tent the loaf with aluminum foil to prevent over-browning. The internal temperature of a fully baked loaf should register between 190-200°F (88-93°C) when checked with an instant-read thermometer. This precise temperature ensures the bread is cooked through without being dry. Every oven is different, so keep an eye on your bread, especially during the last 10 minutes, adjusting as needed.
Achieving golden brown crust
A beautiful golden brown crust is not just for looks; it adds a delightful texture and contributes to the overall flavor of your baked garlic bread. To achieve this, several factors come into play. Firstly, the initial high oven temperature helps to create that desirable crust. Secondly, ensuring the bread has a good second rise allows for proper oven spring, which helps to develop a crisp exterior. For an extra glossy and golden finish, you can brush the top of the loaf with a little melted butter or an egg wash (one egg beaten with a tablespoon of water) before baking. This step is optional but highly recommended for that professional bakery look. Once baked, immediately remove the bread from the loaf pan and transfer it to a wire rack to cool. Cooling on a wire rack prevents the bottom crust from becoming soggy by allowing air circulation. This ensures your swirled garlic herb and cheese bread has a perfect balance of tender interior and a crisp, flavorful crust.
Serving Irresistibly Delicious Swirled Garlic Bread
Best served warm
While delicious at any temperature, this irresistibly delicious swirled garlic bread is truly at its peak when served warm. The warmth enhances the aromatic qualities of the garlic and herbs, and more importantly, it ensures the cheese within is wonderfully melted and gooey. After removing the loaf from the oven and letting it cool for about 10-15 minutes on a wire rack, slice it with a serrated knife. This cooling period is important as it allows the internal structure of the bread to set and prevents a gummy texture. Serving it warm makes it incredibly inviting and allows the full spectrum of its flavors and textures to shine. Pair it with a hearty soup, a crisp salad, or as a side to your favorite Italian dinner. The soft, cheesy interior contrasts beautifully with the slight crunch of the crust.
Ideas for serving this bread
This versatile savory bread can elevate almost any meal. It’s an ideal accompaniment to classic Italian dishes like spaghetti and meatballs, lasagna, or even a simple pasta primavera. Imagine tearing off a warm piece and dipping it into a rich tomato sauce! It also makes a fantastic side for roasted chicken, grilled steak, or a succulent pork roast. For a lighter meal, serve it alongside a fresh garden salad or a bowl of homemade wonton soup. It can even be the star of an appetizer platter, perhaps alongside a bowl of marinara for dipping or a fresh bruschetta topping. Don’t forget to check out our Pinterest page for more creative serving suggestions and recipe inspiration. For more daily cooking inspiration, be sure to follow us on Instagram. This bread is also a fantastic addition to a brunch spread, perhaps with scrambled eggs and bacon. Its comforting flavors make it perfect for any gathering, from casual family dinners to more formal entertaining. Consider serving it with a simple olive oil dip or a balsamic glaze to truly highlight its flavors. The options are endless for enjoying this delightful creation.
Tips for Best Garlic Herb and Cheese Bread
Dough texture advice
Achieving the right dough texture is crucial for a light and airy loaf. When kneading, the dough should feel smooth and elastic, not sticky or tough. If it’s too sticky, add flour a tablespoon at a time until it reaches the desired consistency. If it feels too stiff, a tiny bit of water can help. Humidity and flour type can affect this, so always trust your touch over exact measurements sometimes. Over-kneading can result in a tough bread, while under-kneading won’t develop enough gluten, leading to a dense crumb. Aim for a dough that springs back slowly when poked. For further reading on dough science, a visit to Wikipedia’s article on Dough can provide valuable insights. This attention to detail in dough preparation is one of the most important bread baking tips you can follow.
Oven preheating tips
Never underestimate the importance of a properly preheated oven. Always allow your oven at least 15-20 minutes to preheat after it signals it has reached the target temperature. This ensures the oven cavity and any baking stones or pans inside are uniformly heated, providing consistent baking conditions. A hot oven delivers an initial burst of heat, known as “oven spring,” which helps the dough rise rapidly and creates a superior crust. Using an oven thermometer can confirm your oven’s accuracy, as many home ovens can vary significantly from their display. Placing your loaf pan in a perfectly preheated oven is key to achieving that beautiful golden-brown crust and even bake for your homemade garlic bread.
Adding extra flavors
While the classic garlic, herb, and cheese combination is phenomenal, don’t hesitate to experiment with additional flavors to personalize your loaf. A sprinkle of red pepper flakes in the filling can add a subtle kick. Sun-dried tomatoes, finely chopped, can introduce a sweet and tangy element. Olives, either Kalamata or green, can provide a briny depth. For a different herb profile, try fresh rosemary or oregano alongside the parsley and chives. Smoked paprika can add a smoky undertone to the cheese layer. You can also vary the cheeses; a sharp cheddar, a creamy provolone, or even a little goat cheese could offer interesting twists. Before baking, a sprinkle of flaky sea salt on top can add a textural contrast and visual appeal. Be creative, but remember to maintain a balance of flavors to ensure your garlic herb bread remains irresistibly delicious.
Storing Your Irresistibly Delicious Swirled Bread
Keeping bread fresh
To maintain the freshness of your irresistibly delicious swirled bread, proper storage is essential. Once baked and fully cooled, store the bread at room temperature. The best way to keep it fresh for 2-3 days is to wrap it tightly in plastic wrap, then place it in an airtight container or a bread box. This prevents it from drying out and keeps the crust from becoming too hard. Avoid refrigerating bread, as it tends to stale faster due to a process called retrogradation of starch, which occurs rapidly in cooler temperatures above freezing. If you prefer a slightly crisper crust for day-old bread, you can lightly toast slices before serving. This method ensures your bread remains enjoyable, retaining its soft interior and flavorful swirl for as long as possible.
Freezing for later enjoyment
For longer storage, freezing is an excellent option that preserves the quality of your homemade garlic bread. Once the loaf has completely cooled, slice it or keep it whole, depending on your preference. Wrap the bread tightly first in plastic wrap, then in aluminum foil, or place it in a freezer-safe bag, removing as much air as possible. This double-layer protection helps prevent freezer burn. Label with the date. Frozen bread can be stored for up to 3 months. When you’re ready to enjoy it, you can either thaw the entire loaf at room temperature or take out individual slices as needed. This makes it convenient to have delicious, savory bread on hand whenever a craving strikes, or to prepare ahead for guests. Learning more about food preservation techniques like freezing can be very helpful for home cooks.
Reheating stored bread
Reheating stored bread properly can bring it back to a near-fresh state. If reheating a whole loaf, first thaw it if frozen. Then, preheat your oven to 350°F (175°C). You can either wrap the loaf loosely in aluminum foil to retain moisture or place it directly on the oven rack for a crisper crust. Bake for 10-15 minutes, or until warmed through. For individual slices, a toaster oven or even a regular toaster works wonderfully, warming them through and slightly crisping the edges. If using a microwave, warm for only a few seconds, as microwaving bread can quickly make it tough and chewy. The goal is to gently warm the bread without drying it out, allowing the cheese to melt and the garlic and herb flavors to revive. Enjoying warm, reheated slices of your delicious swirled garlic bread is almost as good as fresh from the oven, offering convenience without sacrificing flavor.
Nutrition Facts for Garlic Herb Bread
Per slice details
Understanding the nutritional content of your garlic herb bread can be helpful for meal planning. While specific values will vary based on exact ingredients and slice size, we can provide general estimations. Typically, one slice of this homemade swirled garlic herb and cheese bread (assuming 12-14 slices per loaf) will contain a certain amount of calories, fats, carbohydrates, and protein. Factors like the type of cheese, amount of butter, and flour used will directly impact these figures. For instance, using a low-fat mozzarella or reduced-fat butter can alter the fat content. Similarly, adding extra vegetables or seeds might increase fiber. Always consider your specific ingredient choices when calculating precise nutritional data, but the following general overview provides a useful reference point.
Calories, fat, and protein
A standard slice of swirled garlic herb and cheese bread is generally moderate in calories, primarily due to the flour and cheese. You can typically expect around 180-250 calories per slice. The fat content will be influenced by the butter and cheese, often ranging from 8-15 grams per slice, with a mix of saturated and unsaturated fats. Carbohydrates, largely from the flour, will be a significant component, usually around 20-30 grams per slice. Protein content, contributed by the flour, yeast, and especially the cheese, can be around 5-8 grams per slice, making it a reasonably satisfying snack or side. Dietary fiber might be modest, typically 1-2 grams. Remember these are approximations, and precise values would require using a nutritional calculator with your exact ingredient quantities. Enjoy this flavorful bread as part of a balanced diet, perhaps alongside a honey garlic chicken for a complete meal.