Homemade cinnamon rolls offer a delightful breakfast pastry experience, filling your kitchen with warmth. This guide provides a simple cinnamon roll recipe to achieve fluffy cinnamon rolls with ease. Follow our steps for baking cinnamon rolls from scratch, ensuring a perfect batch topped with sweet vanilla glaze every time. Enjoy warm cinnamon rolls fresh from your oven.
Key Takeaways
- Achieve incredibly fluffy cinnamon rolls by paying attention to yeast activation and dough rising times.
- Gathering all ingredients, from dough to sweet vanilla glaze, streamlines the entire baking process.
- Proper kneading and two distinct rising periods are crucial for the signature soft texture of homemade cinnamon rolls.
- Master the art of rolling and slicing for uniformly shaped, appealing warm cinnamon rolls.
- Glaze your baked goods while still warm to allow the sweet vanilla glaze to melt and coat perfectly.
- Store leftover cinnamon rolls properly for lasting freshness and easy reheating.
- Small tips, like not overbaking, significantly impact the final quality and softness.
Sweet aromas fill your kitchen. Warm, fluffy cinnamon rolls await. Homemade treats are always best. Enjoy baking with family. Share pure deliciousness today.
Get Ready for Irresistible Homemade Cinnamon Rolls
There’s nothing quite like the aroma of freshly baked goods filling your home, especially when it’s the comforting scent of irresistible homemade cinnamon rolls. This classic breakfast pastry is a favorite for good reason, offering a perfect blend of soft, sweet dough, a spiced cinnamon swirl, and a decadent sweet vanilla glaze. While often seen as a weekend treat, our cinnamon roll recipe makes the process approachable, allowing you to create bakery-quality treats right in your own kitchen. Preparing these delicious rolls from scratch isn’t just about the final product; it’s an enjoyable culinary journey, bringing warmth and joy to any occasion. Whether for a special brunch or a cozy morning, baking cinnamon rolls is a rewarding experience.
Why Make These Delicious Rolls?
Making your own homemade cinnamon rolls offers immense satisfaction that store-bought versions simply cannot match. You control every ingredient, ensuring freshness and quality, and can customize the sweetness and spice level to your preference. The process itself is therapeutic, from kneading the dough to watching it rise. Plus, the sheer delight on faces when you serve a plate of warm, fluffy cinnamon rolls, glistening with sweet vanilla glaze, is priceless. It’s more than just a dessert; it’s a gesture of love, a cherished memory in the making, and an indulgent breakfast pastry experience.
Prep and Cook Times Overview
Understanding the timeline for this cinnamon roll recipe is key to successful baking. The overall process for making homemade cinnamon rolls involves several stages, including dough preparation, two separate rises, shaping, and baking. Typically, you can expect the active preparation time to be around 45-60 minutes. However, the dough will require two significant rising periods: the first rise is approximately 60 minutes, and the second rise around 30 minutes. Baking usually takes about 20-25 minutes, followed by a short cooling period before glazing. Factoring in all these steps, from start to enjoyment, the total time will be around 3-4 hours, though much of this is hands-off rising time.
Gather Ingredients for Your Cinnamon Rolls
The success of your homemade cinnamon rolls begins with gathering the right ingredients. Each component plays a crucial role in developing the rich flavor and desirable texture of this beloved breakfast pastry. Having everything pre-measured and at the correct temperature before you begin will streamline the entire baking process, making your cinnamon roll recipe much smoother and more enjoyable. From the specific type of flour to the freshest yeast, attention to detail here will truly pay off when you’re savoring your warm cinnamon rolls.
Dough Ingredients You Will Need
For the exceptionally soft and fluffy cinnamon rolls, precision with your dough ingredients is paramount. You’ll need active dry yeast to help your dough rise beautifully, warmed milk (around 105-115°F or 40-46°C) to activate the yeast, granulated sugar to feed the yeast and add sweetness, and melted unsalted butter for richness. Eggs add tenderness and structure, while all-purpose flour provides the necessary framework. A pinch of salt balances the sweetness and enhances flavor. Ensure your butter is melted but not hot, and your milk is at the ideal temperature to avoid killing the yeast. This simple combination forms the base of a truly irresistible dough recipe.
Filling and Glaze Essentials
The heart of any good cinnamon roll lies in its flavorful filling, and the crowning glory is, of course, the sweet vanilla glaze. For the filling, you will need softened unsalted butter to create a spreadable base, ground cinnamon for that iconic spiced aroma, and brown sugar for a deep, molasses-rich sweetness. Some recipes also include a touch of nutmeg or cardamom for added complexity. As for the glaze, it’s delightfully simple: powdered sugar (confectioners’ sugar) forms the base, complemented by milk or cream for consistency, and a generous splash of pure vanilla extract for that classic sweet vanilla glaze flavor. Adjust the liquid amount to achieve your desired drizzling consistency. This combination ensures your baking cinnamon rolls will be topped with perfection.
Making the Perfect Dough: Cinnamon Rolls Recipe
Crafting the perfect dough is the cornerstone of exceptional homemade cinnamon rolls. This stage of the cinnamon roll recipe requires attention to detail, from activating the yeast to achieving a smooth, elastic dough. The effort you put in here will directly impact the texture and rise of your final product, leading to those coveted fluffy cinnamon rolls we all adore. Remember that baking is a science, and understanding each step helps ensure success.
Activating Yeast with Warm Milk
The journey to perfect dough begins with activating your yeast. In a large bowl or the bowl of a stand mixer, combine the warm milk (ensure it’s between 105-115°F / 40-46°C – too hot will kill the yeast, too cold won’t activate it) with a teaspoon of granulated sugar and the active dry yeast. Gently stir and let this mixture sit for 5-10 minutes. You should see it become frothy and bubbly, indicating that the yeast is alive and ready to work its magic. This critical step ensures your dough will rise properly, leading to light and airy warm cinnamon rolls. For more details on yeast, consider visiting its Wikipedia page.
Mixing Wet Ingredients Smoothly
Once your yeast is active and bubbly, it’s time to incorporate the remaining wet ingredients. Add the melted (but cooled) butter, remaining granulated sugar, and eggs to the yeast mixture. Whisk everything together until thoroughly combined and smooth. This step ensures that all the rich flavors and tenderizing agents are evenly distributed throughout the dough. A well-mixed liquid base creates a consistent foundation for the flour, preventing any pockets of unmixed ingredients later on. This careful blending contributes significantly to the overall texture of your future fluffy cinnamon rolls.
Kneading Flour into Soft Dough
Gradually add the all-purpose flour and salt to the wet ingredients, mixing first with a wooden spoon or dough hook until a shaggy dough forms. Then, turn the dough out onto a lightly floured surface or continue with the dough hook. Knead for 8-10 minutes until the dough is smooth, elastic, and no longer sticky. The kneading process develops the gluten in the flour, which is essential for the structure and chewiness of your homemade cinnamon rolls. You’ll know it’s properly kneaded when it passes the “windowpane test”—you can stretch a small piece thin enough to see light through it without tearing. This dough recipe ensures a tender result.
First Rise: Let Your Dough Grow
After the meticulous preparation of your dough recipe, the first rise is a crucial period where patience truly pays off. This stage allows the yeast to work its magic, fermenting the sugars and producing carbon dioxide, which creates the airy pockets that define fluffy cinnamon rolls. Proper rising conditions are essential to ensure your dough reaches its full potential, setting the stage for perfectly structured and tender homemade cinnamon rolls.
Covering Dough for One Hour
Once your dough is beautifully kneaded, lightly grease a large bowl with a neutral oil, then place the dough in the bowl, turning it once to coat the entire surface. This prevents the dough from drying out. Cover the bowl tightly with plastic wrap or a clean kitchen towel. Place the covered bowl in a warm, draft-free spot in your kitchen. This could be near a sunny window (but not direct harsh sun), inside a slightly warmed (but turned off) oven, or even just on a countertop in a warm room. Let the dough rise for approximately 1 hour, or until it has doubled in size. This first rise is vital for developing flavor and creating a light texture. For other delightful baked goods, try our Peanut Butter Brownie Swirl Cookies, which also rely on careful baking principles.
Shape Your Irresistible Homemade Cinnamon Rolls
With your dough beautifully risen, it’s time for the creative part of this cinnamon roll recipe: shaping. This stage transforms a simple ball of dough into the iconic spiral rolls that are instantly recognizable. Precision in rolling and spreading the filling will ensure that every bite of your homemade cinnamon rolls has that perfect balance of dough and cinnamon-sugar swirl. This step is key to achieving uniformly sized and visually appealing warm cinnamon rolls.
Rolling Dough into a Rectangle
Gently punch down the risen dough to release the air. Turn it out onto a lightly floured surface. Using a rolling pin, roll the dough into a large rectangle. Aim for a thickness of about 1/4 inch (0.6 cm) and dimensions of approximately 12×18 inches (30×45 cm). Try to keep the edges as straight as possible, as this will help in creating even rolls later on. A consistent thickness is important for even baking and ensuring that each part of the dough cooks perfectly, contributing to the fluffy cinnamon rolls you desire. This flat canvas is where the magic of the cinnamon sugar filling will soon unfold.
Adding Cinnamon and Sugar Sprinkle
Once your dough rectangle is ready, evenly spread the softened butter (about 1/2 cup) all over the surface, leaving a small border (about 1/2 inch) on one of the longer edges. This butter acts as the adhesive for your delicious cinnamon sugar filling. In a separate small bowl, combine the brown sugar (about 1 cup, packed) and ground cinnamon (2 tablespoons). Sprinkle this mixture generously over the butter-coated dough, ensuring an even layer across the entire surface. The richness of the brown sugar combined with the aromatic spice creates the signature flavor profile of these irresistible homemade cinnamon rolls. You can add a pinch of nutmeg for extra depth, if desired.
Rolling Tightly and Slicing
Starting from one of the longer edges, carefully and tightly roll the dough into a log. A tight roll is crucial to prevent gaps in your finished warm cinnamon rolls and to ensure a beautiful, defined swirl. Once rolled, pinch the seam closed to seal the log. Using a sharp knife or, for best results, unflavored dental floss, cut the log into 12-15 even slices, each about 1 to 1.5 inches (2.5-3.8 cm) thick. If using floss, slide it under the log, cross the ends over the top, and pull to slice cleanly. Place the cut rolls into a greased 9×13 inch baking dish, leaving a little space between them for expansion during the second rise.
Second Rise for Fluffy Cinnamon Rolls
The second rise is just as important as the first for achieving truly fluffy cinnamon rolls. This final proofing allows the dough to relax and expand further in its individual roll form, resulting in a lighter, more tender texture once baked. Don’t rush this step; patience now will be rewarded with the most delightful homemade cinnamon rolls possible, full of airy pockets and a soft crumb. This critical stage contributes directly to the overall success of your cinnamon roll recipe.
Placing Rolls in Baking Dish
Once you’ve expertly shaped and sliced your homemade cinnamon rolls, arrange them in a lightly greased 9×13 inch baking dish. Make sure to leave a small amount of space between each roll. They will expand significantly during this second rise and while baking, so don’t pack them too tightly. Arranging them in the dish now ensures they maintain their shape and that the heat circulates evenly around them in the oven, leading to uniformly baked warm cinnamon rolls. This arrangement also makes them easy to glaze and serve directly from the dish.
Letting Them Rise for Thirty Minutes
Cover the baking dish loosely with plastic wrap or a clean kitchen towel. Place it back in a warm, draft-free spot for the second rise, which typically lasts about 30 minutes. During this time, the rolls will puff up visibly, becoming noticeably larger and closer together in the dish. This final proofing is vital for ensuring your cinnamon rolls achieve their signature fluffy texture. You’ll notice they look plump and soft, ready for their journey into the oven. Over-proofing can lead to a slight yeasty flavor, so keep an eye on them. For another delicious breakfast idea, consider making Hawaiian Roll French Toast, also a delightful morning treat.
Baking Your Warm Cinnamon Rolls to Perfection
The moment of truth arrives when it’s time for baking cinnamon rolls. This stage transforms the raw dough into golden-brown, aromatic treats that are soft on the inside and slightly crisp on the edges. Achieving perfect warm cinnamon rolls requires careful attention to oven temperature and baking time, ensuring they are cooked through without becoming dry. The delicious scent filling your kitchen is the first reward of your efforts in this cinnamon roll recipe.
Setting Oven Temperature Correctly
Preheat your oven to 375°F (190°C). Allowing your oven to fully preheat is a critical step in baking cinnamon rolls, as it ensures an even and consistent cooking environment from the moment the rolls enter. An oven that isn’t fully preheated can lead to uneven baking, with some rolls being undercooked and others overcooked. Placing your baking dish into a properly heated oven helps the rolls rise quickly and evenly, resulting in a beautiful, uniform golden-brown crust and a soft interior, truly making them fluffy cinnamon rolls. Proper temperature control is paramount.
How Long to Bake Rolls
Once your oven is preheated and your rolls have completed their second rise, carefully place the baking dish into the preheated oven. Bake for 20-25 minutes, or until the tops are golden brown and the rolls are cooked through. The exact baking time can vary depending on your oven, so it’s always a good idea to keep an eye on them. You can also insert a toothpick into the center of a roll; if it comes out clean, they are likely done. Be careful not to overbake, as this can result in dry, tough rolls. The goal is a soft, tender texture that melts in your mouth. Removing them at the peak of perfection ensures you’ll have the best warm cinnamon rolls possible. For more baking inspiration, explore our wide range of desserts.
Whip Up Your Sweet Vanilla Glaze
No homemade cinnamon rolls are complete without a luscious sweet vanilla glaze. This simple yet decadent topping adds the final touch of sweetness and moisture, transforming your warm cinnamon rolls into an irresistible breakfast pastry. Whipping up the glaze takes mere minutes and is the perfect way to finish off your baking triumph, ensuring every bite is a delightful combination of soft dough and creamy sweetness.
Combining Powdered Sugar and Vanilla
While your cinnamon rolls are baking, or just as they come out of the oven, prepare the sweet vanilla glaze. In a medium bowl, combine 2 cups of powdered sugar (confectioners’ sugar) with 3-4 tablespoons of milk or cream and 1 teaspoon of pure vanilla extract. Whisk these ingredients together until the mixture is smooth and free of lumps. You can adjust the consistency by adding more milk a teaspoon at a time for a thinner glaze, or a bit more powdered sugar for a thicker one. The vanilla extract is key here, infusing the glaze with its comforting, sweet aroma. This simple glaze is the perfect complement to the rich flavors of your baking cinnamon rolls.
Drizzling Warm Rolls with Glaze
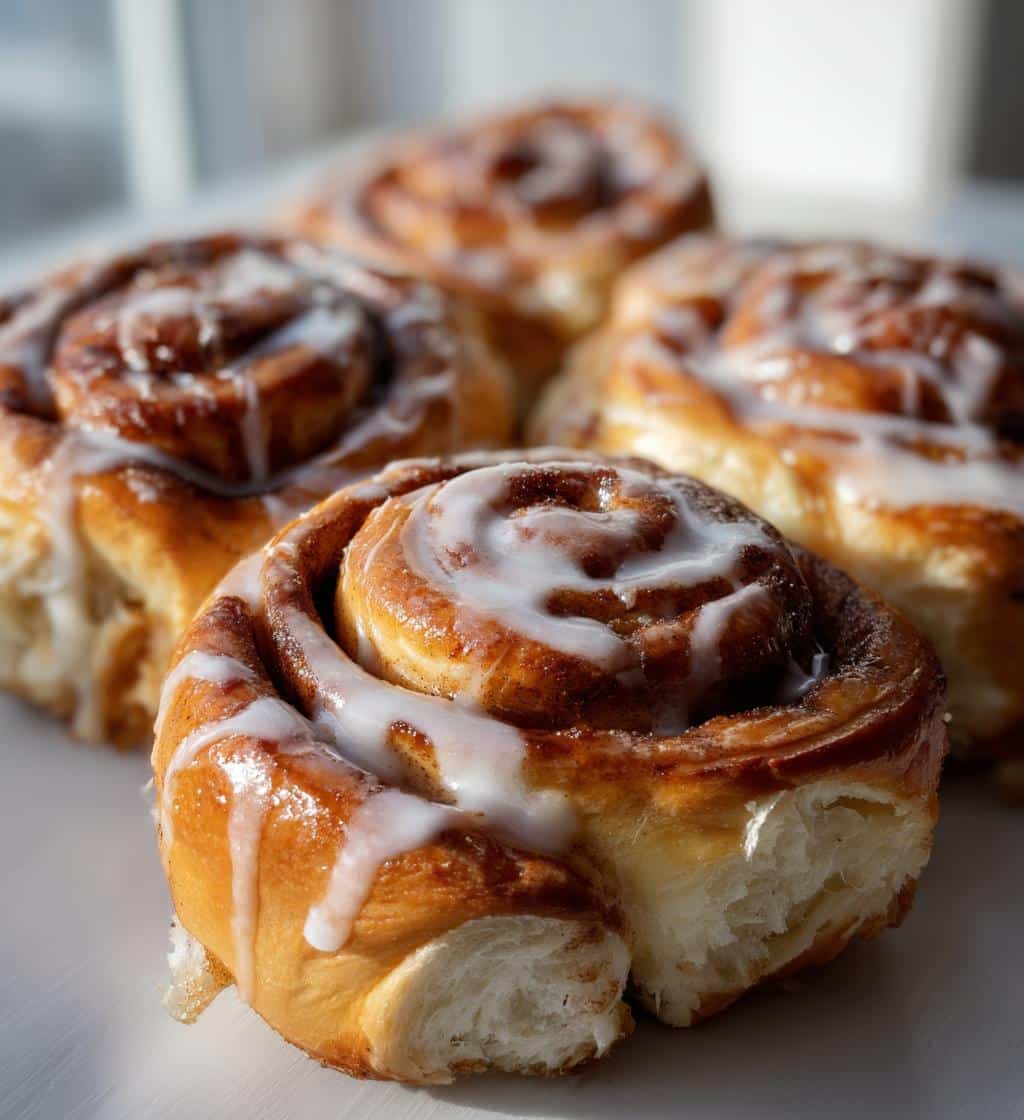
As soon as your cinnamon rolls emerge from the oven, allow them to cool for just a few minutes, about 5-10 minutes. They should still be quite warm when you apply the glaze. Drizzle the sweet vanilla glaze generously over the warm cinnamon rolls. The warmth of the rolls will allow the glaze to melt slightly, spreading beautifully and soaking into the crevices, creating an even more indulgent experience. This ensures that every part of your fluffy cinnamon rolls is coated in a sweet, sticky layer of goodness. Serve immediately for the ultimate warm cinnamon rolls experience.
Serving These Irresistible Homemade Cinnamon Rolls
The moment has arrived to enjoy your efforts! Serving these irresistible homemade cinnamon rolls fresh from the oven, still warm and covered in a luscious sweet vanilla glaze, is an unparalleled joy. Whether you’re sharing them with family, treating guests, or indulging yourself, the presentation and accompanying elements can elevate the experience even further. These warm cinnamon rolls are more than just a dish; they’re a centerpiece of comfort and happiness.
Best Ways to Enjoy Them
For the absolute best experience, enjoy your homemade cinnamon rolls while they are still warm, ideally within minutes of being glazed. The soft, tender dough combined with the melted cinnamon-sugar filling and the slightly runny sweet vanilla glaze is pure bliss. Pair them with a hot cup of coffee, tea, or a cold glass of milk for a truly satisfying breakfast pastry. They also make a fantastic dessert or a special treat for weekend brunch. The warmth makes them incredibly comforting, a perfect way to start any day or enjoy a cozy afternoon.
Adding Extra Flavor with Toppings
While the classic sweet vanilla glaze is perfect, you can add extra flavor with various toppings to customize your warm cinnamon rolls. Consider a sprinkle of toasted pecans or walnuts for a delightful crunch and nutty flavor. A dusting of extra ground cinnamon or even a very light sprinkle of sea salt can enhance the existing flavors. Some people enjoy a drizzle of caramel sauce or a dollop of cream cheese frosting (a slightly richer alternative to the vanilla glaze). For a fruity twist, a side of fresh berries or sliced bananas can add a refreshing contrast to the sweetness. Get creative and make these homemade cinnamon rolls uniquely yours!
Store Leftover Cinnamon Rolls Easily
It’s rare to have leftovers when it comes to delicious homemade cinnamon rolls, but if you do, proper storage is key to maintaining their freshness and taste. You want to keep those fluffy cinnamon rolls soft and moist for as long as possible so you can enjoy them again later. Following these simple storage tips will ensure your cinnamon roll recipe provides enjoyment beyond just the baking day.
Airtight Container for Freshness
To keep your homemade cinnamon rolls fresh, allow them to cool completely after glazing. Once cooled, transfer them to an airtight container. If stacking, you can place a piece of parchment paper between layers to prevent sticking. Store the container at room temperature for up to 2-3 days. For longer storage, you can refrigerate them for up to a week. However, refrigeration can sometimes dry them out slightly, so room temperature is generally preferred for immediate consumption. Properly stored, they’ll retain much of their soft texture and delightful flavor.
Reheating Rolls for Enjoyment
Reheating leftover warm cinnamon rolls is easy and brings them almost back to their fresh-baked glory. For best results, place individual rolls on a microwave-safe plate and heat for 15-30 seconds, or until warmed through. Be careful not to overheat, as this can make them tough. Alternatively, you can place them in an oven preheated to 300°F (150°C) for about 5-10 minutes, covering loosely with foil to prevent excessive browning. This method helps to re-crisp the exterior slightly while keeping the interior soft and gooey. Enjoying a reheated cinnamon roll can be just as satisfying as the first time!
Helpful Tips for Perfect Cinnamon Rolls
Achieving truly perfect cinnamon rolls every time is a rewarding goal, and a few key tips can make all the difference in your cinnamon roll recipe. These insights come from experience and address common pitfalls, helping you consistently bake fluffy cinnamon rolls that are tender, flavorful, and a delight to eat. Even small adjustments can significantly impact the final texture and taste of your homemade cinnamon rolls.
Dough Consistency Matters Greatly
The consistency of your dough is paramount for successful homemade cinnamon rolls. It should be soft, slightly tacky but not sticky, and elastic after kneading. If your dough is too dry, it will be tough and won’t rise properly, leading to dense rolls. If it’s too wet, it will be difficult to handle and might spread too much during baking. Adjust flour amounts gradually during kneading until you achieve the ideal texture. A properly developed gluten network from correct kneading will result in beautifully fluffy cinnamon rolls. Remember, slightly under-flouring is often better than over-flouring for soft results.
Don’t Overbake for Softness
One of the most common mistakes when baking cinnamon rolls is overbaking. While you want them golden brown, baking them for too long will dry them out, making them tough and less enjoyable. Keep a close eye on your warm cinnamon rolls during the last 5-10 minutes of baking. They should be lightly golden on top and cooked through, but still feel tender when gently pressed. If they start browning too quickly, you can loosely tent the pan with aluminum foil. Removing them from the oven at just the right moment is crucial for preserving their delicate, soft texture, making them melt-in-your-mouth delicious.
Nutrition Details for Each Cinnamon Roll
When indulging in the delightful taste of homemade cinnamon rolls, it’s natural to wonder about their nutritional aspects. While they are undoubtedly a treat, understanding the general nutrition details can help you enjoy them mindfully. Keep in mind that specific values can vary significantly based on the exact ingredients used in your cinnamon roll recipe, the size of each roll, and the amount of sweet vanilla glaze applied. These are estimates for a typical breakfast pastry.
Understanding Calories and Sugar
A single homemade cinnamon roll is typically considered a calorie-dense treat, primarily due to the sugar in both the dough and the filling, as well as the sweet vanilla glaze. On average, one medium-sized cinnamon roll can range from approximately 300 to 500 calories. A significant portion of these calories comes from sugars, which contribute to the roll’s sweetness and energy content. While delicious, these warm cinnamon rolls are best enjoyed in moderation as part of a balanced diet. For a deeper look at what constitutes a cinnamon roll, you might explore its Wikipedia page.
Fat and Protein Content
Beyond calories and sugar, cinnamon rolls also contain fats and proteins. The fat content primarily comes from butter in the dough and filling, as well as sometimes cream in the glaze. A typical roll might contain 15-25 grams of fat, with some of it being saturated fat. Protein content is relatively lower, usually ranging from 5-8 grams per roll, primarily from the flour, milk, and eggs used in the dough. While not a significant source of protein, these components contribute to the structure and richness of the fluffy cinnamon rolls. For more delicious recipes and cooking inspiration, follow Carina Recipes on Pinterest and Instagram.