Buttery Brioche Bread is a rich, tender loaf perfect for any occasion. This guide provides a straightforward homemade brioche recipe, walking you through each step of brioche bread baking. Achieve a fluffy brioche texture and sweet flavor, making your baking experience enjoyable and rewarding.
Key Takeaways
- Gather precise ingredients for a rich, tender dough.
- Proper kneading ensures a smooth, elastic texture.
- Two distinct rises are crucial for airy, fluffy brioche.
- Bake at 350°F (175°C) for golden-brown perfection.
- Store properly to maintain freshness and delicate flavor.
Baking brioche brings simple joys. The aroma fills your home. Its delicate crumb melts. Enjoy fresh from the oven. A true bakery delight.
Buttery Brioche Bread: Gather Ingredients
Creating a truly exquisite buttery brioche recipe begins with selecting the finest brioche ingredients. The quality of each component directly impacts the final texture and taste of your homemade brioche. This bread, often described as an enriched dough, relies on a perfect balance of dairy, eggs, and fat to achieve its characteristic richness and delicate crumb. Take the time to measure everything precisely, as this attention to detail is a fundamental brioche tip that ensures a successful brioche bread baking experience from the very start. Whether you’re a seasoned baker or attempting brioche for beginners, meticulous preparation sets the stage for a wonderful loaf.
Flour, Sugar, Salt, and Yeast
For the dry ingredients, fluffy brioche typically benefits from bread flour due to its higher protein content, which develops strong gluten for a light, airy structure. All-purpose flour can also be used, though the texture might be slightly less chewy. Granulated sugar not only adds a delightful sweet brioche flavor but also aids in browning and provides sustenance for the yeast. Salt is crucial for enhancing flavor and regulating yeast activity. When it comes to yeast, either active dry or instant yeast works well. Active dry yeast usually requires proofing in warm liquid before mixing, while instant yeast can often be mixed directly with the dry ingredients. Understanding the role of each ingredient is key to mastering this classic brioche.
Milk, Butter, Eggs, Water
These wet ingredients are what truly make buttery brioche live up to its name. Whole milk adds richness and helps create a tender crumb. Unsalted butter, softened to room temperature, is incorporated for its flavor and contributes to the bread’s melt-in-your-mouth quality. The higher fat content from butter is a hallmark of this bread. Eggs add richness, color, and structure, contributing to the distinctive golden hue and delicate texture. A small amount of water might also be used to adjust the dough’s hydration, ensuring it’s pliable and easy to work with. These elements combine to form the luxurious brioche dough that is a joy to bake.
Combine Wet and Dry Ingredients
Once all your brioche ingredients are prepped and measured, the next crucial step in your homemade brioche journey is to carefully combine them. This stage is where the magic begins, as individual components start to transform into a cohesive brioche dough. Proper mixing ensures that the yeast, sugar, and salt are evenly distributed throughout the flour, setting the foundation for a consistent rise and an impeccably textured brioche loaf. Rushing this step can lead to uneven rising or pockets of unmixed ingredients, so take your time and follow the sequence to achieve the best results for your fluffy brioche.
Mixing Dry Ingredients First
Before introducing any liquids, it’s a good practice to thoroughly whisk together all the dry ingredients. This includes the flour, sugar, salt, and yeast. By doing so, you ensure that the salt doesn’t come into direct, prolonged contact with the yeast, which can inhibit its activity. A well-mixed dry base guarantees that these essential components are evenly dispersed, leading to a balanced flavor profile and consistent fermentation throughout your future sweet brioche. This seemingly small step is a significant brioche tip for achieving uniform deliciousness in every slice.
Adding Wet Ingredients Next
After your dry ingredients are perfectly combined, it’s time to incorporate the wet components. Gradually add the warmed milk, beaten eggs, and any water to the dry mixture. Begin mixing, either with a sturdy spoon or a stand mixer fitted with a dough hook, until a shaggy dough forms. At this stage, it might look a bit messy and sticky, but don’t worry. The goal is to bring everything together until there are no pockets of dry flour remaining. This initial combination is a critical foundation before the intensive kneading begins, which will further develop the gluten structure for your easy brioche.
Kneading Dough for Heavenly Perfection
Kneading is arguably the most vital step in crafting a truly exceptional buttery brioche recipe. It’s during this process that the gluten in the flour develops, creating the elastic network that gives brioche bread its signature chewy yet tender crumb. This is where your brioche dough transforms from a sticky mess into a smooth, pliable mass. Proper kneading ensures that your homemade brioche will have the strength to rise beautifully and hold its structure during baking. Patience and attention to detail here will pay off immensely, leading to a perfectly textured fluffy brioche that is a delight to eat. This stage truly defines the success of your brioche bread baking endeavor.
Achieving Smooth, Elastic Dough
Whether you’re kneading by hand or using a stand mixer with a dough hook, the objective is to develop the gluten sufficiently. For a stand mixer, knead on medium speed for 10-15 minutes, or until the dough is smooth, soft, and elastic. If kneading by hand, this could take 15-20 minutes of vigorous work. A key indicator of readiness is the “windowpane test”: take a small piece of dough and gently stretch it. If you can stretch it thin enough to see light through it without tearing, your gluten is well-developed. This elasticity is crucial for trapping the gases produced during fermentation, resulting in that airy, sweet brioche texture. Don’t be afraid of the initial stickiness; as you knead, the butter will fully incorporate, and the dough will become more manageable, a true brioche tip for success.
First Rise for Brioche Bread
The first rise, also known as bulk fermentation, is a pivotal stage in the brioche bread baking process. It’s during this period that the yeast gets to work, consuming sugars and producing carbon dioxide, which creates the airy pockets that contribute to the fluffy brioche texture. This rise allows the flavors in your brioche dough to develop deeply, enhancing the overall taste of your homemade brioche. Creating the right environment for this rise is crucial; a warm, draft-free spot will encourage steady and even expansion, leading to a beautifully risen brioche loaf. This initial fermentation step is essential for building the foundation of a light and tender bread.
Letting Dough Rise One Hour
After kneading, place your smooth, elastic brioche dough into a lightly greased bowl, turning it once to coat. Cover the bowl tightly with plastic wrap or a clean kitchen towel to prevent it from drying out. Allow the dough to rise in a warm, draft-free place for approximately one hour, or until it has nearly doubled in size. The exact time may vary depending on the ambient temperature of your kitchen. If your kitchen is cooler, the rise might take a bit longer. For optimal results, maintaining a consistent warmth (around 70-75°F or 21-24°C) is an excellent brioche tip. This patient waiting period is crucial for the internal structure and flavor development of your easy brioche.
Punch Down and Shape Loaves
Once your brioche dough has completed its first rise, it’s time for a crucial intermediate step: punching it down. This action gently deflates the dough, redistributing the yeast and gases, which helps to even out the internal structure and prevent excessively large air pockets in the final product. It also gives you a chance to feel the dough’s elasticity and prepare it for shaping into your desired brioche loaf. This step is key to creating a uniform and beautiful homemade brioche. Proper shaping is an art form, ensuring that your bread bakes evenly and looks as delightful as it tastes, ready for the second rise and then baking into a delicious bread.
Preparing Greased Baking Pans
Before you begin shaping, ensure your baking pans are ready. For a classic buttery brioche loaf, standard loaf pans are ideal. You can also use special brioche molds if you prefer smaller, individual rolls or a more traditional fluted brioche shape. Regardless of the pan type, it’s essential to grease them thoroughly with butter or non-stick cooking spray to prevent sticking. A dusting of flour or semolina after greasing can provide an extra layer of protection and contribute to a nice crust. This preparation ensures that your beautifully risen fluffy brioche can be easily removed from the pan after brioche bread baking, preserving its delicate structure and golden-brown exterior.
Second Rise for Perfect Texture
After the shaping process, your brioche dough needs one more period of rest and rising, known as the second rise or proofing. This stage is just as important as the first, as it allows the shaped brioche loaf to regain its volume and develop its final light and airy structure. The second rise contributes significantly to the delicate, melt-in-your-mouth texture that makes buttery brioche so beloved. Skipping or shortening this step can result in a dense, heavy bread, so giving your loaves adequate time to proof is a non-negotiable brioche tip for achieving heavenly perfection in your homemade brioche.
Allowing Loaves Thirty Minutes
Once your brioche dough has been shaped and placed into the prepared baking pans, cover them loosely with plastic wrap or a clean kitchen towel. Allow the loaves to rise in a warm, draft-free spot for approximately thirty minutes. During this time, the loaves should noticeably increase in size, becoming visibly plump and airy. They won’t necessarily double in size like in the first rise, but they should look puffy and feel light to the touch. This shorter rise, often referred to as “proofing,” is the final stage of fermentation before brioche bread baking. It ensures that your fluffy brioche will have an open, tender crumb and a beautiful appearance when it emerges from the oven.
Baking Buttery Brioche Bread
The moment of truth for your homemade brioche has arrived: baking! This final stage is where the heat of the oven transforms your delicate brioche dough into a golden, aromatic loaf. Achieving the perfect bake involves precise temperature control and careful monitoring to ensure a beautiful crust and a thoroughly cooked interior. The rich brioche ingredients, particularly the butter and eggs, contribute to a wonderfully golden-brown exterior that is both visually appealing and adds to the bread’s delightful flavor. Following these steps carefully will culminate in a truly irresistible buttery brioche bread, a testament to your brioche bread baking efforts.
Set Oven to 350°F (175°C)
Preheat your oven to 350°F (175°C). It’s crucial that the oven reaches the target temperature before you place your brioche loaves inside. A properly preheated oven ensures that the bread begins to bake immediately and rises effectively, creating a fluffy brioche texture. Position an oven rack in the center of the oven for even heat distribution. You might consider adding an egg wash (a simple whisked egg with a splash of milk or water) to the top of your loaves just before baking; this will contribute to a gorgeous, shiny, and deeply golden crust, enhancing the visual appeal of your sweet brioche.
Bake for 25-30 Minutes
Carefully transfer your proofed brioche loaf pans to the preheated oven. Bake for 25-30 minutes, or until the bread is deeply golden brown on top and sounds hollow when tapped on the bottom. If you have a kitchen thermometer, the internal temperature of a fully baked brioche should reach around 190-200°F (88-93°C). Keep an eye on the loaves during the last few minutes of baking to prevent over-browning. If they start to get too dark too quickly, you can loosely tent them with aluminum foil. This methodical approach to brioche bread baking ensures your easy brioche is cooked perfectly throughout, offering a delightful aroma and taste.
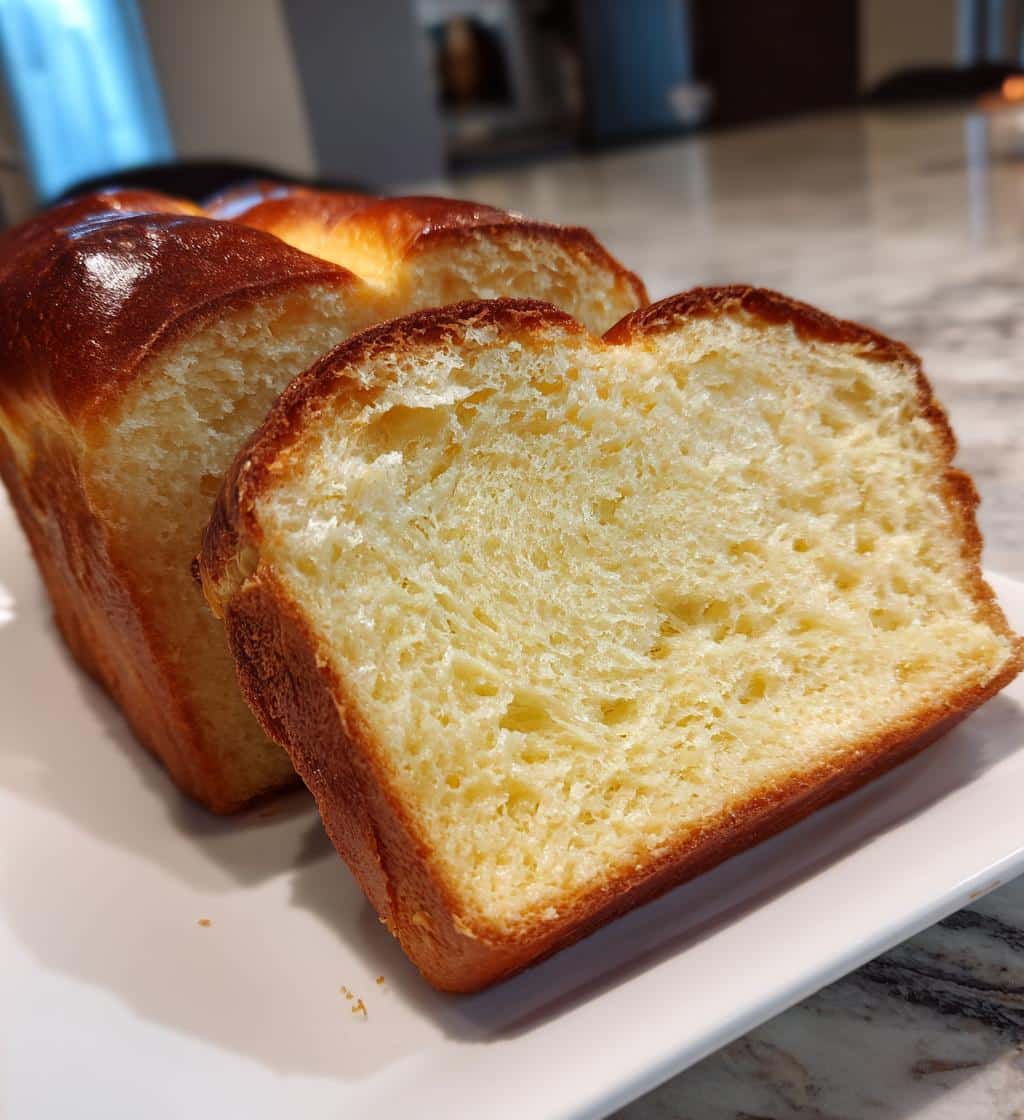
Cooling and Slicing Brioche Bread
The baking process may be complete, but the journey to perfect buttery brioche bread isn’t quite over. The cooling stage is just as important as baking itself, playing a critical role in developing the final texture and flavor of your homemade brioche. Resisting the urge to slice into that warm, aromatic brioche loaf immediately can be tough, but patience here ensures the best eating experience. Proper cooling prevents the bread from becoming gummy and allows the internal structure to set, making for a truly fluffy brioche when you finally cut into it. This final step is an essential brioche tip for enjoying your freshly baked creation.
Let It Cool Completely
Once your brioche bread emerges from the oven, immediately remove it from the baking pan and transfer it to a wire rack. This allows air to circulate around all sides of the loaf, preventing condensation and a soggy bottom. While the aroma of sweet brioche filling your kitchen is incredibly tempting, it’s vital to let the bread cool completely—ideally for at least an hour or two, if not longer—before slicing. Cutting into warm bread can cause the internal moisture to turn to steam and condense, leading to a dense, gummy texture rather than the light, airy crumb you worked so hard to achieve. For the best fresh brioche experience, allow it to cool entirely.
Storing Your Buttery Brioche Bread
After all your effort in brioche bread baking, you’ll want to ensure your exquisite buttery brioche bread stays fresh and delicious for as long as possible. Proper brioche storage is crucial for preserving its delicate texture and rich flavor. Unlike some rustic breads, brioche’s high fat and egg content means it can dry out faster if not stored correctly. Implementing the right storage techniques will allow you to enjoy your homemade brioche for days, whether it’s for breakfast brioche or a sweet treat. These brioche tips will help maintain that desired fluffy brioche quality.
Use Airtight Container
To keep your fresh brioche at its best, store it at room temperature in an airtight container or a sealed plastic bag. This method prevents the bread from drying out and maintains its soft crumb. Avoid refrigerating brioche, as the cold temperature can actually accelerate staling, making the bread firm and dry. If you plan to enjoy your easy brioche over a few days, an airtight container on the counter is your best bet for preserving its quality. For longer storage, consider freezing, which is an excellent option for maintaining freshness without compromising texture.
Store up to Three Days
When stored properly in an airtight container at room temperature, your buttery brioche recipe will typically remain fresh and delicious for up to three days. Beyond this period, you might notice a slight change in texture, though it will still be perfectly edible. For longer preservation, brioche storage in the freezer is ideal. Wrap individual slices or the entire brioche loaf tightly in plastic wrap, then place it in a freezer-safe bag or container. Frozen brioche can last for up to one month. Thaw at room temperature or gently warm in the oven before serving brioche to restore its tenderness.
Serving Suggestions for Brioche Bread
The beauty of buttery brioche bread lies in its incredible versatility. Its rich, slightly sweet flavor and tender crumb make it suitable for a wide array of serving brioche options, from simple breakfasts to elegant desserts. Whether you’ve followed an easy brioche recipe or a more complex one, the resulting loaf is a culinary canvas. Think beyond just toast; this homemade brioche can elevate many dishes. For instance, it can make a delightful base for a Hawaiian Roll French Toast or even complement other sweet treats like Peanut Butter Brownie Swirl Cookies.
Best Fresh or Toasted
Enjoying your fresh brioche bread is often best when it’s simply sliced and served. Its inherent richness and delicate sweetness shine through. However, toasting can bring out a new dimension of flavor and texture, creating a delightful crisp exterior while keeping the interior tender. A slice of lightly toasted brioche makes a fantastic accompaniment to coffee or tea. It also serves as an excellent foundation for both sweet and savory applications. Consider it for gourmet sandwiches, as a base for elegant canapés, or simply with a smear of jam or honey. The options for serving brioche are truly endless.
For Richer Flavor, Add Butter
While buttery brioche bread is already incredibly rich due to its high butter content, adding a thin spread of good quality butter can surprisingly enhance its flavor even further. The additional butter melts into the warm, fluffy brioche, deepening the indulgent experience. For a truly decadent treat, consider a compound butter infused with a hint of honey or cinnamon. Beyond simple butter, brioche also pairs wonderfully with fruit preserves, chocolate spreads, or even savory fillings like ham and cheese, proving its versatility as a classic brioche base for any meal. Don’t forget to check out our Pinterest and Instagram for more recipe ideas, including other rich dishes like Creamy Baked Mac and Cheese.
Nutrition Facts for Buttery Brioche
Understanding the nutrition facts for your buttery brioche is helpful, especially given its reputation as an enriched dough. While precise values can vary based on the specific homemade brioche recipe used and portion sizes, brioche is generally known for being higher in calories, fat, and sugar compared to more traditional, leaner breads. This is a direct result of the generous inclusion of butter, eggs, and sugar, which contribute to its distinctive taste and texture. Always consider these factors when incorporating breakfast brioche into your diet, especially if you are monitoring specific dietary intakes.
Per Slice: Calories, Fat, Protein
On average, a single slice of buttery brioche bread can contain a significant number of calories, primarily from its fat content. The fat is largely contributed by the butter and egg yolks, giving the bread its signature moistness and richness. Protein content, while present from the flour and eggs, is typically not the dominant macronutrient. These values highlight why brioche is often considered an indulgent treat rather than an everyday staple, a key characteristic of classic brioche.
Sugar, Sodium, Carbohydrates
The sweet brioche flavor comes from its sugar content, which also aids in yeast activity and crust browning. Sodium is present from the salt, which is vital for flavor balance and yeast control. Carbohydrates form the bulk of the bread’s weight, primarily from the flour. While brioche is a delightful food, its nutritional profile reflects its rich ingredient list, making it a delicious option for occasional enjoyment. This brioche loaf offers a truly satisfying experience for those who appreciate fine baked goods.
Common Questions About Brioche Bread
As with any specialty bake, there are often a few common questions that arise when preparing buttery brioche bread. From tweaking the brioche recipe to understanding brioche storage, knowing the answers can help ensure your homemade brioche is always a success. These brioche tips are designed to help you troubleshoot and personalize your brioche bread baking experience, making it even more enjoyable. Addressing these queries ensures you get the most out of your easy brioche journey.
Can I Add More Butter?
While the standard buttery brioche recipe already calls for a generous amount of butter, you can technically increase it further for an even richer enriched dough. However, be cautious: adding too much butter can make the dough very sticky and difficult to handle during kneading and shaping. It can also result in a denser crumb rather than the desired fluffy brioche, as the butter might weigh down the gluten structure. If you wish to experiment, increase butter gradually and be prepared for a slightly different texture and longer kneading time to incorporate it fully.
How Long Does Brioche Keep?
When stored correctly in an airtight container at room temperature, your fresh brioche bread will typically remain delicious for 2-3 days. Beyond that, its texture might start to change, becoming firmer. For longer brioche storage, it freezes exceptionally well. Wrap the brioche loaf or individual slices tightly in plastic wrap, then place in a freezer-safe bag for up to a month. Thaw at room temperature and gently warm in an oven or toaster to revive its tender crumb. This ensures you can enjoy your delicious sweet brioche whenever a craving strikes.