Banoffee Pie is a beloved dessert, combining sweet bananas, rich toffee, and a fluffy cream topping on a crunchy biscuit base. This classic British recipe is surprisingly simple to make at home. It offers a delightful balance of textures and flavors. Prepare to impress everyone with this fantastic treat.
Key Takeaways
- Banoffee Pie is a modern British invention from the 1970s.
- It’s incredibly quick to assemble, making it ideal for busy cooks.
- Homemade toffee (dulce de leche) is created by boiling a can of condensed milk.
- Chilling the pie thoroughly is crucial for setting and flavor development.
- Utilize ripe bananas and fresh cream for the best taste.
This classic dessert brings joy. Layers of rich toffee delight. Fresh bananas add sweetness. Cream provides light balance. A perfect treat always.
A Sweet History of Banoffee Pie
Banoffee Pie, a truly iconic dessert, holds a special place in the hearts of sweet-toothed individuals worldwide. While it feels like a timeless classic, its origins are surprisingly recent, tracing back to a quaint restaurant in England. This delicious concoction has charmed its way into countless kitchens, becoming a staple for celebrations and simple family gatherings. Its appeal lies in its straightforward yet decadent combination of flavors and textures, making it a dessert that truly stands out. Understanding its heritage not only provides context but also adds to the charm of preparing this delightful treat yourself.
British Dessert Origins
The story of Banoffee Pie begins in 1971 at The Hungry Monk Restaurant in Jevington, East Sussex, England. The brainchild of owner Nigel Mackenzie and chef Ian Dowding, it was initially a variation of an American recipe called “Blum’s Coffee Toffee Pie.” Dissatisfied with the original, which they found “too sickly sweet,” they experimented with various ingredients, eventually landing on the combination of rich toffee made from condensed milk, fresh bananas, coffee-flavored cream, and a buttery biscuit base. The coffee was later dropped, simplifying the name and the flavor profile to the beloved version we know today. The pie quickly became a sensation, with customers demanding the recipe. Its popularity soared, leading to its inclusion in many cookbooks and menus across the UK and beyond, cementing its status as a proud British contribution to the world of desserts. For another delightful British-inspired dessert, you might enjoy trying a Quick Italian Cream Cake, offering a different but equally rich experience.
Why Bananas and Toffee?
The marriage of bananas and toffee might seem unconventional to some, but it’s a pairing that creates a harmonious symphony of flavors. Toffee, with its deep, caramelized sweetness, provides a rich, almost buttery foundation. Bananas, especially when perfectly ripe, introduce a natural, mellow sweetness and a creamy texture that beautifully contrasts with the dense toffee. Beyond taste, bananas offer a freshness that cuts through the richness of the other components, preventing the dessert from becoming overly cloying. This combination isn’t just about flavor; it’s also about texture. The soft, yielding bananas and smooth toffee sit atop a crisp, buttery biscuit base, all crowned with light, airy whipped cream. This interplay of textures—crunchy, creamy, and smooth—is what makes each bite of Banoffee Pie so utterly satisfying and a truly classic dessert. It’s a testament to simple ingredients coming together to create something extraordinary.
Why You’ll Love Banoffee Pie
Banoffee Pie is more than just a dessert; it’s an experience. Its widespread appeal isn’t accidental; it stems from a combination of factors that make it a favorite for both home cooks and those enjoying it at a special occasion. From its straightforward preparation to its universal deliciousness, this pie ticks all the right boxes for a truly beloved treat. Whether you are a seasoned baker or a novice in the kitchen, the charm of Banoffee Pie is undeniable, promising a delightful outcome with minimal fuss. It’s the kind of dessert that encourages creativity in presentation while delivering consistent satisfaction in every slice.
Quick to Assemble
One of the most compelling reasons to fall in love with Banoffee Pie is its incredible ease and speed of assembly. Unlike many traditional pies that require intricate pastry work or extensive baking times, Banoffee Pie is largely a no-bake affair (aside from the quick chilling of the base, and the boiling of the condensed milk which can be done ahead). The base typically uses crushed digestive biscuits mixed with melted butter, pressed into a dish and chilled. The toffee, often made by boiling a can of sweetened condensed milk, can also be prepared in advance. Once these components are ready, it’s simply a matter of layering: base, toffee, sliced bananas, and whipped cream. This straightforward process means you can create a show-stopping dessert without spending hours in the kitchen, making it perfect for last-minute gatherings or when you want something impressive without the stress. It truly embodies the spirit of an “easy dessert” that delivers on taste and presentation.
Crowd-Pleasing Dessert
Beyond its simple preparation, Banoffee Pie holds a powerful secret weapon: its universal appeal. The combination of sweet toffee, fresh bananas, and fluffy cream is a flavor profile that resonates with almost everyone. It’s not overly adventurous, but rather a comforting and familiar blend that appeals to a wide range of palates, from children to adults. The sweetness is balanced by the fresh fruit, and the textures—from the crunchy base to the smooth toffee and soft cream—offer a delightful sensory experience. This makes Banoffee Pie an ideal choice for any gathering, be it a casual family dinner, a birthday party, or a festive holiday meal. You can be confident that serving this pie will result in satisfied smiles and requests for seconds. It truly is a crowd-pleasing dessert that leaves a lasting impression.
Ingredients for Banoffee Pie
Creating a truly magnificent Banoffee Pie doesn’t require an extensive list of exotic ingredients. In fact, one of its charms lies in the simplicity of its components, which are readily available in most grocery stores. However, while the ingredients are simple, their quality and freshness play a pivotal role in the final taste and texture of your pie. Paying attention to these details can elevate your homemade Banoffee Pie from good to extraordinary, ensuring every bite is a delightful experience. Let’s delve into what makes the ingredient list so manageable yet impactful.
Simple Pantry Staples
The beauty of Banoffee Pie lies in its reliance on common pantry items. You’ll need digestive biscuits (or graham crackers if digestives are unavailable) for the base, melted butter to bind them, and a can of sweetened condensed milk to transform into the rich toffee layer. These are items many households already have, or can easily acquire. The remaining ingredients are fresh produce and dairy: ripe bananas and fresh heavy cream. The accessibility of these ingredients means you can whip up a Banoffee Pie almost anytime the craving strikes, without needing a special shopping trip. This makes it a fantastic go-to recipe for spontaneous dessert urges or unexpected guests, solidifying its place as a practical and delicious choice for any occasion. Consider adding a homemade Snickerdoodle Cobbler to your repertoire, also relying on simple ingredients.
Freshness Matters Most
While the ingredients for Banoffee Pie are simple, their freshness is paramount to achieving the best results. For instance, using good quality butter for the biscuit base will ensure a richer flavor and a more stable crust. The sweetened condensed milk, while processed, should be from a reputable brand to guarantee a consistent and delicious toffee. Most crucially, the bananas must be perfectly ripe – firm but with a few brown spots, indicating their peak sweetness. Overripe bananas can become mushy, while underripe ones lack the essential sweetness. Finally, the heavy cream should be cold and fresh, whipping up into light, airy peaks that provide a beautiful contrast to the denser toffee and banana layers. The difference between a good pie and an amazing pie often comes down to the quality and freshness of these straightforward components. For more dessert inspirations, check out our Desserts category.
Easy Steps to Make Banoffee Pie
Making Banoffee Pie is a rewarding culinary journey that combines simple steps with spectacular results. The process is designed to be approachable for cooks of all skill levels, ensuring that a decadent dessert is always within reach. By breaking down the creation into manageable stages, you’ll find that assembling this sweet treat is not only straightforward but also enjoyable. Each layer builds upon the last, contributing to the harmonious balance of flavors and textures that defines this beloved British classic. Follow these guidelines, and you’ll soon be enjoying a slice of homemade perfection.
Easy Process Summary
The creation of Banoffee Pie can be distilled into a few key stages. First, you’ll prepare the biscuit base by crushing digestive biscuits and mixing them with melted butter, then pressing this mixture into a pie dish and chilling it until firm. Next, the magical toffee layer is made by boiling an unopened can of sweetened condensed milk for several hours until it transforms into a thick, golden caramel – this requires careful attention to safety. Once the toffee has cooled, it’s spread over the chilled biscuit base. The final layers involve arranging freshly sliced ripe bananas over the toffee, and then generously topping the entire pie with freshly whipped heavy cream. A final sprinkle of cocoa powder or chocolate shavings adds an elegant touch. The pie then needs to be thoroughly chilled for several hours, ideally overnight, to allow all the layers to set properly and the flavors to meld beautifully. This simple sequence ensures a perfectly structured and delicious Banoffee Pie every time.
Crafting the Perfect Biscuit Base
A successful Banoffee Pie begins with a perfectly crafted biscuit base. This foundational layer provides the essential crunch and buttery richness that complements the soft, sweet layers above. Achieving the right consistency and firmness in your base is crucial, as it holds the entire pie together and contributes significantly to the overall textural experience. While seemingly simple, a few key techniques will ensure your biscuit base is not just good, but truly outstanding, setting the stage for a dessert that is both structurally sound and incredibly delicious.
Crushing Digestives Evenly
The first step to a flawless base is ensuring your digestive biscuits (or graham crackers) are crushed evenly. The goal is to achieve fine crumbs, akin to coarse sand, without large chunks. You can do this using a food processor for speed and uniformity; pulse the biscuits until the desired consistency is reached. Alternatively, place the biscuits in a large zip-top bag, seal it, and crush them with a rolling pin or the bottom of a heavy pan. This method can be therapeutic and also works well. Evenly crushed biscuits ensure that when mixed with melted butter, they bind together consistently, preventing crumbly patches or overly dense areas in your finished crust. This uniformity is key for both structural integrity and a pleasant eating experience. Remember, consistency here leads to perfection later.
Pressing Firmly into Dish
Once your finely crushed biscuits are thoroughly mixed with melted butter, it’s time to press them into your pie dish. This step requires a bit of attention and technique. Pour the mixture into your chosen dish (a loose-bottomed flan tin or springform pan works wonderfully for easy removal). Use the back of a spoon, your fingertips, or a flat-bottomed glass to press the crumb mixture firmly and evenly across the bottom and up the sides of the dish. Apply consistent pressure to compact the crumbs, creating a solid, dense crust. Pay particular attention to the edges and corners to ensure there are no weak spots. A well-pressed base will hold its shape beautifully when sliced and prevent the filling from seeping underneath. After pressing, refrigerate the base for at least 30 minutes to allow the butter to firm up, setting the crust. This chilling time is non-negotiable for a sturdy foundation.
How to Make Golden Toffee
The heart and soul of Banoffee Pie is its luscious, golden toffee layer. This isn’t just any caramel; it’s a rich, deep-flavored concoction that provides the quintessential sweetness and creamy texture that defines the dessert. While there are shortcuts, the traditional method of making this toffee (often referred to as dulce de leche) is surprisingly simple and yields the most authentic and satisfying results. It requires patience and a bit of care, but the payoff is a truly sublime layer that perfectly complements the bananas and cream. Let’s delve into how to achieve this delicious transformation.
Canned Condensed Milk Method
The classic method for creating the Banoffee Pie toffee involves a simple, yet miraculous, transformation of sweetened condensed milk. You will need unopened cans of sweetened condensed milk. It’s crucial to use *sweetened* condensed milk, not evaporated milk, as the sugar content is necessary for the caramelization process. The magic happens when these cans are gently simmered in water. The heat causes the sugars and proteins in the milk to undergo the Maillard reaction, slowly turning the pale, liquid milk into a thick, golden-brown, spreadable toffee. This method requires minimal effort but a significant amount of time, allowing for a deep, complex flavor to develop. It’s an ingenious way to create a rich toffee that forms the foundational taste of your Banoffee Pie, making every bite a delight. For a similar rich flavor profile, you might enjoy making Butterfinger Balls, another simple yet decadent treat.
Boiling Safely for Two Hours
Boiling cans of condensed milk to make toffee (dulce de leche) is an effective method, but it absolutely requires adherence to safety precautions. Place the unopened cans in a large pot, ensuring they are fully submerged in water by at least an inch. Bring the water to a gentle simmer, then reduce the heat to maintain a low boil. The key is to keep the cans fully covered with water throughout the entire cooking process, which typically lasts around two to three hours. Check the water level every 30-45 minutes and top it up with hot water as needed. Never let the cans boil dry, as this can cause them to explode due to pressure buildup, which is extremely dangerous. After boiling, carefully remove the cans from the hot water with tongs and allow them to cool completely at room temperature before opening. This cooling process is vital for safety, as opening a hot, pressurized can is hazardous. Once cool, you’ll be rewarded with perfectly caramelized, rich toffee, ready for your pie. For more on the science of this transformation, you can refer to the Wikipedia page on condensed milk.
Assembling Your Banoffee Pie Dessert
Once your biscuit base is chilled and your golden toffee has cooled, the exciting part begins: assembling your Banoffee Pie. This stage is where all the prepared components come together to form the beautiful, layered dessert. The process is straightforward, focusing on careful layering to ensure each element is distributed evenly, contributing to the perfect balance of flavors and textures in every slice. Precision in assembly ensures that your finished pie not only tastes incredible but also looks like a professional creation, ready to impress anyone lucky enough to receive a slice.
Layering Toffee Smoothly
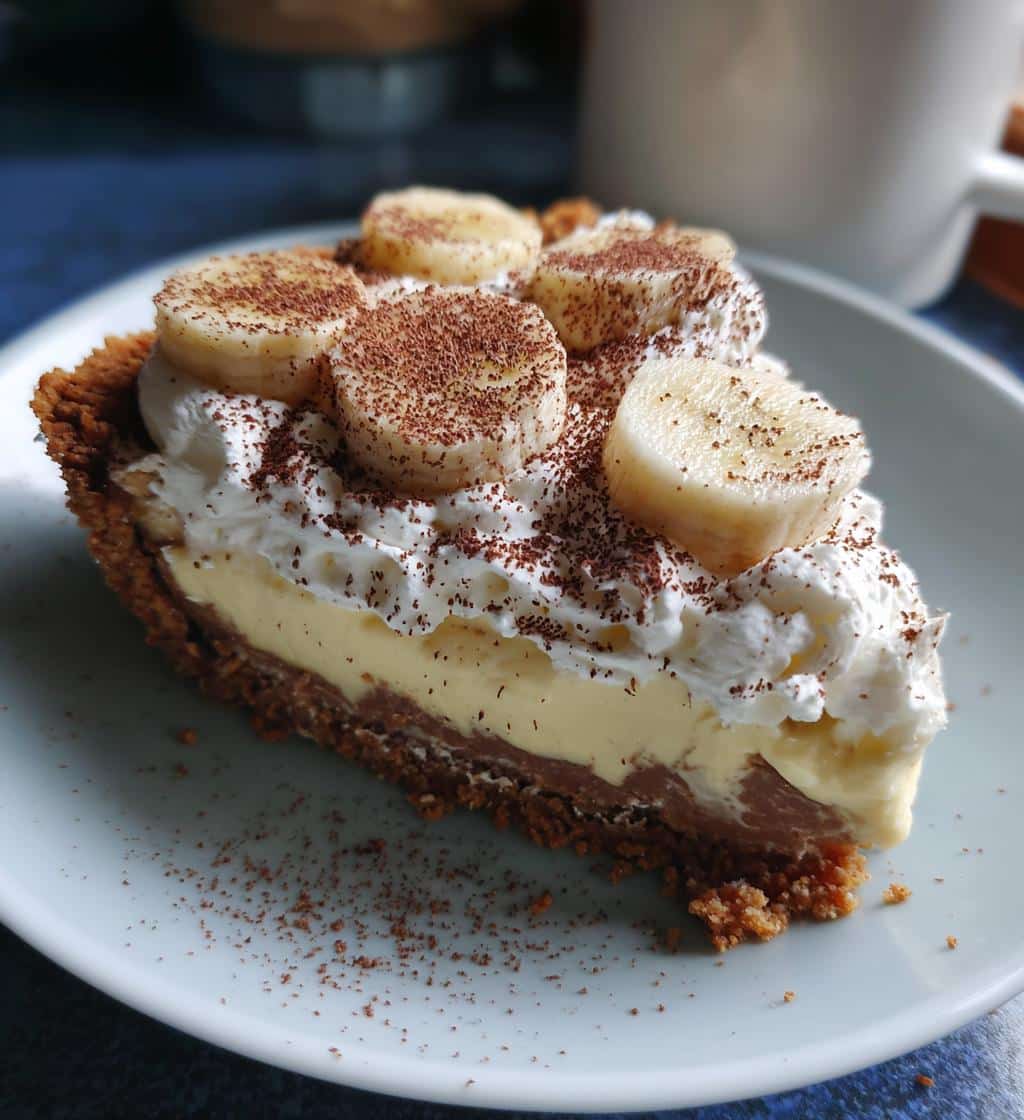
With your chilled biscuit base firmly set, the next step is to spread the glorious, homemade toffee. Carefully open your cooled can of dulce de leche. The consistency should be thick and spreadable. Spoon the toffee generously over the biscuit base. Using the back of a spoon or an offset spatula, gently spread the toffee evenly across the entire surface of the crust. Work slowly and methodically to create a smooth, consistent layer that extends to the edges. Avoid pressing too hard, as you don’t want to break up the biscuit base. This smooth layer is crucial for providing a uniform sweetness and richness throughout the pie, ensuring a harmonious bite with every forkful. The visual appeal of a perfectly smooth toffee layer also adds to the overall elegance of the dessert.
Sliced Banana Placement
The fresh banana layer is pivotal, offering a natural sweetness and a creamy contrast to the rich toffee. Choose ripe, but still firm, bananas. Peel and slice them into even rounds, about 1/4 to 1/2 inch thick. Immediately arrange the banana slices over the smooth toffee layer. You can create a decorative pattern, such as overlapping concentric circles, or simply cover the entire surface evenly. Speed is important here to minimize exposure of the bananas to air, which can cause them to brown. Some people like to toss their banana slices in a tiny bit of lemon juice to prevent browning, though for immediate consumption, it’s often unnecessary. Ensure the bananas cover the toffee completely, as they are a key component of the “ban” in Banoffee. This layer adds a fruity freshness that cuts through the richness of the toffee and cream, making the pie wonderfully balanced.
Whipped Cream Topping
The final crowning glory of your Banoffee Pie is a generous layer of freshly whipped cream. For the best results, use very cold heavy cream (at least 35% fat content). Whip it with a stand mixer or hand mixer until soft peaks form, then add a touch of powdered sugar (confectioners’ sugar) and a splash of vanilla extract for extra flavor, whipping until firm peaks are achieved. Be careful not to over-whip, as it can turn grainy. Once whipped, spoon the airy cream over the banana layer. You can spread it smoothly with a spatula for a clean finish, or create beautiful swirls and peaks using an offset spatula or a piping bag fitted with a star tip for a more elegant presentation. This light and fluffy cream provides a delightful textural contrast to the dense toffee and crisp base, completing the iconic Banoffee Pie experience. It’s the perfect, cloud-like finish to your sweet creation.
Serving Your Banoffee Pie
After all the effort of crafting your Banoffee Pie, the moment of truth arrives: serving. This final stage is just as important as the preparation, as it ensures the pie is presented at its best, both in terms of taste and appearance. Proper chilling and a thoughtful garnish can elevate the entire dessert, transforming it from a simple sweet treat into a truly memorable culinary experience. Pay attention to these details, and your Banoffee Pie will undoubtedly be the star of your dessert table, inviting everyone to enjoy a perfect slice.
The Importance of Chilling
Chilling is not merely an optional step; it is absolutely crucial for Banoffee Pie. After assembling, the pie needs to be refrigerated for at least 4-6 hours, or ideally, overnight. This prolonged chilling period serves several vital purposes. Firstly, it allows the biscuit base to firm up completely, making it easier to slice without crumbling. Secondly, the toffee layer, which might still be slightly soft after cooling, will set more firmly, achieving its ideal dense and chewy texture. Most importantly, chilling allows all the distinct flavors – the rich toffee, fresh banana, and light cream – to meld and harmonize, creating a more cohesive and delicious taste profile. A well-chilled pie also holds its shape beautifully when cut, ensuring clean, appealing slices for your guests. Patience in chilling truly pays off in the final enjoyment of this dessert.
Dusting with Cocoa Powder
To add a final touch of elegance and a subtle hint of bitterness that balances the pie’s sweetness, a dusting of cocoa powder is traditionally applied just before serving. Use a fine-mesh sieve or a small strainer to lightly dust unsweetened cocoa powder over the whipped cream topping. This creates a visually appealing contrast and introduces an extra layer of flavor complexity. Alternatively, you can grate a little dark chocolate over the top for a more indulgent finish. Some even prefer a sprinkle of finely ground coffee for a nod to the pie’s original iteration. Whichever you choose, this simple garnish elevates the presentation and provides a lovely aroma, signaling that a delicious treat awaits. It’s the perfect final flourish to your homemade Banoffee Pie.
Tips for the Best Banoffee Pie
Creating a truly exceptional Banoffee Pie involves more than just following the recipe steps; it’s about understanding the nuances that elevate a good pie to a great one. These expert tips focus on ingredient selection and preparation techniques that can make a significant difference in the final taste, texture, and overall enjoyment of your dessert. By paying attention to these details, you can ensure that every Banoffee Pie you make is a masterpiece, impressing your family and friends with its deliciousness and perfect consistency.
Choosing Ripe Bananas
The quality of your bananas dramatically impacts the flavor of your Banoffee Pie. For optimal sweetness and texture, choose bananas that are perfectly ripe. Look for bananas with a vibrant yellow skin, speckled with a few small brown spots. These spots indicate that the starches have converted to sugars, resulting in a naturally sweet and aromatic fruit. Avoid green, underripe bananas, as they will lack sweetness and have a firm, starchy texture that won’t meld as well with the other soft layers. Conversely, overly mushy, heavily browned bananas might be too soft and overwhelming in flavor. The ideal banana is firm enough to slice neatly but soft enough to be deliciously tender. They bring a fresh, tropical counterpoint to the rich toffee, balancing the sweetness perfectly. This careful selection ensures your Banoffee Pie reaches its full flavor potential.
Pre-chill Your Pie Dish
A simple yet effective trick for ensuring a pristine Banoffee Pie base is to pre-chill your pie dish before pressing in the biscuit mixture. Place your empty pie dish in the refrigerator for at least 15-20 minutes, or even in the freezer for 5-10 minutes, before you add the buttered crumbs. When you press the warm butter-biscuit mixture into a cold dish, the butter will begin to firm up almost immediately upon contact. This helps the crumbs adhere better to the dish, creates a more stable and less crumbly crust, and prevents the butter from melting too much and making the base greasy. A well-chilled dish contributes to a firmer, more structurally sound base, which is crucial for a pie that holds together beautifully when sliced. This small step makes a big difference in the integrity of your crust.
Storing Banoffee Pie Leftovers
While Banoffee Pie is often devoured quickly, it’s always helpful to know how to properly store any leftovers to maintain its freshness and deliciousness. Proper storage ensures that each subsequent slice is just as enjoyable as the first, preserving the delicate balance of flavors and textures. Understanding the best practices for refrigeration and knowing the typical shelf life will help you get the most out of your homemade creation, allowing you to savor it for a few more days without compromising on quality.
Refrigeration Guidelines
Due to its fresh cream and banana components, Banoffee Pie must be stored in the refrigerator. After serving, any remaining pie should be covered tightly with plastic wrap or aluminum foil. Ensure the covering is snug to prevent air exposure, which can cause the bananas to oxidize and brown, and the cream to absorb other odors from the fridge. If you used a springform pan or a dish with a lid, these are ideal for storage. Place the covered pie in the coldest part of your refrigerator. While the pie is generally stable once chilled, keeping it cool is paramount to food safety and maintaining its delightful texture. Avoid leaving the pie at room temperature for extended periods, especially in warm environments, as this can lead to spoilage of the dairy and fruit components. Proper refrigeration is the key to enjoying your Banoffee Pie over several days.
How Long Does It Last?
When properly refrigerated, Banoffee Pie is best consumed within 2-3 days. The primary factor limiting its shelf life is the fresh bananas. Bananas, even when covered, will naturally begin to soften and brown over time due to oxidation and enzymatic reactions. While still edible beyond three days, their texture and appearance will degrade, and they might become overly mushy or discolored. The whipped cream also tends to lose its peak freshness and firmness after a couple of days. The biscuit base and toffee layer, however, remain quite stable. For the absolute best flavor and visual appeal, aim to enjoy your Banoffee Pie within 48 hours of assembly. Freezing Banoffee Pie is generally not recommended due to the delicate nature of the bananas and cream, which can become watery and lose texture upon thawing. Stick to refrigeration for optimal enjoyment.
Banoffee Pie Nutrition Facts
Understanding the nutritional profile of your favorite desserts can be helpful for those managing dietary intake. Banoffee Pie, a truly indulgent treat, is packed with delicious ingredients that contribute to its rich flavor and energy content. While it’s certainly a dessert to be enjoyed in moderation, knowing its basic nutritional breakdown can help you make informed choices. This section provides a general overview of what a typical slice might contain, allowing you to appreciate your sweet treat within a balanced diet.
Calories Per Slice
As a decadent dessert, Banoffee Pie is naturally calorie-dense. The exact calorie count per slice can vary significantly based on the portion size, the specific ingredients used (e.g., full-fat vs. reduced-fat cream, amount of sugar in the toffee), and the thickness of each layer. However, a typical generous slice of Banoffee Pie can range anywhere from 400 to 600 calories. This comes primarily from the high fat content in the butter, condensed milk, and heavy cream, as well as the sugars present in the toffee and biscuits. While a delicious indulgence, it’s important to consider these figures if you are monitoring your caloric intake. Enjoying Banoffee Pie as an occasional treat rather than a regular staple is key to balancing its rich profile with a healthy lifestyle. This dessert is perfect for special occasions, perhaps after a lighter Easy Butter Chicken recipe.
Key Nutritional Information
Beyond calories, Banoffee Pie provides other nutritional elements. It is generally high in total fats, including saturated fats, due to the butter, condensed milk, and heavy cream. The toffee and biscuit base also contribute a significant amount of carbohydrates, primarily from sugars. While bananas offer some dietary fiber, potassium, and vitamins (like Vitamin C and B6), their contribution to the overall nutritional profile of the entire pie is relatively small compared to the other components. The dairy products (condensed milk and cream) do offer some calcium. Given its rich composition, Banoffee Pie should be viewed as an occasional treat rather than a primary source of nutrients. For those mindful of their diet, enjoying smaller portions or sharing a slice can be a good way to savor the flavors without over-indulging. For more recipe ideas and nutritional insights, visit our Instagram page.
More Ways to Enjoy Banoffee Pie
While the classic Banoffee Pie is a masterpiece in itself, its delicious combination of flavors also lends itself beautifully to creative interpretations and alternative serving methods. If you’re looking to put a fresh spin on this beloved dessert or adapt it for different occasions, there are numerous ways to innovate without straying too far from its delightful essence. These variations can make the pie even more personalized or suitable for a wider range of settings, adding an element of surprise and creativity to a traditional favorite.
Creative Topping Ideas
Beyond the traditional dusting of cocoa powder, Banoffee Pie offers a fantastic canvas for creative topping ideas. Consider drizzling a contrasting sauce, such as a dark chocolate ganache or a salted caramel sauce, over the whipped cream for an extra layer of decadence. To add texture and crunch, sprinkle toasted nuts like pecans or walnuts, or even crushed candy bars (like a Heath bar or Reese’s Peanut Butter Cups, perhaps reminiscing a peanut butter dessert). For an even fruitier twist, add other berries like raspberries or blueberries alongside the bananas, or even a sprinkle of toasted coconut flakes for a tropical vibe. A grating of orange zest can also provide a bright, zesty counterpoint to the richness. These additions not only enhance the visual appeal but also introduce new flavor dimensions, allowing you to customize your Banoffee Pie to suit individual preferences or seasonal themes.
Individual Serving Options
While a large Banoffee Pie is perfect for sharing, sometimes individual portions are more convenient or elegant. Consider making Banoffee Pie in small dessert glasses, ramekins, or even shot glasses for a party. Simply layer the crushed biscuit base, toffee, sliced bananas, and whipped cream in smaller vessels. This allows guests to easily grab their own dessert without the need for slicing, and it presents a beautiful, deconstructed version of the classic pie. Another popular option is Banoffee Pie in a jar, which makes it portable and perfect for picnics or lunchboxes. You can also create mini Banoffee tarts using a muffin tin or small tartlet molds for a bite-sized treat. These individual servings are not only charming but also offer better portion control and reduce mess, making them ideal for catering, potlucks, or simply a personalized treat at home.