Cheesy Pepperoni Pizza Bombs are a fantastic way to enjoy classic pizza flavors in a fun, bite-sized form. These savory bites are perfect for an easy snack, party appetizer, or a quick, kids-friendly meal. Learn how to prepare these delicious, homemade pizza bombs for any occasion with simple steps.
Key Takeaways
- Quick and easy recipe for delicious pizza bombs.
- Step-by-step instructions for prepping, filling, and sealing.
- Tips for perfect baking and serving suggestions.
- Ideas for creative toppings and ingredient swaps.
Pizza bombs are always a crowd-pleaser. They combine simplicity with amazing taste. Ideal for gatherings or a family treat. Everyone loves these savory, cheesy bites. Prepare them easily for any event.
Cheesy Pepperoni Pizza Bombs: Easy Recipe
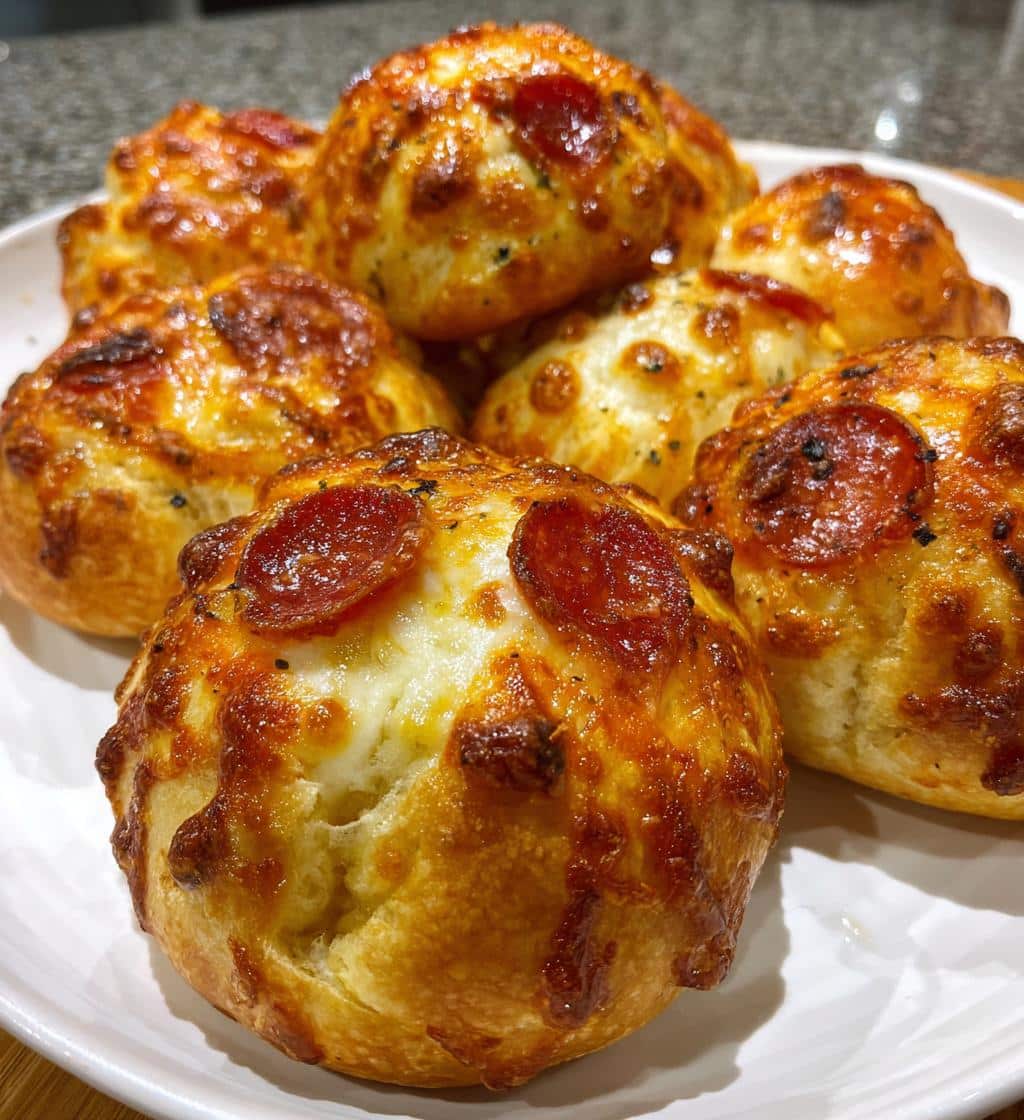
These cheesy pepperoni pizza bombs are a delightful twist on classic pizza, offering a convenient, bite-sized experience. Perfect for a party appetizer, an after-school easy snack, or a fun addition to any meal, this recipe simplifies the joy of homemade pizza. The process is straightforward, making it accessible even for novice bakers. Imagine warm, gooey cheese and savory pepperoni encased in perfectly baked dough – truly delicious! These quick meal options are incredibly versatile; they can be customized with various fillings to suit all tastes. We’ll walk you through each step, ensuring your pizza bombs turn out golden brown and utterly irresistible.
Prep and Cook Times
Making these savory bites doesn’t take all day. The active preparation time for these pizza bombs is approximately 20-30 minutes, allowing you to quickly assemble all the components. This includes gathering ingredients, prepping the dough, and filling each bomb. The baking time typically ranges from 12-15 minutes, depending on your oven and how golden you like your crust. Therefore, you can have these warm, ready-to-eat treats on your table in under an hour, making them an ideal choice for last-minute cravings or spontaneous gatherings. The relatively short duration also makes it a great recipe to involve kids, teaching them basic cooking skills in an enjoyable way.
Yield: Number of Servings
This recipe generally yields about 24-30 individual pizza bombs, depending on how large you cut your dough squares. This quantity is typically sufficient for serving 4-6 people as a generous appetizer or snack. If you’re preparing them for a larger crowd, or if you anticipate them being the main event, consider doubling the recipe. The beauty of these homemade pizza bombs is how easily scalable they are. For a main course, you might pair them with a fresh salad, creating a balanced and satisfying dinner. They are a fantastic way to enjoy delicious, savory bites without the fuss of a full-sized pizza.
Gather Ingredients for Pizza Bombs
Before you begin the fun process of assembling your cheesy pepperoni pizza bombs, it’s crucial to gather all your ingredients. Having everything ready and measured out makes the entire cooking experience smoother and more enjoyable. The core components are simple, typically found in most kitchens or easily acquired from any grocery store. For this easy snack, we focus on fresh, high-quality items to ensure the best flavor. We often recommend using pre-made pizza dough to save time, but feel free to make your own from scratch if you prefer a truly homemade pizza experience. Remember, the quality of your ingredients directly impacts the deliciousness of the final product.
What You Will Need
To create these amazing savory bites, you’ll need:
- Refrigerated Pizza Dough: One tube (approximately 13.8 oz) or a similar amount of fresh dough.
- Pepperoni Slices: About 4-6 ounces, preferably mini pepperonis or regular ones quartered.
- Mozzarella Cheese: 1 cup, shredded (low-moisture, part-skim works best for melting).
- Pizza Sauce: ½ cup, your favorite brand.
- Italian Seasoning: 1 teaspoon, for added flavor.
- Garlic Powder: ½ teaspoon, optional but recommended for an extra kick.
- Egg: 1 large, beaten (for an egg wash to achieve a golden crust).
- Flour: A small amount for dusting your work surface.
These quantities are perfect for making a batch of delectable, kids friendly pizza bombs. If you’re looking to add a bit more excitement, consider having some finely grated Parmesan cheese or red pepper flakes on hand to sprinkle on top before baking. Ensuring all these items are at room temperature, especially the dough, can significantly help with workability, as we’ll discuss later for quick meal preparation. For another great appetizer idea, check out our recipe for Spinach Feta Quesadillas.
Prepping Pizza Dough for Bombs
The foundation of every great pizza bomb is well-prepared dough. Whether you opt for store-bought refrigerated dough or a fresh batch from your local bakery, proper handling ensures a perfect texture for your easy snack. Bringing the dough to room temperature before you start is a game-changer, making it far more pliable and easier to work with. This step is crucial for achieving that ideal balance of soft inside and slightly crispy outside once baked. A well-prepped dough is the first step toward creating those delicious, savory bites that everyone will love. Precision in this stage helps in achieving uniform sizing and consistent baking results for your homemade pizza bombs.
Rolling Out the Dough
Begin by lightly flouring your clean work surface to prevent the dough from sticking. Gently unroll or place your pizza dough onto this floured surface. Using a rolling pin, roll the dough out into a large rectangle, aiming for a thickness of about ¼ inch. Consistency is key here; try to make the dough as uniform in thickness as possible to ensure even cooking. If the dough springs back or becomes difficult to roll, let it rest for 5-10 minutes. This allows the gluten to relax, making it much easier to achieve your desired dimensions without resistance. Don’t overwork the dough; a gentle hand will yield the best results for your cheesy pepperoni bombs.
Cutting Dough into Squares
Once you’ve rolled out the dough, it’s time to cut it into individual squares. Using a pizza cutter or a sharp knife, trim the edges to create a neat rectangle. Then, cut the dough into roughly 2×2 inch squares. Aim for about 24-30 squares from a standard tube of dough. The exact size might vary slightly, but consistency helps ensure each pizza bomb bakes evenly and holds its fillings without bursting. These squares will form the outer shell of your quick meal, encasing the delicious pepperoni and cheese. Having uniform squares is especially helpful if you’re making these for a party appetizer, as it creates a more appealing presentation for your delicious, kids friendly treats. For another comforting main course, consider our Creamy Baked Mac and Cheese recipe.
Filling Pizza Bomb Centers Perfectly
The heart of every cheesy pepperoni pizza bomb lies in its filling. Getting this step right is crucial for ensuring each bite delivers a burst of flavor. Overfilling can lead to bombs that are difficult to seal or burst during baking, while underfilling might leave them feeling hollow. The key is to find the perfect balance and placement of ingredients on each dough square. This careful assembly contributes significantly to the overall enjoyment of these savory bites, turning simple ingredients into a truly delicious, homemade pizza experience. Proper filling technique guarantees a delightful surprise in every single bomb.
Pepperoni and Cheese First
On each dough square, begin by placing a small amount of shredded mozzarella cheese. Aim for about half a tablespoon. It’s important to keep the cheese centered, leaving a small border around the edges of the dough square. On top of the cheese, place 2-3 mini pepperoni slices, or a few pieces of regular pepperoni if you’ve quartered them. The cheese acts as a barrier, preventing the sauce from making the dough soggy and helping the pepperoni adhere to the dough. This initial layer ensures that when you bite into a pizza bomb, you immediately taste that classic combination of gooey cheese and spicy pepperoni, creating a core of flavor for your easy snack.
Sauce and Seasoning Next
Once the pepperoni and cheese are in place, add a tiny dollop of pizza sauce – about a teaspoon – directly on top of the pepperoni. Be careful not to use too much sauce, as excess moisture can make the dough difficult to seal and potentially lead to bursting during baking. Less is more here; you want just enough to provide that quintessential pizza flavor without overwhelming the bomb. Finally, sprinkle a tiny pinch of Italian seasoning and garlic powder over the sauce. These seasonings amplify the savory notes and bring out the aromatic qualities that define delicious pizza. This layering technique ensures a balanced flavor profile in every single one of your quick meal pizza bombs. You can find more Appetizer recipes on our site, perfect for any gathering.
Sealing Your Cheesy Pepperoni Bombs
Properly sealing your cheesy pepperoni bombs is a critical step to prevent fillings from oozing out during baking and to ensure a neat, spherical shape. A well-sealed bomb retains its moisture and flavor, resulting in a more delicious and aesthetically pleasing final product. This process isn’t overly complicated but requires a little attention to detail. Think of it as wrapping a small gift; you want to enclose the precious contents securely. Mastering this technique will ensure your easy snack holds its shape and delivers that perfect bite of savory goodness. It’s a key factor in making these homemade pizza bombs truly successful.
How to Fold Dough
To fold the dough, gently bring up the four corners of each dough square to meet in the center, directly over the filling. It’s like gathering a small parcel. Press these corners together lightly to form a basic pouch. Then, start working your way around the edges, carefully bringing the sides up and pinching them together. The goal is to encase the filling completely, creating a small, rounded ball. Take your time with each one to ensure the dough covers all the ingredients. This folding method helps to create a secure pocket, keeping the pepperoni, cheese, and sauce safely inside during the baking process for your quick meal.
Pinching Edges Tight
After bringing the corners together, the most important part is to pinch the edges tight. Use your fingertips to firmly press and seal all the seams, ensuring there are no gaps. Work your way around the entire seam, twisting and pinching until the bomb is completely enclosed. If the dough feels a bit dry and won’t stick, you can lightly moisten your fingertips with a tiny bit of water before pinching. This helps the dough adhere better. A tight seal prevents any cheese or sauce from escaping and burning on your baking sheet, ensuring your delicious, kids friendly pizza bombs stay intact and moist inside. Place the sealed bombs seam-side down on a parchment-lined baking sheet.
Brushing with Egg Wash
For that beautiful, golden-brown crust and a slight sheen, an egg wash is essential. In a small bowl, whisk one large egg with a tablespoon of water until well combined. Using a pastry brush, lightly brush the top and sides of each sealed pizza bomb with this egg wash. This step not only adds a lovely color but also helps create a slightly crispier exterior, enhancing the texture of your savory bites. It also acts as a binder if you choose to add any toppings, such as Parmesan cheese or sesame seeds, before baking. Don’t overdo the wash; a thin, even coat is all you need for perfectly baked, cheesy pepperoni bombs.
Baking Bombs Until Golden Brown
The final step in creating your delicious cheesy pepperoni pizza bombs is baking them to perfection. This stage transforms the raw dough and fillings into the warm, gooey, golden-brown treats you’ve been anticipating. Proper oven temperature and baking time are crucial for ensuring the dough is cooked through, the cheese is melted and bubbly, and the exterior achieves that desirable crispiness. Achieving this perfect balance is what makes these homemade pizza bombs truly irresistible. It’s not just about cooking them; it’s about making sure every aspect contributes to a fantastic culinary experience, perfect for an easy snack or a party appetizer.
Oven Temperature Setting
Preheat your oven to 375°F (190°C). A consistently hot oven is key for baking pizza bombs evenly and quickly. Allow your oven to fully preheat for at least 15-20 minutes, even after it indicates it’s reached the desired temperature. This ensures the entire oven cavity, including the baking sheet, is uniformly hot. Placing the bombs into a cold or lukewarm oven can result in a soggy crust and uneven cooking. The high temperature helps the dough puff up quickly and encourages that beautiful golden-brown color on the outside, essential for delicious, savory bites. Always use an oven thermometer if you’re unsure about your oven’s accuracy.
Baking Time and Appearance
Once your oven is properly preheated, place the baking sheet with your pizza bombs into the oven. Bake for approximately 12-15 minutes. The exact time may vary slightly depending on your oven’s calibration and the size of your bombs. You’ll know they’re ready when they are puffed up, golden brown on top and bottom, and the cheese inside is visibly melted (sometimes a little might peek out, which is totally fine and adds to the rustic charm!). Keep an eye on them, especially during the last few minutes, to prevent over-browning. For a quick meal option, ensuring they are baked to perfection means a satisfying and gooey center every time. These delightful treats are much like our Easy Butter Chicken recipe in their ability to satisfy cravings quickly.
Serving Up Delicious Pizza Bombs
After patiently baking your cheesy pepperoni pizza bombs to a beautiful golden brown, the moment has finally arrived to serve these delicious, savory bites. While the aroma might be tempting you to grab one immediately, a little patience goes a long way to ensure the best eating experience. These homemade pizza bombs are fantastic as a stand-alone easy snack, a centerpiece for a party appetizer spread, or a fun addition to a quick meal. Their versatility makes them a hit with both adults and kids friendly crowds, making them a perfect choice for any casual gathering or family dinner.
Let Cool Before Eating
It’s crucial to resist the urge to bite into a pizza bomb straight out of the oven. The internal cheese and sauce will be incredibly hot, capable of causing a nasty burn. Transfer the baked pizza bombs to a wire cooling rack and allow them to cool for at least 5-10 minutes. During this cooling period, the internal temperature will stabilize, the cheese will firm up slightly (while remaining gooey), and the flavors will meld beautifully. This short waiting time ensures a much more enjoyable and safe eating experience, preventing scorched mouths and allowing you to fully appreciate the deliciousness of these cheesy pepperoni bombs. A cooled bomb is a perfect bomb!
Dipping Sauce Suggestions
While these pizza bombs are absolutely delicious on their own, serving them with a variety of dipping sauces can elevate the experience and add another layer of flavor. Classic marinara or pizza sauce is always a winner, reinforcing the traditional pizza taste. Ranch dressing or blue cheese dressing offers a creamy, tangy contrast that many people love. For those who enjoy a bit of heat, a spicy sriracha mayo or a chili garlic sauce can provide a delightful kick. Even a simple garlic butter sauce, brushed on top after baking or served on the side, can enhance the savory profile. Presenting a few options allows everyone to customize their savory bites, making these a truly interactive and enjoyable party appetizer. Remember to always have your Pinterest board handy for more inspiring serving ideas!
Storing Leftover Pizza Bombs Safely
Occasionally, you might find yourself with a few leftover cheesy pepperoni pizza bombs – though this is rare given how delicious they are! Proper storage is essential to maintain their freshness, flavor, and food safety. Whether you’ve made a large batch for a party appetizer or simply have a few remaining from a quick meal, knowing how to store them correctly ensures you can enjoy these savory bites another day. Storing them properly means you can extend the life of your homemade pizza treats and enjoy them just as much as when they were freshly baked, making them an excellent easy snack option for later.
Refrigeration Guidelines
To store leftover pizza bombs, allow them to cool completely to room temperature first. This prevents condensation from forming inside the container, which can make the bombs soggy. Once cooled, place them in an airtight container or a heavy-duty resealable plastic bag. Store them in the refrigerator for up to 3-4 days. For reheating, a conventional oven or toaster oven is recommended to bring back their crispiness. Reheat at 350°F (175°C) for about 8-10 minutes, or until warmed through and the cheese is re-melted. Microwaving is an option for speed, but it may result in a softer, less crispy texture. These refrigeration guidelines ensure your delicious, kids friendly pizza bombs remain a delightful treat even on subsequent days.
Creative Topping Ideas for Bombs
While the classic cheesy pepperoni pizza bombs are undeniably delicious, there’s a whole world of flavor waiting to be explored by adding creative toppings and fillings. Transforming this easy snack into something truly unique can be a fun way to customize your quick meal and cater to different preferences. Think beyond the ordinary and consider how various ingredients can complement or contrast with the savory pepperoni and cheese. This section offers ideas to personalize your homemade pizza bombs, making them even more exciting and adaptable for any occasion or dietary preference, truly elevating these delicious bites.
Veggie Add-in Options
Incorporating vegetables is an excellent way to add freshness, nutrients, and new textures to your pizza bombs. Finely diced bell peppers (red, green, or yellow), sautéed mushrooms, or thinly sliced black olives are popular choices that blend well with the existing flavors. Consider adding some caramelized onions for a touch of sweetness, or a sprinkle of fresh spinach or basil (added after baking for optimal freshness and color). Remember to finely chop or sauté any harder vegetables beforehand so they cook through adequately within the short baking time of the bomb. These veggie add-ins can transform your simple pepperoni bombs into a more complex and flavorful party appetizer or even a more wholesome easy snack.
Adding a Spicy Kick
For those who love a bit of heat, infusing your pizza bombs with a spicy kick is incredibly easy and satisfying. A common and effective method is to sprinkle a pinch of red pepper flakes directly over the sauce and pepperoni before sealing. You could also mix a tiny amount of hot sauce into your pizza sauce for a more even distribution of spice. Diced jalapeños, either fresh or pickled, can be added along with the pepperoni for a bold, zesty heat. For a smoky, spicier flavor, consider swapping out some of the regular pepperoni for spicy sausage or even adding a few finely chopped bits of chorizo. These spicy additions make your savory bites a more adventurous quick meal or a thrilling party appetizer. For more dinner ideas, be sure to follow us on Instagram!
Try Different Sauce and Cheese
The beauty of cheesy pepperoni pizza bombs lies not only in their ease of preparation but also in their incredible adaptability. While the classic marinara and mozzarella combination is a perennial favorite, experimenting with different sauces and cheese varieties can open up a whole new world of flavors. This allows you to tailor your homemade pizza bombs to specific tastes or dietary preferences, turning them into a truly customized easy snack or a gourmet party appetizer. Don’t be afraid to innovate and make these delicious, savory bites uniquely your own.
Alternative Sauce Choices
Beyond traditional pizza sauce, several other options can dramatically change the character of your pizza bombs. A creamy Alfredo sauce can create a rich, indulgent bomb, especially if paired with chicken or spinach. Pesto, with its vibrant basil and garlic notes, offers a fresh, herbaceous alternative that works wonderfully with sun-dried tomatoes or feta cheese. For a tangy twist, a BBQ sauce base could be fantastic, especially with shredded chicken and a blend of cheddar and mozzarella. Even a simple garlic and olive oil base, perhaps with a sprinkle of fresh herbs, can provide a light yet flavorful foundation for your quick meal. These alternative sauces are perfect for transforming a basic recipe into something extraordinary. To learn more about the diverse world of pizza, you can visit Wikipedia’s pizza page.
Swapping Cheese Varieties
Mozzarella is the go-to for its meltability, but don’t limit yourself! A blend of mozzarella with provolone can add a sharper, more complex flavor. For an extra creamy interior, try adding a small dollop of ricotta cheese along with the mozzarella. Parmesan or Pecorino Romano, when finely grated, can add a salty, umami kick, especially when mixed with other cheeses. If you’re going for a more intense flavor profile, consider incorporating smoked gouda or even a touch of crumbled blue cheese for adventurous palates. Each cheese swap offers a distinct taste and texture, ensuring your kids friendly pizza bombs remain exciting and new with every batch. Understanding different cheeses can help you create amazing savory bites, much like how learning about pepperoni can enhance your pizza knowledge.
Quick Cheesy Pepperoni Pizza Bombs
Sometimes, you need a delicious easy snack or a quick meal in a hurry, and these cheesy pepperoni pizza bombs are perfectly suited for such occasions. While the recipe is already designed for efficiency, a few expert tips can further streamline the process, getting those savory bites into your hands even faster. These hacks focus on optimizing dough handling and troubleshooting common issues, ensuring your homemade pizza bombs are both speedy to prepare and utterly delicious. Efficiency doesn’t have to mean sacrificing quality, and with these pointers, you’ll be a pizza bomb pro in no time, making them a fantastic, kids friendly option.
Room Temperature Dough Tip
One of the most effective ways to speed up the preparation of your pizza bombs is to ensure your refrigerated pizza dough is at room temperature. Cold dough is stiff, elastic, and difficult to roll out, making it resistant to shaping. Take your dough out of the refrigerator about 30-60 minutes before you plan to start assembling. This allows the gluten to relax, making the dough much more pliable, easier to roll, and less likely to spring back. A warm, relaxed dough is a dream to work with, significantly cutting down on frustration and effort during the rolling and cutting stages, turning what could be a chore into a quick meal prep step.
Sticky Dough Solutions
Even at room temperature, some dough can be a bit sticky, especially if you live in a humid environment. If your dough is proving stubborn and sticking to your hands or the rolling pin, don’t panic! The simplest solution is to use a light dusting of flour on your work surface, your hands, and your rolling pin. Avoid using too much flour, as this can dry out the dough and make it tough. Just enough to create a non-stick barrier is perfect. Another trick is to lightly oil your hands with a neutral cooking oil, which can help prevent sticking without altering the dough’s texture too much. These quick fixes ensure a smooth assembly process for your delicious, savory bites, leading to perfectly sealed cheesy pepperoni bombs.
Cheesy Pepperoni Pizza Bombs: Nutrition
For those mindful of their dietary intake, understanding the nutritional aspects of these cheesy pepperoni pizza bombs can be helpful. While they are a delicious easy snack or a fun party appetizer, knowing the caloric and macronutrient breakdown allows you to incorporate them thoughtfully into your diet. Keep in mind that nutritional values can vary significantly based on the specific brands of ingredients used (e.g., lean pepperoni vs. regular, type of cheese, store-bought dough vs. homemade). This section provides general guidelines for these savory bites to help you make informed choices, ensuring you can still enjoy these homemade pizza treats as part of a balanced lifestyle or quick meal plan.
Per Serving Details
A single cheesy pepperoni pizza bomb, made according to this recipe, typically contains the following approximate nutritional values. Please note these are estimates and can vary.
- Calories: 120-150 calories
- Total Fat: 6-8g (Saturated Fat: 3-4g)
- Cholesterol: 15-25mg
- Sodium: 250-350mg
- Total Carbohydrates: 12-15g (Sugars: 1-2g, Fiber: 0-1g)
- Protein: 5-7g
These values can change if you add extra ingredients like more cheese, different types of meat, or additional sauces. For example, using turkey pepperoni or low-fat mozzarella can slightly reduce the fat content, making them a slightly lighter easy snack. Conversely, adding extra cheese or a rich dipping sauce will increase these numbers. Always refer to the specific nutritional information of the products you use for the most accurate details for your quick meal or party appetizer considerations.