DIY Moon Sand is incredibly easy to make, using only two simple ingredients for hours of mesmerizing, moldable play that children adore. You can quickly mix flour and baby oil to create a super-soft sensory material that holds its shape and crumbles delightfully for calm, creative fun.
DIY Moon Sand is a fantastic low-mess sensory activity that truly sparks creativity and calms busy hands. You are looking for a simple, safe, and satisfying play material, and this two-ingredient recipe is your answer. You can create a little slice of tactile magic, often called cloud dough, which feels like sand but molds like clay, perfect for your children’s imaginative play.
Key Takeaways
- Requires only flour and baby oil (or vegetable oil).
- It is no-cook, simple, and safe for supervised play.
- The texture is soft and moldable, ideal for sensory bins.
- You can easily customize the sand with different colors and scents.
Fast Answer
You can quickly make DIY Moon Sand by mixing 4 cups of flour with 1/2 cup of baby oil until the mixture is crumbly yet moldable, resembling wet beach sand. This simple recipe provides a silky, soft, and inexpensive play dough alternative that stores well in an airtight container for future use and hours of fun.
The Magic of DIY Moon Sand
DIY Moon Sand is sometimes called cloud dough because of its wonderfully soft and airy texture. It’s a special material that feels dry to the touch, preventing the sticky mess of traditional play dough, yet it sticks together beautifully when you press it into a mold. You get the best of both worlds: the crumbly fun of sand and the shaping power of dough.
You can think of this creation as a fluffier, easier-to-make version of kinetic sand, making it an ideal base for any indoor sensory activity. You’ll love that it promotes both focus and creative play without demanding complex ingredients or cooking steps from you.
Why This DIY Moon Sand Recipe Works So Well
The success of this recipe lies in the perfect ratio of a solid to a liquid binder, which is 4:1 by volume for the flour and oil. You need to ensure you measure both ingredients accurately to achieve the desired texture that is both crumbly and cohesive. If your mix is too dry, it won’t hold a shape; if it is too oily, it will feel greasy.
You will appreciate that this simple combination uses common household ingredients, making this sensory activity highly budget-friendly. You can confidently provide a high-quality play experience without the expense of store-bought sensory materials, leaving more room for you to get creative with other aspects of play.
The Essential Ingredients You Will Need
Flour: The Main Bulk of DIY Moon Sand
You will need 4 cups of all-purpose white flour to create the soft, powdery base of your moon sand. This provides the primary structure and the delightful fine texture that makes cloud dough so enjoyable to manipulate. You should use standard flour for the best results, as specialty flours can sometimes alter the feel.
You might find that using gloves when mixing is helpful if you have sensitive skin, especially when adding color to the batch. You should always ensure you measure the flour first and pour it into your large mixing bowl to prepare for the oil addition.
Baby Oil: The Binding Agent for DIY Moon Sand
You must use 1/2 cup of baby oil, as it is the magic ingredient that gives the moon sand its smooth, non-greasy, and moldable qualities. The oil lightly coats the flour particles, allowing them to cling to each other just enough when compressed. You will notice the silky difference it provides compared to other oils.
You can substitute baby oil with vegetable oil or coconut oil, but understand the texture and scent will change slightly. Baby oil provides the classic, clean scent and silky feel that most people associate with the best homemade moon sand. You will simply pour the oil over the flour.
Quick Steps for Mixing Your Perfect DIY Moon Sand
You should start the process by thoroughly combining the measured flour and baby oil in a large mixing bowl. Using your hands is the most effective way to mix, as your warmth helps distribute the oil evenly through all the flour particles. You are aiming for a texture that looks like wet beach sand.
You need to keep mixing and kneading until there are no pockets of dry flour or excess oil left in the mixture. You should be able to press a handful of the moon sand tightly and have it hold a solid shape before crumbling apart gently. If it is too dry, add a teaspoon of oil; if too wet, add a tablespoon of flour.
How to Add Color to Your DIY Moon Sand
Using Food Coloring for Vivid Hues
You can easily add vibrant color to your batch using liquid food coloring, which works perfectly with the oil base. You should add a few drops of your chosen color directly to the oil before you mix it into the flour for the easiest and most even color distribution. You can always start with less and add more if you desire a darker shade.
You will need to knead the sand aggressively once the color is added to ensure it is fully mixed and uniform throughout the entire batch. You should wear gloves during this process to prevent the food coloring from temporarily staining your hands. Try making multiple small batches of different colors for a rainbow moon sand set.
Adding Scent for Enhanced Sensory Play
You can significantly boost the sensory experience by adding scented extracts to your moon sand. A few drops of vanilla, almond, or lemon extract mixed into the oil before combining will make your creation smell delicious. You can use these scents to match play themes, like lavender for calming bins.
You will love how the scent adds another layer of engagement for your children, making the activity more immersive and enjoyable. You should always use food-grade extracts, even though the sand is not meant for eating, as a safety precaution. You can find more sensory ideas on Pinterest.
Tips for Storing Your DIY Moon Sand
You need to store your finished DIY Moon Sand in an airtight container or a large, sealed zip-top bag to maintain its texture and freshness. This prevents the small amount of oil from evaporating and keeps the flour dry and moldable. You can keep it on a shelf in a cool, dry place for the best preservation.
You will find that properly stored moon sand can last for weeks, or even months, giving you plenty of time for repeated play sessions. You can easily refresh an older batch that feels a bit dry by kneading in a tiny splash of new baby oil. This simple step brings the silky texture right back to life.
Fun Ways to Play with Your DIY Moon Sand
Creating Themed Sensory Bins
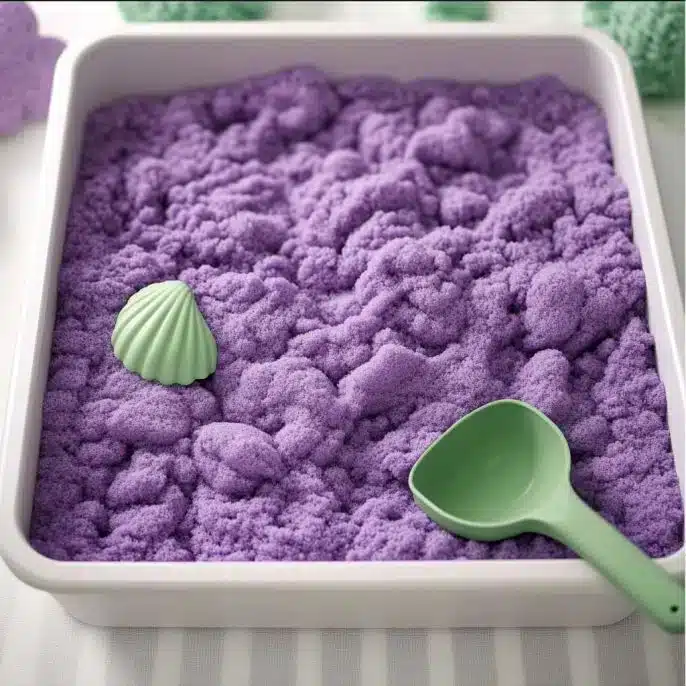
You can easily transform the simple moon sand into an elaborate sensory bin experience by adding accessories and toys. Try setting up a “construction zone” with toy trucks, small shovels, and pebbles, or a “beach day” with mini shells and plastic ocean animals. You can find great inspiration for sensory bins on Instagram.
You should use cookie cutters, measuring cups, and spoons to encourage pretend baking or building. This helps children practice fine motor skills and hand-eye coordination while fostering imaginative storytelling. This type of play is wonderful for quiet, focused time.
Building and Molding Techniques
You should encourage your children to experiment with different levels of pressure when molding the moon sand. When you gently crumble it, it acts like dry sand, but when you press it firmly into a mold, it holds its shape perfectly, allowing for detailed structures. You can teach them the difference between light and heavy touch.
You will find that small plastic containers or even ice cube trays make excellent molds for creating mini bricks or fun shapes. You can visit the Sand Castle Wikipedia page for creative inspiration on how to build structurally sound creations using your new material.
Understanding the Science of DIY Moon Sand
The fascinating texture of DIY Moon Sand is due to the scientific interaction between the flour and the oil. The oil, which is a non-polar substance, coats the individual flour particles, preventing them from bonding with the same strength as they would with water (like in traditional dough). You are creating a unique, delicate structure.
You should know that this mixture exhibits properties of a non-Newtonian material, though in a dry form, because its viscosity and behavior change based on the pressure applied. When you squeeze it, it acts solid; when you release the pressure, it collapses gently. This makes it a great, simple science lesson.
Important Safety Considerations for DIY Moon Sand
You must remember that even though the ingredients are non-toxic, the finished DIY Moon Sand is not meant for consumption. You should always supervise young children and toddlers closely during playtime to ensure they do not try to eat the mixture. You can teach older children about the importance of not tasting sensory materials.
You will need to ensure you clean up the play area properly after each session, paying special attention to hands and surfaces. You can sweep or vacuum the sand easily, but if any gets onto clothing or upholstery, simply shake it out or brush it off before washing. Consider setting up a play area on a large tray or mat for easy containment and cleanup.
How DIY Moon Sand Supports Child Development
Playing with this moldable sand provides immense value for your child’s development, moving far beyond just simple fun. You are supporting the development of critical fine motor skills as they pinch, squeeze, and scoop the material. You can see their small hand muscles getting stronger with every creation they build, which helps prepare them for writing.
You will notice that sensory play like this helps to calm and focus busy minds by providing a repetitive, satisfying activity that engages their senses. You are giving them a constructive outlet for creative expression and imaginative role-playing, which is essential for emotional and cognitive growth. Add some cups and utensils and call it a great “main course” activity like this one.
Troubleshooting Your DIY Moon Sand Texture
My Moon Sand Is Too Dry and Crumbly
If you find that your moon sand is excessively dry and crumbles immediately without holding any shape, you need to add a small amount of oil. You should add baby oil one teaspoon at a time, kneading thoroughly after each addition until the desired moldable consistency is achieved. You can easily overdo the oil, so be patient and go slowly.
You should check the texture often by squeezing a small handful in your palm; it should remain intact when you open your hand. If it simply falls apart like flour, it definitely needs more oil. You want a product that feels light but dense enough to compress easily.
My Moon Sand Is Too Oily and Sticky
If your batch feels greasy or leaves a residue on your hands, you have likely added too much oil. You must counteract this by adding more flour, one tablespoon at a time, until the oiliness disappears. You will need to knead the mixture vigorously to ensure the new flour is fully incorporated.
You should also ensure you are using a large enough bowl to allow for effective mixing and kneading, which helps prevent over-saturation in one spot. You can then resume your creative play, maybe adding some fun items from the side dishes category, like tiny spoons or scoops.
Conclusion
DIY Moon Sand is truly a go-to recipe for calm, creative play that is as fun for you to make as it is for your children to enjoy. You can create this simple, safe, and incredibly satisfying sensory medium with just two ingredients in under five minutes. You are providing a magical, moldable world right in your own home, perfect for quiet afternoons and focused engagement.
You should definitely keep a large batch of this silky moon sand on hand, stored in an airtight container, for whenever the mood for imaginative play strikes. You have now learned how to create an amazing, budget-friendly activity that supports your child’s development while keeping clean-up simple. Enjoy the endless possibilities of building, digging, and molding! Thank you for stopping by!