DIY Lava Lamp projects are fantastic for introducing kids to density and chemical reactions using common household items like oil, water, and antacid tablets.
DIY Lava Lamp projects are incredibly popular because they combine simple chemistry with mesmerizing visual effects. You can create a classic, bubbling display without any special equipment or heat. This experiment teaches concepts like density and immiscibility in a fun, engaging, and unforgettable way. You’re about to make a mesmerizing piece of moving art.
Key Takeaways
- You will need oil, water, food coloring, and an antacid tablet.
- The oil and water separate due to density differences.
- The antacid tablet creates carbon dioxide bubbles.
- These gas bubbles carry colored water droplets up through the oil.
- Adding more tablets restarts the bubbling action instantly.
A DIY Lava Lamp works by mixing oil and water, which don’t mix due to density and polarity differences. When you add an antacid tablet, it reacts with the water, producing carbon dioxide gas. These gas bubbles attach to the colored water droplets, making them lighter than the oil, causing them to float to the top and create the lava effect.
What Exactly is a DIY Lava Lamp?
This project uses household liquids and a simple effervescent tablet to replicate the classic, hypnotic look of a commercial lava lamp. The magic lies in the interaction between oil, water, and gas. You can witness principles of physics and chemistry at work right on your countertop.
The beauty of this project is its simplicity and low cost. You are creating a visual demonstration of science that looks like a special effect. The result is a calming, bubbling visual display that is safe and non-toxic for most ages, provided there is adult supervision.
Safety First: What You Need to Know
While the ingredients are generally safe, always supervise younger children during the process. Ensure that no one ingests the oil, water mixture, or the antacid tablets. You should also cover your work area with a tray or towel to contain any accidental spills or overflow during the fizzing reaction.
Keep the materials out of reach when the experiment is not in progress. Though the chemical reaction is mild, you want to maintain a controlled and clean environment. Once completed, you can seal the bottle for a fun, shakeable sensory toy.
Understanding the Science of the DIY Lava Lamp
The entire bubbling spectacle hinges on two main scientific concepts: density and chemical reactions. Understanding these concepts helps you appreciate why the liquids behave the way they do. This is a perfect way to introduce scientific vocabulary to your children or students.
The materials you use are fundamental to showing these concepts in action. By visually separating the layers, the DIY Lava Lamp makes abstract ideas concrete and easy to grasp. This hands-on learning tool is far more impactful than reading a textbook.
The Role of Density and Immiscibility
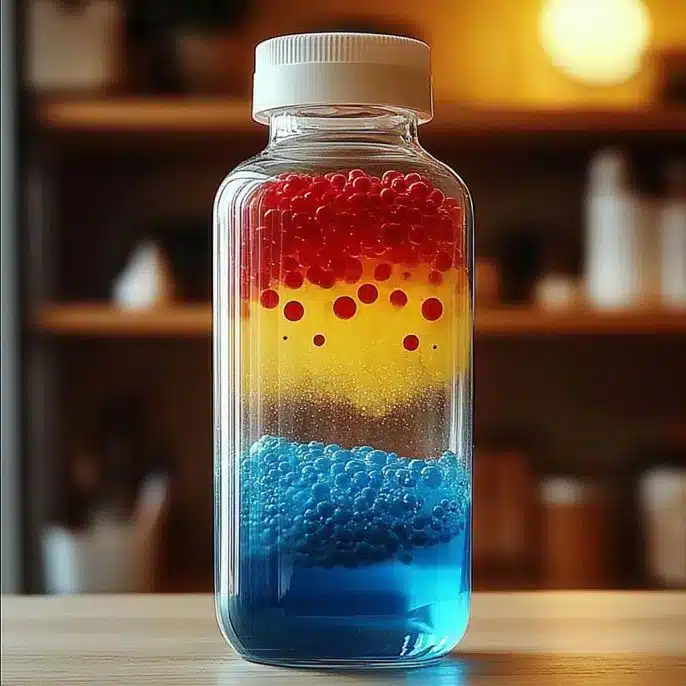
Density is simply how much “stuff” is packed into a certain volume. Water is denser (heavier) than oil, which is why the water sinks to the bottom when you mix them. The liquids also display immiscibility, meaning they refuse to mix due to differences in their molecular polarity.
This separation creates the distinct layers necessary for the experiment to work. The oil layer acts as the medium through which the bubbles travel, and the water layer holds the color and the reacting tablet. This foundational separation is the canvas for your lava lamp art.
How the Chemical Reaction Creates the Fizz
The antacid tablet contains citric acid and sodium bicarbonate. When the tablet hits the water, these compounds dissolve and react, generating carbon dioxide ($\text{CO}_2$) gas. This is the same gas that puts the “fizz” in soda.
The $\text{CO}_2$ gas forms bubbles. These bubbles capture some of the colored water, lift it up through the oil layer because the gas makes the droplet buoyant, and then release it at the surface. Once the gas escapes, the water droplet becomes heavy again and sinks back down, restarting the cycle. For more on this, look up the Le Chatelier’s principle online.
Gathering Your Supplies for the DIY Lava Lamp
This experiment uses ingredients you likely already have in your pantry or medicine cabinet. Gathering everything beforehand ensures a smooth and interruption-free activity. You will need a clear bottle to best observe the mesmerizing motion of your lava.
Don’t worry if you don’t have exactly what is listed. Most clear oils will work fine, and any effervescent tablet will produce the needed $\text{CO}_2$ gas. Check out our other main course recipes for more ideas on common ingredients you may have.
The Necessary Ingredients List
- 2 empty plastic bottles (water or Gatorade)
- Vegetable or canola oil (enough to fill $3/4$ full)
- Water
- Food coloring (2 or more colors)
- Antacid tablets (like Alka-Seltzer)
These simple components are the foundation of your amazing demonstration. The choice of bottle size will determine the scale of your lava lamp; larger bottles create a bigger visual effect. Make sure your bottles are completely dry before you start pouring the oil.
Essential Tools and Prep Work
You may find a funnel helpful for adding the oil and water to the bottle without spills. A measuring cup is great for controlling the amount of water you add. Also, a tray or a towel is a must-have for easy cleanup, especially when doing this activity with younger participants.
Remove any labels from the bottles to give you the clearest view of the reaction. Clean, dry bottles are key to making sure the oil and water layers are distinct and easy to observe. This simple prep improves the overall viewing experience.
Step-by-Step Instructions for Your DIY Lava Lamp
The creation process is quick and simple, making it perfect for an impatient audience. Follow these steps precisely to guarantee a beautiful, bubbling result. The most important step is allowing enough space at the top of the bottle for the fizzing action.
Do each step methodically, and be patient between the addition of the water and the food coloring. This allows the density layers to fully settle before the chemical reaction begins. Soon you will be enjoying your very own bubbling creation.
Setting Up the Liquid Layers
Start by filling your clean, dry bottle about three-quarters full with oil. Next, slowly add water until you have about two inches of space left at the top. You will immediately see the water sink below the oil, creating two clear layers.
Now is the time to add your color. Drop 4 to 5 drops of food coloring into the bottle. The coloring will mix with the water layer at the bottom. We have a great recipe for cheesy garlic chicken wraps that also involves simple layering!
Activating the Bubbling Action
Break an antacid tablet into smaller pieces—halves or quarters work well. Drop one piece of the tablet into the bottle and step back to watch the show. The reaction starts almost instantly as the tablet sinks into the water layer.
The resulting bubbles will rise, carrying the colorful water, which looks exactly like lava. Once the fizzing slows down, you can add another tablet piece to reactivate the fun. This continuous action is what makes the DIY Lava Lamp so captivating.
Creative Variations and Tips for Your Lava Lamp
You can customize your lava lamp to make it even more visually striking. Simple changes to the ingredients or the environment can produce stunningly different effects. Feel free to experiment with different combinations to find your favorite look.
Trying different sizes of bottles, or even using a jar, can change the flow dynamics of the bubbles. These small changes keep the experiment fresh and offer new lessons in fluid dynamics. Creativity in science is always encouraged.
Making a Glowing DIY Lava Lamp
For a truly spectacular effect, try using neon or glow-in-the-dark food coloring. You will need to place the bottle under a black light (ultraviolet light) in a darkened room to see the magical glow. This adds a spooky or retro twist to the project.
The glow effect works because the neon pigments absorb the UV light and re-emit it as visible light. This is a great demonstration of fluorescence. You can share your amazing glowing creations by tagging us on Pinterest or Instagram!
Experimenting with Add-Ins and Flow
A few drops of dish soap can slow down the reaction, making the bubbles linger longer before they pop. Adding fine glitter will give your “lava” an extra shimmer as it floats up and down. Just be careful not to add too much, or it will cloud the oil.
You can also try using different types of oil, such as baby oil, to see if the clarity or flow changes. This kind of hands-on experimentation helps you truly understand the properties of the liquids. Why not try adding some glitter and comparing it to our creamy chicken alfredo lasagna rolls, which rely on layers for a different kind of magic?
DIY Lava Lamp Cleanup and Storage
Once the bubbling fun is over, you will need to clean up your workspace and decide what to do with your creation. Proper cleanup is essential to keeping your materials ready for the next experiment.
The mixture is easy to manage, but remember that oil should never be poured down the sink. Dispose of the contents properly and store the bottle safely if you decide to keep it as a sealed sensory object.
Sealing Your Creation for Long-Term Fun
If you want to keep your DIY Lava Lamp as a sensory bottle, make sure the lid is secured tightly. You can use strong glue or electrical tape to seal the cap to the bottle. This prevents accidental spills.
Once sealed, you can shake the bottle vigorously to create temporary, swirling, and cloudy effects. When the bottle settles, the layers will slowly separate again, waiting for the next shake. This makes a great reusable sensory toy for kids.
Safe Disposal of the Mixture
Do not pour the oil and water mixture down the sink, as the oil can clog pipes. The best way to dispose of the liquid is to pour it into an old container (like an empty milk jug or coffee can) and throw it in the trash. The plastic bottle can be rinsed out with soap and water and recycled.
Cleaning up spills on your workspace is simple with soap and water or a paper towel. Since you used simple household ingredients, the cleanup is generally non-toxic and straightforward. Keep your area tidy so you can start your next experiment soon.
Why This DIY Lava Lamp is Great for Classrooms
This project is a perfect tool for educators looking for an interactive, high-impact science demonstration. It visually explains several key concepts that are often hard for students to grasp from a textbook. The element of surprise and color keeps students engaged.
The activity requires minimal setup and the supplies are cheap and readily available. This makes it scalable for a classroom environment. You can quickly set up several stations and let students conduct the experiment in small groups.
Lesson Plans: Connecting Science to the Curriculum
The DIY Lava Lamp provides excellent teaching moments on buoyancy, density, chemical changes, and acids/bases. You can introduce the scientific method by asking students to hypothesize about what will happen when the tablet is added.
This hands-on experiment reinforces concepts learned in the classroom. You can extend the lesson by having students research the actual technology used in commercial lava lamps, which use heat and different types of wax and oil. This bridges the gap between simple chemistry and real-world application.
Conclusion
DIY Lava Lamp projects prove that the most amazing science can be found in your kitchen cabinets. You just completed a mesmerizing experiment that demonstrates density, immiscibility, and chemical reactions using oil, water, and a simple antacid tablet. It’s a fantastic, low-cost activity that is visually stunning for all ages.
The continuous cycle of the colored water droplets rising and falling is simply captivating. Whether you’re using this for a classroom lesson or a fun weekend craft, you now have the knowledge to create your own bubbling masterpiece. Remember, you can always drop in another tablet to start the show again and again!