My family loves this Banana Pudding Cheesecake Cones recipe, and it’s perfect for warm days or when you need something quick and delicious. This article covers everything you need to know about making this fun and flavorful dessert, from gathering your ingredients to customizing it for any occasion. You’ll learn how to whip up a creamy cheesecake filling, combine classic banana pudding flavors, and create a delightful treat that everyone will love.
Contents
- 0.1 The Story & Intro: A Beloved Dessert Reimagined
- 0.2 A Playful Twist on a Comfort Classic
- 0.3 Crafting the Creamy Filling: The Heart of Your Cones
- 0.4 Infusing the Iconic Banana Pudding Flavor
- 0.5 Assembling Your Delightful Banana Pudding Cheesecake Cones
- 0.6 Creative Garnishes for Perfect Banana Pudding Cheesecake Cones
- 0.7 Why Banana Pudding Cheesecake Cones Are Your Next Party Favorite
- 0.8 The Ultimate Crowd-Pleaser and Versatile Treat
- 0.9 Conclusion: Your New Favorite No-Bake Delight
- 1 Banana Pudding Cheesecake Cones
The Story & Intro: A Beloved Dessert Reimagined
I grew up in a home where banana pudding was more than just a dessert; it was a warm hug on a spoon, a staple at every family gathering, especially at our cozy home outside Asheville, North Carolina. The creamy vanilla, the soft bananas, and those comforting vanilla wafers always brought a smile to everyone’s face. I remember my grandmother, Nonna Carina, meticulously layering each component, always ensuring there was enough to go around. It was a dish that celebrated traditions and brought my family together around the table. One day, while brainstorming new ways to enjoy classic flavors, the idea of combining that beloved banana pudding with the creamy tang of cheesecake, all tucked into a crispy cone, just clicked! It felt like a playful twist on a timeless favorite. That’s how these Banana Pudding Cheesecake Cones were born – a perfect blend of nostalgic comfort and exciting new fun.
A Playful Twist on a Comfort Classic
There’s something incredibly charming about taking a familiar dessert and giving it a fresh, playful spin. These Banana Pudding Cheesecake Cones do exactly that. They transform the comforting layers of traditional banana pudding into a portable, no-bake treat that’s perfect for little hands (like my energetic grandchildren!) and grown-ups alike. You get all the creamy, dreamy texture of a cheesecake, infused with that unmistakable banana pudding flavor, all neatly packaged in a crunchy waffle cone. It’s an innovative way to enjoy a classic, making it suitable for casual gatherings or even a special weeknight indulgence. The idea was to create something easy, joyful, and utterly delicious, and these cones truly hit the mark. They are certainly a delightful addition to any meal, perhaps after enjoying some main dishes with your family.
Crafting the Creamy Filling: The Heart of Your Cones
The magic of these Banana Pudding Cheesecake Cones truly begins with their rich, creamy filling. You’ll start with eight ounces of softened cream cheese in a large mixing bowl. It’s crucial that your cream cheese is at room temperature; this ensures it beats smoothly without any lumps, creating that perfectly velvety base we’re aiming for. Beat the cream cheese until it’s light and fluffy, usually a couple of minutes with an electric mixer. Then, gradually incorporate one cup of granulated sugar and one teaspoon of vanilla extract, mixing until everything is beautifully combined and the sugar has dissolved. This step is essential for a smooth, sweet foundation for your cones.
Infusing the Iconic Banana Pudding Flavor
Once your cream cheese mixture is smooth and sweet, it’s time to introduce the signature banana pudding elements. Add one cup of sour cream and one cup of heavy cream to the bowl, blending until the mixture becomes wonderfully creamy and cohesive. The sour cream adds a subtle tang that balances the sweetness, while the heavy cream contributes to the light, airy texture. Finally, gently fold in half a cup of banana puree – about two ripe bananas mashed until smooth – and half a cup of crushed vanilla wafers. These additions are what truly transform the cheesecake base into a delightful Banana Pudding Cheesecake Cones filling, bursting with that familiar nostalgic taste. After mixing, chill the mixture for at least 30 minutes in the refrigerator. This brief chilling period firms up the filling, making it easier to pipe or spoon into your waffle cones, ensuring your cones are neat and delicious. You might even find this filling versatile enough to use in other desserts.
Assembling Your Delightful Banana Pudding Cheesecake Cones
Once your creamy banana pudding cheesecake filling has chilled to perfection, it’s time to bring your Banana Pudding Cheesecake Cones to life. This is where the fun really begins! You have a couple of options for filling your twelve waffle cones. For a neat and professional look, you can spoon the chilled mixture into a piping bag fitted with a wide tip and pipe the filling into each cone. If you don’t have a piping bag, no worries at all—a spoon works just as well. Simply spoon the creamy filling into each cone, filling it generously to the brim. The key is to work quickly so the cones remain crispy. This step creates the delicious base for your portable dessert, making each Banana Pudding Cheesecake Cone a delightful experience from the very first bite.
Creative Garnishes for Perfect Banana Pudding Cheesecake Cones

Banana Pudding Cheesecake Cones
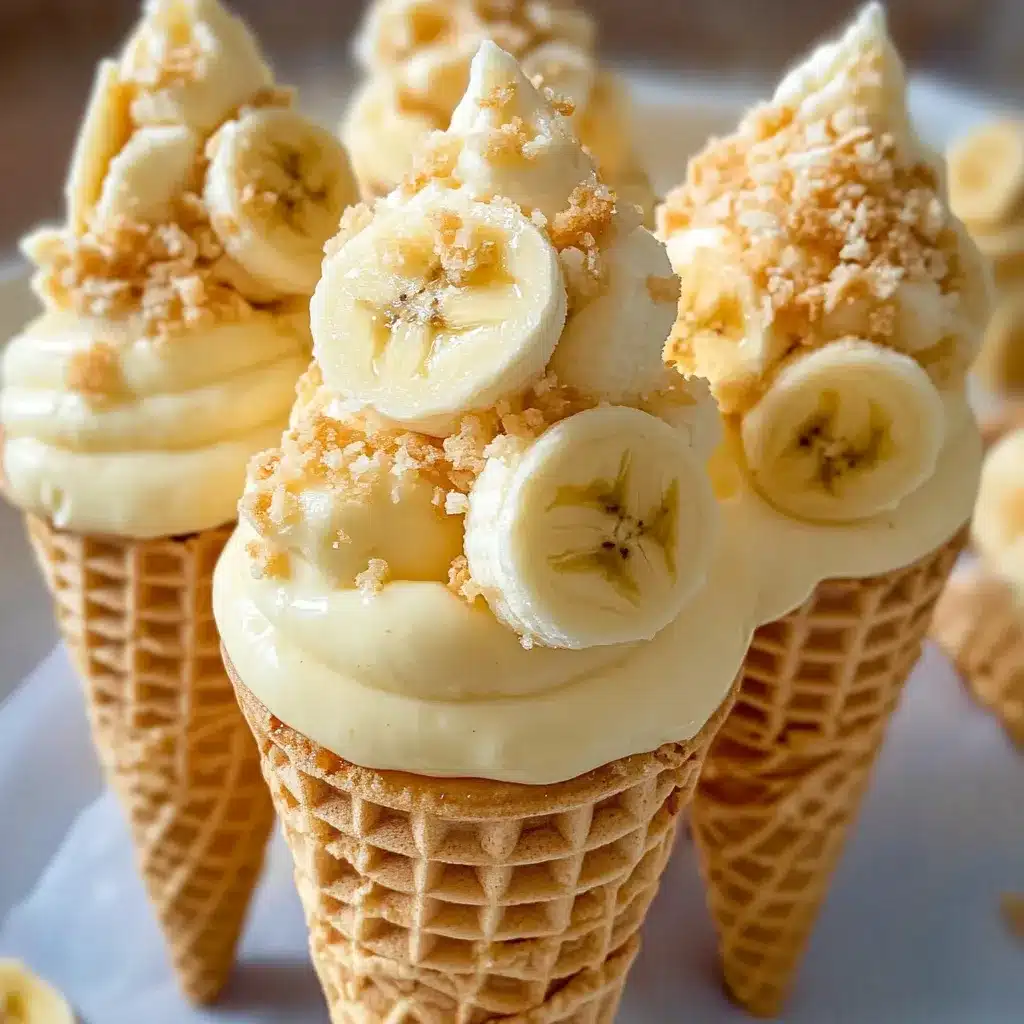
Now for the grand finale: topping your Banana Pudding Cheesecake Cones! This is where you can truly make them shine and add those classic banana pudding touches. Start by arranging fresh banana slices on top of the creamy filling. Their vibrant yellow color and soft texture are essential to the authentic banana pudding experience. Next, add a generous dollop of whipped cream for that airy, cloud-like finish. Finally, sprinkle additional crushed vanilla wafers over the whipped cream. These not only add a lovely textural contrast but also reinforce that comforting vanilla flavor. Serve your Banana Pudding Cheesecake Cones immediately after assembling to ensure the waffle cones stay wonderfully crisp. This thoughtful presentation makes them irresistible and ready for any gathering, whether it’s a casual family dessert or a special occasion. For other fun and easy treats, be sure to check out our appetizers section.
Why Banana Pudding Cheesecake Cones Are Your Next Party Favorite
These Banana Pudding Cheesecake Cones are an absolute game-changer, especially when you’re hosting a gathering or just looking for a fun, easy dessert that truly wows. One of their biggest appeals is the “no-bake” factor. You don’t need to turn on the oven, which is a huge plus, especially during warmer months or when your oven is already occupied with other dishes. This makes the preparation incredibly simple and stress-free. The entire process, from mixing the ingredients to filling the cones, comes together in about 20 minutes, giving you more time to enjoy your company and less time sweating in the kitchen. Their playful, handheld nature also makes them perfect for parties – no plates or forks required! Just grab a cone and enjoy. It’s a dessert that naturally encourages mingling and makes everyone feel a little more relaxed and joyful.
The Ultimate Crowd-Pleaser and Versatile Treat
The appeal of Banana Pudding Cheesecake Cones goes far beyond their ease of preparation; they are genuinely a crowd-pleaser for all ages. The classic flavors of banana pudding evoke a sense of nostalgia for many, while the cheesecake twist adds a sophisticated creaminess that adults adore. Kids, especially my grandchildren, absolutely love the idea of a dessert in a cone! This versatility means they fit perfectly into a casual backyard barbecue, a celebratory birthday party, or even a simple family dessert night. You can easily scale the recipe up or down depending on your needs. For a gluten-free version, simply opt for gluten-free cones and vanilla wafers. And for an extra touch of indulgence, a drizzle of caramel sauce before serving takes these cones to another level of deliciousness. They truly offer a delightful experience for everyone, making them a fantastic addition to any celebration. You might even find yourself pairing these with some delightful drinks.
Conclusion: Your New Favorite No-Bake Delight
These Banana Pudding Cheesecake Cones offer a delightful journey back to the comforting flavors of childhood, playfully reimagined into an easy, no-bake treat. They embody everything we love about homemade desserts: simple ingredients, irresistible taste, and the power to bring smiles to faces. Whether you’re a seasoned home chef or just starting your culinary adventures, this recipe proves that truly impressive desserts don’t always require hours in the kitchen or complicated techniques.
From their creamy, banana-infused cheesecake filling to the satisfying crunch of the waffle cone, every element of these Banana Pudding Cheesecake Cones works in perfect harmony. They are the ideal solution for busy days, spontaneous gatherings, or whenever a craving for something sweet and nostalgic strikes. So go ahead, whip up a batch, and watch as these fun, flavorful cones become a new favorite in your home, creating sweet memories just like my grandmother’s banana pudding always did for us.

Ingredients
For the Cheesecake Filling:
- 8 ounces cream cheese, softened
- 1 cup granulated sugar
- 1 teaspoon vanilla extract
- 1 cup sour cream
- 1 cup heavy cream
- ½ cup banana puree (about 2 ripe bananas)
- ½ cup crushed vanilla wafers
For Assembly and Garnish:
- 12 waffle cones
- 2 bananas, sliced
- Whipped cream, for garnish
- Additional crushed vanilla wafers, for garnish
Instructions
- In a large bowl, beat the softened cream cheese until it is smooth and creamy.
- Mix in the granulated sugar and vanilla extract until well combined, scraping down the sides of the bowl as needed.
- Add the sour cream and heavy cream to the mixture, blending until the consistency is smooth and creamy.
- Gently fold in the banana puree and the ½ cup of crushed vanilla wafers until just incorporated. Do not overmix.
- Cover the bowl and chill the cheesecake mixture in the refrigerator for at least 30 minutes to allow it to firm up.
- Once chilled, pipe or spoon the creamy mixture into each of the 12 waffle cones.
- Immediately before serving, top each cone with fresh sliced bananas, a dollop of whipped cream, and a sprinkle of additional crushed vanilla wafers.
- Serve immediately and enjoy your delicious Banana Pudding Cheesecake Cones!
Notes
Recipe Notes:
- Assembly Tip: For the best crispness, assemble the cones just before serving. This prevents the cones from becoming soggy from the filling.
- Gluten-Free Option: To make this recipe gluten-free, simply use gluten-free waffle cones and gluten-free vanilla wafers.
- Extra Indulgence: For an even richer treat, drizzle a little caramel sauce over the top of the whipped cream before serving.

